Final Major Project (Production)
I declare that the material contained in this assessment is the result of my own work and that due acknowledgement has been given in the bibliography and references to ALL published and unpublished sources. I confirm that I have reviewed the guidance on academic integrity at Academic Malpractice | MyCumbria to ensure that I understand the requirements.
Starting The Project (05/03/25)
With the project receiving the green light all of us can enter full production. However unlike other projects this one has already had it's pre production completed, which was the last project. This is different from normal because we would have to quickly put together the pre production at the start of the project. To recap the games idea we've got a turn based game similar to Octopath Traveler (Square Enix, 2018), featuring a blended art style between Bloodborne (Sony Interactive Entertainment, 2015) and Enigma of Fear (Dumativa, 2024). The team has also remained the same, with myself, Adam, Erica and Jac. I'll be the game designer and programmer. Adam is one of our concept artists and a decal artist. Erica will be on production management as well as concept pieces and game assets, like the UI. And finally Jac is our 3D modeller and texture artist. This project incorporates all of these skill sets so all of us should have plenty to do.
The deadline for this project is on the 19th of may which gives us a total of around 11 weeks to work on this project. This should be a good amount of time to get a high quality end product. As an objective for this project I would like it to run at a good level of performance. Previous projects haven't look into optimisation in the past and I want to change that this time. This game should be able to run on most modern devices including the Valve Steam Deck.
Production Management (05/03/25)


In addition to the Trello board we've got a file structure that I've been working on. It's pretty much the same as what we had in the Indie game project but it should work out really well here. There's a section for every asset that this game will have along with a section for the production management and also the pre production. This way everyone has access to the assets along with the production management. Inside of the asset related folders, there's a README file that will explain the file naming and organisation for that particular asset. This way files should be easy to find and not be a complete mess.
This isn't it for the production management as we still need a production schedule and a burndown chart. Erica will be working on this over the next week and I'll be writing up a GDD for the project as a whole. I've already started this it just needs finishing off.
Game Design Document (08/03/25)

A game design document or GDD is used to compile everything about the project into one place. It should contain everything about the project from the core idea to the art style, and it'll even have examples of gameplay elements that the game needs. The document is really in depth with it covering everything. It even includes examples of the different game along with the pre production elements that were made in the last part of this project. With Jac not being in for the first day of the project, this should help to catch him up on what the project actually is. In addition to all of that there's also a quick GDD at the end of the page. This covers the entire GDD in every quick and to the point bullet points. It'll make the GDD more accessible since the entire 2000 word breakdown doesn't need to be read to get the core idea of the game.
Modelling A Rose (11/03/25)
With the production management mostly done, we now need to focus on the actual production part of the project. And to make a start I chose this very quick rose model. The reason for this is simply because the model doesn't really matter too much. Most games will use a simple image for foliage and for a flower like this an image is all the game needs. So the quality of the model doesn't really matter too much since all that matters is that it looks good on camera.


The model it's self is going to be made in very similar way to how I modelled the lilies for my Art development render. Essentially it uses a plane that's been bent with a bend deformer, along with a smoothing it with the poly smooth face tool. After that the model is UV unwrapped, this will make it so it's easy to duplicate without worrying about the UV's.


Next step is to actually assemble the flower. To do this I simply placed the petals around a sphere trying to get the rough shape. It's not perfect but it works. Afterwards the petals were combined and scaled down to better get that rose look. The petals are now smaller and it looks more consistent.


To save on time I'm not going to model the stem of the rose. Instead I'm going to reuse the stem I made for the lily flower. It still looks good and it should work out quite well for this rose. The only thing it's missing is the thorns. Which aren't anything special, they're just cones that have been placed on the stem.

Thankfully the UV unwrapping was pretty much already done. Everything was already unwrapped they just needed to be arranged.


For the texturing I kept it really simple. The petals have a organic flesh material on them that's been set to a dark red, along with a dirt generator that'll add some black spots to the model. In addition the stems have a vegetation texture on them with some white veins being painted on with the organic spread brush.

Finally as a quick test I decide to render this rose as pixel art in Blender. I'm not sure on pixel art foliage at this point but this rose really does look nice as pixel art. It also looks quite good a higher resolutions which would be ideal to match with the art style. So with that I think this rose should be usable for the final game.
Planning The First Sprint (12/03/25)

For the first sprint we're going to be taking it a little bit easy. The main intention of this is get used to working with each other and maintaining communication. Which is exactly why we've planned to mainly focus on completing the burndown charts as they should have been done before today. In addition to that we'll start and model some of the buildings. These are another key element of the game that is a requirement. To go along side of this we'll be starting on some set dressing models, just the quick one's to get them out of the way while we have the time. Finally a player concept will be made so we have a clear understanding on what our player will look like.
For additional notes this week, Jac will be reading the GDD to get a good understanding on the overall game idea. He wasn't in for the first day of the project so this should help get him up to speed.
Burndown Chart (12/03/25)

We're a little behind on making this but Erica was having trouble with the burndown template so it's taken a little longer than expected. However this is fine since the past week has been for the production management anyways. And because of that it looks like we're one task behind. But in reality we're on track since all of the production management is near done. I've even had the time to model a rose in the meantime so that's a good start.
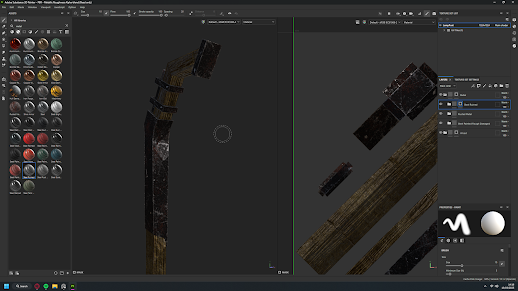
Making Environment Set Dressing Models (13/03/25)
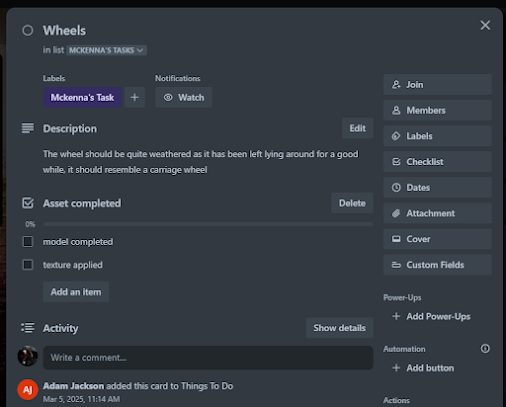
For these model I'm going to follow the description that each of these tasks have. From the description I know that the wheel needs to look quite withered like it's been left for quite some time. It also needs to be a carriage wheel which makes sense for the overall style.


To start this off the base of the wheel needs to be made first. All that needed to be done to make this is simply to create a Boolean out of two cylinders. That way I get the correct shape that I'm after for this wheel. Booleans aren't perfect, even this one that might look fine at first. But it needs quite a bit of correcting since it broke some of the edges. Thankfully it was an easy fix, with them simply being deleted.

One workflow that I've adopted is UV unwrapping as I work on the model. Since I like to combine object, in turn merging the UV's, it makes sense to Unwrap as I work on the model since it's not going to make this much easier.
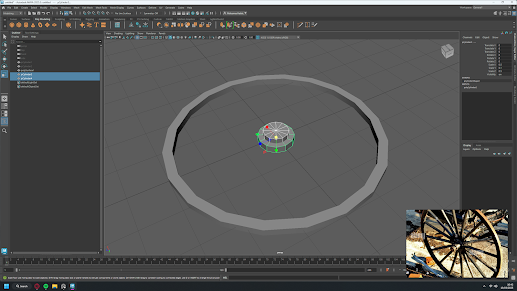
Next step is to create the centre point of the wheel. Unfortunately to get this I needed to create another Boolean. Which also means that I need to correct the model. I ended up fixing this in the same why as before with me deleting some left over edges.


Finally for the modelling there needs to be some spokes. For these they only need to be basic cylinders, that's all. The difficult part for these is the positioning of each spoke. The ones in the typical eight directions were really easy. The rest took a little of working out to get them perfectly aliened. It was doable just took a little longer than expected. Also the original cylinder was UV unwrapped before it was duplicated.

The UV's aren't the best but they should work okay. Even if there are issues with the texture it'll probably not be noticeable.

Normally when I make something like this I typically se the resolution all the way to 4K and then scale it down in engine. This time I'm not going to be doing that. Instead I'm going to set the resolution to a more reasonable size for this asset. This wheel for example is just a background prop so it doesn't need to be big, so the resolution only needs to be 512 by 512 pixels. Not only is this better for the file size it's also far more efficient.


Since this is meant to be a carriage wheel it makes sense to have the majority of it made from wood. From some research I did I learned that these wheel we made from wood to make the overall carriage cheaper, for lower class people. But to the people who had quite a bit more money they would have had metal wheels on the carriage. So since this is going to be left in the streets I'm going to make it from really aged wood.

Finally to finish this off I made the centre of the wheel out of metal. From some images I saw I noticed that there was a metal centre, so I'm mimicking that here. I also painted over some of the mistakes to hide them. They aren't visible now because of this so that's good.

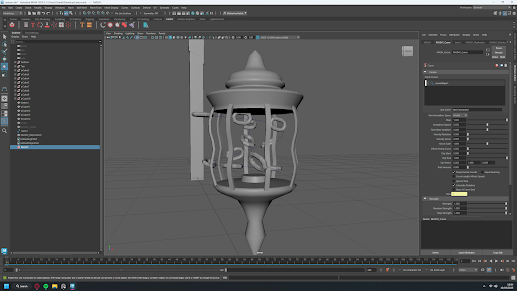
Again I start off this model by looking at the tasks description. This one explains two different kinds of lantern. One will be wall mounted and another will closely resemble a street light. For this I'm going to try something a little unique.

My main point of reference for this will be the lanterns from Bloodborne (Sony Interactive Entertainment, 2015). It's really unique with it hanging from the pole by a chain. I know that the description mentions to use glass, and this is probably going to go a bit far from what was planned, but I think that this will fit with the overall theme and I can make it so it's easy to modify of it doesn't fit with the style. But I pretty confident that this will fit in with the rest of the game.
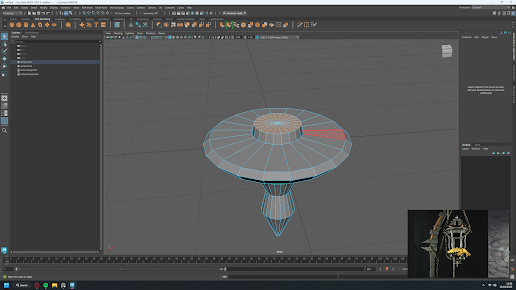

To start with the top and bottom portions of the lantern need to be made. To do that I'm simply using a cylinder that I'm extruding and scaling the edges. This gives me a good foundation for the shape so that I can go back later and refine it.


With the two halves done there needs to be something that connects the two. For that I'll be using these very basic bars that will connect the two. They aren't great but they work.


After I was happy with the shape I UV unwrapped it and duplicated the piece 7 times to go around the lantern. Now it actually looks like one piece.


To finish off this part of the model I UV unwrapped the top and bottom portion of the lantern. On the bottom part there's a little bit of distortion but for the most part it should look okay. It's just a very awkward shape to unwrap. The final UV's are looking quite good with decent Texel density.


Moving on, there needs to be something for this lantern to hang on. so I'm starting on this really quick stand for the lantern. The plan is to have something attached to the lantern for it to hang off of both this poll and also from a wall. This way the same lantern can be used in both situations. For this model I'm keeping it really primitive. It'll probably change later on but for now I'm just making this as a proof of concept.
One thing that this lantern really needs is a chain for it to hang on. One problem though, I've got no idea on how to model one. Which is why I ended up watching this video. It showed me how to make a chain using the MASH tool in Maya.


Of course before I can make a chain I need a chain link. For that I'm using a torus with the number of edge loops being reduced to 8. I'm doing this to save on performance a little bit. After wards I quickly UV unwrapped the chain link, since it'll be duplicated quite a lot I need the UV's in advance.

Now I can actually start and make the chain. And to start I need to map out where I actually want the chain. For that I'm using the CV curve tool which lets me draw out a pretty good outline for where this chain will go. It's weaved through the frame of the lantern which will make it look like it's properly being held up by this chain.


At this point I'm closely watching the video to understand how the MASH tool actually works. My understanding of it is that it's designed to manipulate one object to do a whole bunch of different things to it. In this case I'll be using a replicator node which will duplicated the chain into a straight line. I'm using 10 replicants as a base line just to set up the MASH. Another thing that needed changing was to change the pattern on the replicator. With the rotation set to 90 every other chain link will be rotated by 90 degrees, which makes this actually look more like a chain.

The next node that needs adding is the curve node. This changes the position of the replicants to any curve mesh that I add to it. In this case the curve mesh that was made before needs to be added here. At first it looked like it was completely broken with the chain links floating everywhere but this was fixed after changing the position offset on the replicator to 0. That set all chain links to be around the lantern.


Following the curve node, the number of replicants needs to be increased to fill in the rest of the curve mesh. I increased the number of chain links to just over 70 which quite a lot. But this is where a problem appeared. For some reason some parts of the chain were completely straight with no rotation on them. The fix for this is to simply disable the curve node and reenable it again. Effectively this refreshes the curve node into keeping the rotation.


The final node that needs adding is a random node. This will be used to randomly rotate the chain links giving a much nicer chain look. Afterwards I duplicated the entire chain to make it into it's own model. If I used the generated mesh from the MASH it would have completely broken when exported. So duplicating it makes it so it's no longer reliant on the MASH. I also used the reduce tool on the chain to cut down the number of polygons. I did this by 50% which halves the total number of polys. Finally I combined the chain to the lantern and arranged the UV's. The chains UV's are at the bottom right of the UV map.


One more thing that needs to be done is to create a new chain that hangs from the pole. For this I positioned the lantern so it's hanging roughly were I want it to be. Then this was followed up with a new CV curve. After that I followed the exact same steps as before with setting up a MASH for the chain link.


To finish off the lantern the chain was duplicated and combined. The chain was also reduced before combining. With the lantern having the chain attached to it, it means that this model can be used for both wall mounting and so it's hanging from the pole. It's much more efficient than having two separate models.


On to texturing, starting with the lantern. I started this off by using my rust material I used on the reverse bear trap model. It still works really well and it's still looking good for this chain. After that The rest of the model had a painted metal texture applied to it. I went for a dark grey look since I thought it would contrast really well with the lighting. Finally a layer of rust was added to make it look more aged.


This is going to be kept really simple and basic. To start I'll be using the same wood texture that I used for the medical crate model for the base of the poly. Afterwards a painted black metal was applied to the other pieces. Again it's a dark grey metal which should contrast with the lighting. Finally there are some metal bolts that I painted on. It's just a basic silver metal material with the height turned all the way up.


Finally, after all of that work, I imported the models into unity and created a prefab so I can piece together the lantern. For now I'm just using a point light for the lighting over some really fancy VFX. Overall though I think it look's really good once it's in the scene. I was right about the metal it really does contrast really well. The wheel also looks really nice. It blends into the scene so well that it's almost like it's always been there. Next steps will be to start and block out zone 2 of the map. I'll be using my original grey box kit for this to make it's creation a little easier.
Outlining Zone 2 (18/03/25)

Just like I did in the pre production phase of this project, I'm going to be using the tile map to get a rough outline on the second zone. The main reason for doing this is game feel. If the zone feels really long and tedious to play I can quickly adjust it with the tile map. On the off chance that one portion of the map feels really long and annoying to play I can easily change it. To start I made the zone in the exact same way to what was on the map. But I quickly realised that it wasn't a good idea. It's very straight and it wouldn't be much fun to play. So I modified it so there's more corners.
In addition to the tile map I also run through the level and time how long it takes for the player to run through. In this case this section takes around a minute and a half to completely run through. This may not sound bad, but with the addition of enemies and secrets this could take the player 5 minutes to run through. And on top of that there's too much of an initial straight line for the first 30 seconds. It feel really boring to play and it needs adjusting.

My fix for this was to add more turns to the starting run in addition to shortening the left portion of the zone. It now feels much nicer to play with it not feeling really boring to play.
Additive Level Loading (18/03/25)


Setting up additive level loading isn't too bad to do. The hard part isn't actually the code, despite how it might look. To start with the level loader script will simply load certain scenes and then unload other scenes, but only when the player hits the collider. This way I can effectively load a new portion of the level and unload the level the player has come from, all without the player noticing. It's also better for performance since there's not two levels loaded at the same time. Also the don't destroy script is way more advanced than a typical don't destroy. Normally an instance is made from the script and that's used to DontDestroyOnLoad. But the problem with that is if more than one object has this script it'll delete all but one of these objects. So with this script it creates an ID for each object. Because of this I can add this script to multiple things and they'll all not be destroyed on load.


The hard part of additive level loading is the set up. To start with the second part of the level needs to be in a separate scene, but it's also got to be in the same position. It's complicated but it's so it spawns in at the right point when the scene is loaded. I've also got to set up two colliders with the level loader script on them. These will act as gates that the player will go through triggering the level loader. I've got one that loads the second zone and there's one in the second zone that unloads the first zone. Finally there's also another pair of loaders that will load the first zone and unload the second zone. This is so the player can move back to a previous zone if they wish to.
And it's working as intended. It doesn't look the best but I'm hoping to work out a way to try and mask the loading. Similar to when I last used this in my Bloodreign project. It's working nicely it just needs to be hidden a little better.
Scrum Meeting (19/03/25)

This is our mid sprint scrum meeting and for the most part everything seems to be going smoothly. Adam has completed the player concept and will be working on Decals, along with some weapon concepts, over the next week. He has not had any issues with his tasks. Jac has completed two houses and will be working on some additional houses over the next week. Again there's been no issues with this. For myself I've completed some set dressing models, these being the wheel and the lantern, and over the next week I'll be working on blocking the second zone. I've had no major issues with this. For Erica She's had a bit of a problem over the past week. She's been struggling with fitting everything into the 11 weeks on the production schedule and has only mentioned this during the scrum. The first 3 weeks have been filled in, including the production management and the houses but there's nothing else on it. To correct this problem I'll be helping her with this later on today. This needed to be done at the start of production so it needs completed immediately. This will be the priority for the time being.

For the updated burndown chart we've completed 7 tasks over the past week. We're still on track and overall I think we're doing a good job. I'm hoping that we can achieve around 8 tasks this week since that'll make up for being a task down in week 1.
Double 11 Meeting (19/03/25)
As part of this project we will be receiving advice and feedback from Patrick Randall (producer at Double 11). With his knowledge of producing a game, in an industry environment, he can give us some pointers on what we can do to make development more efficient. He will also be giving feedback on the game it's self along with Charlie Blay who is also in the call. Charlie gave us some feedback on the last major project and his feedback helped quite a lot back then. For this we showed the GDD, the quick version to be more specific, along with the production management that we have on hand. We also showed the prototype of the game from the video on the GDD, this took up most of the time in development.
In terms of feedback there was quite a lot to get through. Starting with a positive we have a good idea and a good understanding on how to execute the idea. This is great to hear from someone else. While we think we've got a solid idea some other may think differently, so this confirms that we've got something good. However there was one problem with the idea and that's the souls elements in it. Right now it's more comparable to a Metroidvania game with the short cuts, with there being no other souls elements. I've got an idea on how to implement more souls elements which I'll mention later. And that actually brings me to another negative with us needing to focus more on mechanics as opposed to the style. While the style is looks great there isn't any mechanics to back it up. I didn't want to focus to heavily on the mechanics since everyone, other than me, are artists. It didn't make sense for this to be a mechanics driven game with a team of 3 artists and one coder. However I can step back from the art side and focus on the code, which I'm best at. I can still give pointers on the style but this shouldn't be my main focus. Also the camera clipping was brough up again. This really needs fixing.
For the project management side of the project there was some feedback for that also. Starting first with the scope of the game. I've created this massive map for the game and we've been scaling it down to find an MVP. And while this isn't a bad thing we just need to workout an MVP while we have the chance to. We need to work towards a set goal instead of one that's constantly changing. However there was some positives, capacity planning is one of them. The idea is fully designed around the team, which is great since we know it's doable. This means that we know what we are capable of doing. And on top of that they seem to think that were a unified team, which is a great sign. We're all on the same page and we know where everyone is at, and most college teams aren't like this. On top of that we're in a good position and we're are off to a good start.
With that feedback in mind we need to figure out a way to implement it into the project. And to start with we'll plan adding souls elements into the battles. I'm thinking of a mechanic where the player can attack as much as they want as long as they have the stamina. If they run out then they'll be open for a critical hit from the enemy. This way the player can get a battle over and done with quickly for smaller enemies, but bigger enemies will have an opportunity to punish the player. We can also include a mana system, but this was already planned from the beginning. Stamina will partially recover at the start of the players turn, because of this an over use of stamina can kill the player if they aren't careful.

Along side of that there is also now a set MVP. I've added it to the Trello so everyone can easily view it, essentially Zone one and two need completing along with at least one boss fight. And of course the player, enemies and the battle mechanics are also essential. This is the bare minimum that I would like to see for this game with everything being secondary. I've also asked the team if they would be okay with using my character as a boss fight and they all seem happy with that. However this will only be added if we don't have the time to make a boss from scratch.

Finally a game called YarmTown (Max Mraz, 2020) was mentioned towards the end of the call. At it's core it's Bloodborne (Sony Interactive Entertainment, 2015) but in the style of a 16 bit SNES game. It's a cool concept and I see why it was mentioned here. With the camera view and the movement closely matching what our game has. I'll be playing this over the next few days to research a little on the gameplay style of this game.
To conclude I think it went nice and smoothly, for the most part. I feel like we've gained some really insightful feedback to our game, with some elements I didn't even consider. We'll be incorporating the feedback into our project and I'm confident that we can execute them within the deadline.
Production Schedule (19/03/25)

We're a little behind on the completion of this but it's done. It's a little busy in some areas but it should work out nicely. And it's got the approval of all team members so we're confident that we can abide by this. We've tried to give more time than is necessary to major tasks, like with the battle mechanics with that having 3 weeks on the schedule. In addition to that we've also spaced out each task so the work load is minimal from week to week. But honestly there's still quite a bit to do from week to week. The final 4 weeks are primarily preparation time for the end of year expo. Since the project is officially over in the 19th of May these extra few week are exclusively for preparation time.
Test Short Cut (22/03/25)

For the time being all I need is something that works. The original idea was to have the short cuts be part of each zone, meaning that the player could walk through them just like they would the rest of the game. Instead of doing that we're going to teleport the player into a short cut room for them to run through instead. This way it's much easier to build our levels and the player still gets the short cut, it's a good compromise. And thankfully I've already got the code to make this work. I'm using the level loader as a basis for this, this way I can load and unload scenes while the player is moving through the short cut. On top of that all I've got to do for the teleport is simply move the player to the same position as an empty object. Eventually they'll be a delay for a crossfade, that'll hide the transition.


To test this I set up a very basic short cut block out and placed the shortcut loaders. The white gizmos boxes are where the player will be teleported to, they're out of the way so the player can't get stuck in an infinite teleport loop.
It's working but there's a few issues. First off it's not a smooth transition, you can see the camera move rapidly from one point to another. In addition to that, the player can access it at all times. Which shouldn't be the case. The visual issues can wait for now but the player should only be able to access the short cut once they've progressed far enough.


To stop the player from accessing the short cut when ever they want, I've placed a door to block access to it. For now It's just a cube but this can be changed. Essentially when the player contacts something with the UnlockDoor tag, it'll access the script on the door and unlock them. The catch is that only one door has this. Eventually this can be changed to be a lever for the player to pull to open this up, but I think that for now this is fine.
With that done it's pretty much fully functional. The only issue that it has right now is the visuals of it. Outside of models the doors need to open through an animation as opposed to snapping open. And there needs to be a cross fade of some kind to hide the transition between areas. But despite that this is mostly working how I want it to. The doors will even stay open when the player is moving between scenes, which is nice.
Steam Deck Performance Test (22/03/25)

The reason for doing this test is to check how the game performs on lower end hardware. My desktop that the project is mostly running on is really powerful and doesn't have any trouble handling this game. The Steam Deck however could potentially struggle with this. It's a PC handheld so it could potentially run into an issue. To give the steam deck a fighting chance I'm creating a Linux build of the game. The Steam Deck uses Linux so this will make it so the game is running natively.


After the build is created it's pretty easy from there. All I've got to do is add the game to a USB drive, plug it into the steam deck and transfer the game to the deck. From there I create a link to the game onto the desktop and add that as a non Steam game. For some reason Steam wouldn't recognise the X86 file but it'll recognise the link. Finally I also needed to set up the controls a little bit. The only thing that I changed was setting the right track pad to act as a mouse along with setting the right trigger as a left mouse click. I did the same for my Bloodreign project and that worked out nicely.
And it's working without a problem. There was an initial frame drop at the start where all of the foliage was, this was the same in Bloodreign so there's debate that this was the problem that game was having. But one I got past that area the rest of the game ran at a locked 60. Which is fantastic. There was also another problem on initial boot, the game would stutter quite a lot. However I know the cause of this problem. Steam OS typically would download all of the shaders before the game even launches. And it does this to prevent the stuttering issue when shaders are compiling. But since this game was added as a non Steam game the shaders aren't downloaded before boot. So the initial boot will always be a mess while it's compiling. It's not a big deal it's just something I noticed. Also the control also need refining for controllers. The movement was fine but the combat wasn't ideal. We're think of having similar battle controls to Persona 5 (Atlus, 2016) where the player can make their choice with a few button presses.
Character Modelling Test (23/03/25)


One thing that I've been trying to do over this entire course is find short cuts for everything I can. For my character animation I used an Unreal Engine mannequin and added some models to it. And that worked out quite well for it's use case. And I want to try and take that concept to a new level. With this project we've not got much time to get things made, so with the character for our game we're going to be using the mannequin again. This time however we're going to keep it rigged and skinned and simply add models to the bones. This will save to much time since we won't be caught up skinning the entire model. For this test I'm going to be using a few models from SketchFab which can be seen above. These won't be used for the final character but just for a test.


Since this is just for a test I'm also going to use this as an opportunity to teach my self a bit more of Blender. I've not worked with a rig in Blender before so why not learn it here. To start with I'm going to line up the mannequin with the coat. And it's really simple to do, all I've got to do is select the rig and enter pose mode. That lets me move the rig just like I would in Maya.


Now for the fun part binding the other objects to the head of the mannequin. It's a little involved but It's pretty easy after the first few tries. To start I need to have both the model and the rig selected, then enter pose mode. Then I can select the bone I want (while holding down SHIFT) then using CTRL + P that will open a menu for binding the object to the rig. In this case the Bone option is best since that will simply add the model to the bone. This is ideal since now the model will simply move along side of the bone.
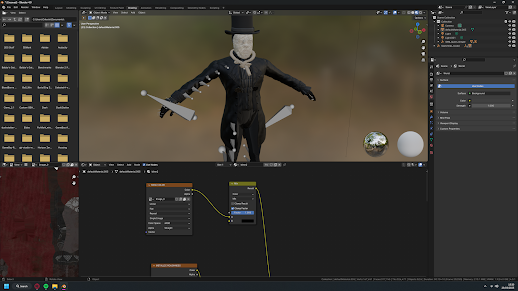
Finally I'm going to adjust the colour of each model to better match what was on the player concept, it's still not fully inline with the concept but it's close enough


While this doesn't look perfect at all it gets the point across. It proves that the concept with only one downside. The downside is that the coat will need to be split into multiple pieces. Since we're binding models to a bone that's not going to work for a full coat model, since it covers more that one bone. so the model will have to be split, so they'll be one model for the upper arm and one for the lower arm for example. It's not ideal but it's workable. And since it's being rendered into pixel art anyways it can be correct in the pixel art.
Sprint One Review (26/03/25)
To start off this sprint review we had Alex play through the initial prototype of our game. There were a few things that he pointed out. First off was the shimmering around the buildings. This is mainly caused by the bloom on the post processing and this is normally corrected with anti aliasing. But since this game is working with pixel art anti aliasing isn't going to work for this game. We can look into a solution for this at a later date. He also pointed out the place holder model, which makes sense. They are incredibly noticeable and they'll be replaced when the zones are being built. Despite these issue he seemed to like the overall smoothness of the game especially with the battles. This is something we'll try and maintain throughout development as it's crucial to this type of game. Oh, he also mentioned the camera clipping.

Now onto discussing what has been done over the past few weeks. And pretty much everything that was planned out has been completed. With a few additional tasks being down alongside of this. The only thing that hasn't been done was the Zone 2 Blocking which was my responsibility. This wasn't because I didn't want to do it, it's more so a case of there not being a point in doing it. I spoke to the team about this, but essentially there wasn't a point in making a block out for a level that was going to be built soon anyways. So it made sense to just leave it for now will the zone is about to be built. In addition Jac's house models were due to be completed by the end of the sprint. He was able to create five different variations of house and they're looking quite good. However there's a slight problem with the textures on them. They're a bit too dark and will need brightening before they can make it into engine. He'll be correcting this soon. For Erica she has been able to draw up some house concept for Jac which seem to have been a big help. During this meeting we also discussed what we will do without Adam. He's underwent surgery and will be out of commission for the next few weeks. We feel like we'll still be able to meet deadlines without him we might just have to do a little more work in his absence.
Our next steps over the next week will be to correct the house textures, this is Jac's job, Erica will be drawing some more house concepts for later use and I'll be working on building the first and second zones using the houses we currently have. I should be able to replace the textures easily once they are modified.
Sprint One Retrospective (26/03/25)


In terms of how the sprint went we feel as if it went really well. We were able to do everything that was planned so that's a good start. However there's a few issue that the sprint had. It didn't really follow what was planned on the production schedule. Granted it wasn't done by that point but we should have better planned out what tasks we wanted to do in the sprint. For example the Zone one and two building were scheduled to have started last week. So for the next sprint we need to look at the production schedule to see everything that needs doing. Despite that we're making good progress, we've tackled most of what needed doing and we have a buffer week to try and catch up on missed tasks. Like the Zone one and two building. For the burndown chart it was a little bit of a slow week, but this is mainly because we were tackling the bigger tasks this past week. The test character took a little longer than I had anticipated to I wasn't able to get much done. But that doesn't really matter since the sprint goal was met.
Going into the next sprint we need to do a few things. First off we need to plan out each task with the production schedule in mind. This way we wont run into the same issue as this sprint were we left tasks out of it. And on top of this we also need to be doing more than one scrum meeting per week. We've had a bit of a problem with communication outside of he college so I've got a plan. Every Saturday I'll message the everyone in our Teams group chat asking the typical scrum questions. This way we have a little bit more communication that we didn't have before. It also means that if there's any problems they can be caught sooner.
Scrum Meeting (29/03/25)

For the first time this project we're having a mid week scrum meeting. And for the most part it's been a quiet week so far. Since we've not started a new sprint yet we're catching up on some of the tasks we missed or completing smaller tasks while we've got the time. For this week all three of us have been writing up our blogs, we've mainly been focusing on the project lately. In addition to that Jac has changed the houses textures to a much brighter colour with some specs of dirt on them, they're looking much nicer and should be good for the levels. And for me I've been refining and optimising the game for stability. This mainly involves rewriting some code to not run every frame but to run only when needed. It's far more optimal and should help out later on for performance.
Erica's next steps will be to create some additional houses concepts, these can be used for later zones if we have the time. Jac will be working on the coffin and guillotine models, while these aren't required they can make for some nice set dressing models to use later down the line. And for me my next steps will be to build out the first and second zone. I'll be starting this off tommorow and they should be done by Monday night.
Building Zone One (30/03/25)

To start off I need to set up the houses that Jac made. Firstly the textures need applying to all five of the models, that's normal. One issue that I've had with these models however is the origin point on each of them. Some were okay, they weren't perfect but they were usable, but some were completely off with it being far away from the model. I'm not sure on what was causing this but it's an easy fix. I've just got to parent it to a empty object and that corrects the issue. I'll ask Jac to try and keep the origin point in mind for his models.


While actually building the levels with the houses is quite simple actually placing them can be really tedious. For the original grey boxing it wasn't too bad since that was intended to be rough and quick. This one needs to look good, so I've got to take care in where I'm placing the houses. To speed this up I've made a "kit" that I can use. It's a collection of all five houses that I can pick from. Building the levels this way is working out to be much quicker than placing each of them from the prefabs. I'm also using the isometric over view camera to further increase the build speed. The height in all of the houses is already correct so all I've got to do is place them into position.


In addition to building the main level it's self I've also got to rebuild all of the alternate paths. The secret area needs rebuilding as it's completely broken. But in addition to this the short cut path needs to be rebuilt to actually fit into the level. Right now it was only there for testing, now it can actually be used as it would in the final game. I've also built another section for a future short cut that will be using in the second zone. It's not going to do anything right now but it should do soon.

Since I'm building the level I'm going to get rid of the opening foliage section. It was only there as a very early test and now it had no place in the game. So it's gone and replaced with the houses. Now it makes more sense.


With the entire level being rebuilt the colliders for the buildings also need rebuilding. It's really easy to correct since the colliders are just an empty game object with a box collider on it.


The final thing that needs to be changed is the lighting, as well as the ground. The ground has been a place holder for weeks now and it needs changing. So to act as a temperary material I'll be using this cobblestone material from Rob Tuytel on Poly Haven. It's a nice material and it should work well enough for this project. For the time being I'm placed this material onto a terrain object and increased the tiling to around 100 on both axis. Another thing is that I need to change all of the lights to mixed as opposed to Realtime. Realtime lighting is really expensive in terms of computer utilisation, so changing this to mixed helps quite a bit. It lessens the load a little bit by using a lightmap in combination with the typical lighting. The only annoyance is baking the lighting, which can take quite a while with over 50 lights. Last thing, I've enabled a little bit of fog to the scene. It mixes things up a little bit.
After many hours of baking I can safely say that this is zone one mostly done. There's still some placeholders (for objects like the doors) but outside of them it's pretty much done. One thing to note is that I needed to go back to using the tile map for the floor. As it turns out Unity's URP (universal render pipeline) can only render at most eight lights on a single object. In most cases this is perfectly fine, but in this kind of game that doesn't really work. So by using the tile map again I can get around this since it's no longer rendering on just one object. One concern that I have with this is the performance impact. I'll look into this soon by doing another Steam Deck performance test to see if it'll be a problem or not.
Building Zone 2 (31/03/25)


Building the second zone should go much smoother than the first zone. With this one I'm following a path that was made earlier as opposed to replacing already excising models. This is part of the reason why we never built a grey box for this zone, since it was all going to be replaced eventually anyways.


However I'm going to experiment a little bit with this zone. A highlight of the first zone is actually the bridge section with it feeling so much more unique to play. So I want to try and replicate that a little bit with this zone. Which is why I built this little open section for the player to go through.


In doing this I discovered something I should be doing throughout the building of these levels. And that's to test how the player fits into the level. The first zone for example feels really cramped with not much space to move around, this one feels a little too open. So I narrowed down the street a little bit. It's still going to feel weird to the player but hopefully not in a way that's jarring.


Another thing I've thought of is where are we going to put the execution tools that we've been planning out. We've got things like a Iron maidan planned out with no where to put it. So I'm going to build this section to act as an execution ground. It's an open area that we can put all of the execution related models. Similar to a section of Central Yharnam from Bloodborne (Sony Interactive Entertainment, 2015) where there's a burning Cleric beast on a crucifix.

With the building mostly done I'll start and place the ground and adjust the lighting. I like to make sure the level is looking good both visually and functionally before I go ahead and place the colliders. I prefer to finalise the level before placing the colliders so I don't have to go back later and adjust them.


Now I can start and place the colliders. This level was far more annoying to build the colliders with some of them needing to be placed on a specific angle. I had to disable the main floor so I could actually see the houses, which is why they can't be seen above. The floor blends in really well with the houses.
For the most part the level is looking decent. With only a few issue that I noticed. First off parts of this level feel really open to the point where the player can lose track of where they're meant to be going. This can be corrected with some set dressing models by blocking parts of the level to force the player into a specific direction. I'll revisit this level after some more set dressing models have been made. There's also a noticeable bug with the players movement. The player will randomly jitter forwards and I'm not sure what's causing this. I'll be working on fixing this over the next week.
Planning The Second Sprint (02/04/25)


The entire sprint plan for these two weeks are going to be based exclusively on what's on the production schedule. Last time we didn't even have a schedule so we've got something to base this off of now. So by following the schedule we know that the player and enemy models need completing, as well as the battle mechanics, player/ enemy animations, and the sprite sheets need starting. For me I'll be working on coding the battle mechanics along with some of the animations, as I may have a trick for this. Jac will be working on the player models all of the components. And Erica will be working on some UI assets for the battles. She knows roughly what we need for UI but I can assist if needs be.
In addition to managing tasks we also talked about the fate of Zones three, four and five. Since the MVP doesn't include these we can cut them without affecting the quality of the overall game. And in cutting these that leaves two weeks open on the schedule that we can use to improve the quality of the excising elements. Like improving the style of the second zone. It makes sense to do this and we can use the time more effectively.
The last thing that I want to mention is about the music for this game. It was mentioned during this meeting since we thought we'll have to use some online assets for this. But instead Matt was able to get us in touch with some musicians from the music department. Both Dylan and Louis will be making music tracks for our game in a heavy metal style. The main insperation for this will be Mick Gordon's work on the Doom (Bethesda Softworks, 2016) soundtrack. Which sounds crazy to even think about. We've given them a deadline of the beginning of May to give them as much time as I physically can. That should give them a two week buffer period as well just in case they need that little extra amount of time. I'm really looking forward to see how this turns out.
First Round Of Bug Fixing (06/04/25)

The first bug that's annoying me is the jitter bug the player is currently experiencing. This only started occurring when the tile map ground was reintroduced and I think I know what's causing the problem. Not to long ago, to clean up the player code, I removed quite a few features from the player. One of these things was the player gravity, which I simplified since the player didn't really need it. Now that change is a problem with the tile map ground being back in the game. So to counter this I've come up with a compromise by using a terrain for the collision and the tile map for the looks. This way it's the best of both with the full collider mixed with the nice looking ground.

It was a simple fix but it's worked and it's worked well. Right now we don't have any upper levels planned so I think something like this should work okay.
Next up is the dreaded camera clipping. This isn't really a bug it's just something that's been incredibly annoying. In games camera clipping will always happen at some point. For example in NieR: Automata (Square Enix, 2017) the player can easily clip the camera into some buildings. So it's going to happen but currently the camera doesn't even try to prevent it. So to fix the camera clipping I'm going to convert the current camera script with the cinemachine. This way I can control the position of the camera based on the cameras collider. So it'll move closer to the player when it's too close to an object. One thing I needed to keep in mind is how the cinemacine works. It's effectively an override to the cameras typical transform. Meaning I can't change the position of the camera like I normally would, I've got to do it through the cinemachine. So the offset is set to 7 on the Y axis and -16 on the Z axis which places the camera into the exact same position as the current camera. In addition to that the Body setting is set to follow the player using the 3D person follow setting. This already has an option for camera obstacles which I'll set up now.


To set up the collision I need to add a collider to all of the houses. I can't use the big colliders in the scene since some of them the camera will need to go through. So it's easier to simply add a collider to all house prefabs and change the layer to Houses. After that I can simply set the Camera Collision filter to only interact with the Houses.


In testing it was obvious that the camera has a problem aiming at the player while being pressed up against a wall. The camera seems to point towards the origin of an object, which makes sense. But because of this the camera can look up into an empty sky. So to correct this I created another camera lock on the player that the camera will aim at. It's under the level so this should mean that the camera will be locked to this point, even when being pressed up against a wall.

With all of that done the camera can now dynamically change the cameras position based on objects around the camera. There's still a little bit of clipping but as I mentioned before it's really hard to now have any clipping. But I think this is doing a good enough job.
Testing The Usability Of Mixamo Animations (06/04/25)

We're very quickly running out of time for this project. To start with we're half way through the project and we've still haven't got the combat incorporated yet. And since we want to have a boss fight at the end it's going to be really hard. So I've decided to experiment with something to, hopefully, save us a significant amount of time. Mixamo is an amazing online tool owned by Adobe that lets me import a fully rigged model and apply an animation to it. And the catalouge of animations is huge which means it's easy to find something for our needs.


For this test I've chosen an animation called "Sword and Shield Attack" it looks really cool and actually works quite well with the scythe. And another thing that's great about Mixamo is that I can set the animation speed by adjusting the Overdrive setting. In this case I set it to 65 and that looks quite good. There's one issue and that's with the scythe. However that's my fault since the scythe is always misaligned with the hand. But this is fine since I can export the animated model into Maya and correct the animation there.

Realigning the scythe wasn't too bad at all. All I needed to do was find the mode exaggerated pose and position the scythe to match with that pose. I've been through this before when I made the attack animations before, the scythe broke in the exact same way.

Another minor issue with the animation is the forward movement of the model. With my previous animations I always kept one bone grounded so the model stayed in place. Mixamo doesn't do this. So to counter act this I needed to animate the camera moving along side the model. I only animated the camera moving from side to side, if I did this any other way that would have broken the pixel consistency.
Overall I think that this test was a success. This animation only took me 10 minutes to correct and render. Which is awesome as an animation like this probably taken me or Jac a few hours at least just to animate. So I think we will be using this from now on since it's so much easier.
Battle Mechanics - Run, Health And Damage (07/04/25)

First up is the run mechanic. Not only is it a guarantee that it'll work but it's also triggered with a mouse click. So to start I've converted the run button to use a controller button input as opposed to a mouse click. This is similar to how Persona 5 (Atlus, 2016) handles it's controls. Instead of incorporating this through a control scheme I'm simply doing this all in code. It's much easier this way.


Secondly I want the run mechanic to be random chance as opposed to a guarantee. This is similar to how the majority of turn based games handle this mechanic. When the player uses the run button it'll generate a random number between 0 and 4. The returned value will be check to see if it's 0, if it is them the player can run. If not then the player can't run. For now a Debug.Log will be shown to reflect this.


So the player can't simply mash the run button I've incorporated a turn countdown. This will increase at the end of the players turn, and right now the run will be using this to count when the player can run again. If the player fails a run attempt the run Boolean will be disabled and the failedRunTurn integer will become equal to the current turn. In the update function the failedRunTurn value will be checked. The value is increased by 3 and checked to see if that result will match the current turn. This way the player will need to wait 3 turns before they can attempt a run again. UI elements will also be changed to tell the player that they can't use the run button.


Now I can focus on the health and damage. For the player the health and damage will be included into the GameManager. Everything is already there so this is easier. The attack is another button just like the run mechanic and this will iterate through all present enemies and minus 1 health point from them. This will be changed later, the 1 damage was just for testing. Then for health I'm creating a new playerDamage function that other scripts can access. When it's called to it'll remove the given value by the players health to deal damage. When the players health reaches 0 the player will be Destroyed. Again this is just for testing and will be changed later on.
Also in terms of mechanics this attack damages all enemies mainly because it makes to code easier. And to balance this attack out a little bit it'll reduce the players stamina significantly resulting in a turn loss if used enough. A gun can be used as an alternative attack but this will be a random attack on one enemy.

On the enemies turn they'll be able to trigger a various number of attacks at random. Each of these will also deal a different amount of damage or one could even heal an enemy. For now it'll simply do the same thing but it's set up for multiple attacks.


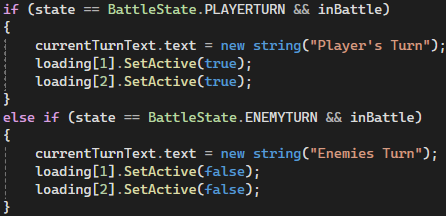
In addition to that I also need to detect when enemies have been deleted. So when the battle starts an array will look for any enemies that are present in the scene, it's doing this by looking for any objects with the "BattleBats" tag. Then depending on the length of the enemies array a for loop will add each enemy to the enemiesList list. Finally in the update function another for loop will iterate through the list and remove any null objects in the list. These null objects will be the enemies after they've been destroyed. If the enemiesList has no more enemies in it the round will end and the win screen will be shown.


I've also had to modify the spawners to detect if they have any child objects present or not. If a spawner does have a child object or an enemy in this case then it'll be an option for destruction if the player loses a battle. This way the spawners can be cleared at the end of a battle and it'll only affect the spawners that have enemies present. It also prevents the weird errors I was getting before.


Finally I need a way for the player to die properly. For this when the players health hits 0 the player will teleport to the starting position with full health. Almost like the souls games where you respawn right at the beginning again. This is where the short cuts come into play with the player being able to use them to return to where they died. Along with this I've also included a counter to show the current turn. This won't be in the final game this is mainly present to test the run mechanic.
For the most part it's working. It's not perfect at all but it's functional. What this really needs is some juice to really make the battles pop. Right now it's a stail button mash. I'll work on including a delay to animations have time to do their thing. Along with some fancy VFX later on. Next steps will be to incorporate the stamina as well as the shooting mechanic. As well as the delay.
Battle Mechanics - Stamina (08/04/25)

Overall the stamina shouldn't be too hard to implement. It's mainly going to be a problem with modifying the attack function to use it. Which is what I did first. Every time the player uses the attack it'll reduce their stamina by 30 when they have 100. That gives the player a total of 3 attacks overall. The attack also deals a random amount of damage to each enemy. It should feel much better to play now since all enemies won't die at the same time.


However I may have lied a little bit. In reality I could have mashed the attack button without caring about the stamina. As the attack wasn't even using the stamina. Now the attack will check if the player has enough stamina to perform an attack, if the player doesn't then a canAttack Boolean will be disabled. The way that it enables it will need to change but this should work for now.

Now I need to set a limit to the stamina. If the stamina is below 0 it needs setting to 0 if it's greater then 100 then it needs to be set to 100. On top of that I'm also checking if the player hasn't got enough stamina and setting the can attack Boolean to false to reflect this. I'll simply add an else function beneth this to re enable it in any other situation.
Just like before it's functional but it doesn't look good. There needs to be a delay between each action to make it actually feel like a turn based game. Right now it just looks like a button clicker without any substance to it. There's also a but that I noticed where the player dies while winning at the same time. This is happening because there isn't a delay between attacks. The enemy was able to attack the player at the same time it's health hit 0.
Scrum Meeting (09/04/25)

We were meant to have a scrum meeting over Teams this weekend but everyone was busy. So this is another scrum meeting after a little while. So far Jac has started modelling the player, Erica has started gathering reference for the UI, I've completed some battle mechanics, bug fixing and did an animation test. Our next steps will be UI elements along with research into UI scaling for Erica, Additional player modelling and texturing for Jac and I'll be working on some more battle mechanics along with some animations If I've got the time.

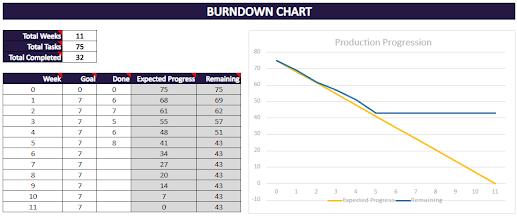
In terms of if we're on track or not I'll say that we are. The burndown chart does say that we're three tasks behind but in reality we're on track. The current sprint is going well so far, it's just a matter of if this momentum will stay going into the holiday.
Next week on the 16th well be doing a sprint review just like we have done before. Hopefully this will let us plan out next move along with planning what we will do over the rest of the easter holiday. While I'm okay with working during this time the other may not be and that's okay. It's just to get people up to speed around what we will do over this time. We will also continue our scrum meetings over the holidays also, this will be done in Teams like it has been for a few weeks now.
Industry Call (09/04/25)

This call was a little bit different from last time. Last time we had Charlie Blay and Patrick Randall in the call, giving us advice on how to manage the project along with the typical project critiques. This time Charlie was here but Instead of Patrick we had Sam Webster to take his place. He also works for next gen and he'll be giving us advice just like Charlie. For this I've complied everything onto a blog post so everything was on hand to show to both Charlie and Sam. This included a video of the current version of the game, images of what each of us have been working on, the production management and also an audio sample that I recieved last week. Louis and Dylan have been doing a fantastic job and I'm really looking forward to what they've got for us in the coming weeks. But more on the music later.
In term of how the call went I would say that It went really well. We seem to be doing a good job and mostly everything is going well. To start with the positives, Charlie noticed that we took the feedback from last time and implemented it into the project. Things like the brightness, the dreaded camera clipping and the lack of souls elements have all been addressed in some way leading into this call. The clipping was fixed with a cinemachine, the brightness was slightly brightened up and we've incorporate souls mechanics with things like stamina. In addition to that we've also be managing our scope really well. It's far more condensed over previous projects and is well within the scale of the project. However one thing we were asked is if the scope has been shifting or not. And honestly I thought that everything was fine. Outside of one thing which I'll get to later the scope has pretty much stayed the same since we planned the project. To Charlie this either means we've planned really well or we've simply not noticed the scope shifting. We're hoping that we've just planned really well but this is something we'll have to keep in mind leading into the next sprint review. Finally the overall project has involved everyone's skill set really well. When I was originally planning this project at the beginning of the year I tried to think about everyone else's skill set along side of my own. I'm the only game designer and coder in the class, so when I was planning this I needed to accommodate for other skills. Which I did, I made it really 3D modelling friendly along with it being good for 2D artists. And that seems to be working out really well with everyone's contributions being critical for the game.
Now onto the negatives and first off is with me pointing out some known bugs. When I was playing the video I was pointing out some bugs mainly involving the short cuts and Charlie made a good point around these bugs. He pointed out that we're only half way through the project and that we shouldn't be focusing on these bugs for the time being. These should be problem for a later date not right now. From now on we'll document all bugs on the Trello so we can do a round of bug fixing at a later date. Another issue was with our reasoning around the cutting of zone three, four and five. It made sense to cut them since the game is already massive, but not so that we can include more features. Cutting features should be done to save on time and that's not what we did here. We cut them to give us time to incorporate the music, and as it was mentioned to us, it's cool that we've got it but it's not a requitement to be included into this. It would be a shame to not use it but if we've not got the time then what's the point in having it. I think I've got a short cut to incorporate audio into the game by reusing a script from a past project. But this is something I'll get to at a later date. Last note is that the audio sample that we were given doesn't loop. I think this is because this was just a test sample and doesn't perfectly reflect what the end result is. While this was just pre production I've asked both Dylan and Louis about this and they're planning on incorporating a fade at the beginning and end of each track. That way there's a little bit of a fade leading into each loop.
Overall I feel like that went really well. We appear to be on track and people are liking our current progress. We should hopefully be near completion leading into May but we'll have to see.
Battle Mechanics - Action Delay (11/04/25)


The whole point in doing this is to leave room for animation and VFX. These need to be timed really well and it simply won't work if there isn't a delay. Right now everything is done instantly and while it works, it can be so much better. And that's why I've moved the enemy action to an IEnumerator so I can add a slight delay to each action. For now I've simply added a one second delay to the attack, but I can add more if needs be. Also at the end of any of the players actions it'll change the state to the enemy state and start the coroutine.

While I'm here, I'm also going to add the players actions to an IEnumerator also. This is for the exact same reason as before, where I want to leave space for animation and VFX coming later. These actions have a very small delay on them but this is only for the time being.

I'm also going to add a little debug note that'll tell me who's turn it is. That's a major problem right now were it's really hard to notice. So there's a little text box that'll simply tell the player the current turn. It'll be removed later on, it's just a debug thing for now.
With the delay it makes the battle's feel much nicer to play. Before it was a little too fast, now the player actually has time to process what's happened.
Scrum Meeting (12/04/25)

This past week has been quite busy. We've had quite a bit to do over the past few days, since we spent a little while preparing for the call on Wednesday. But since then, Adam has completed some blood decals, Erica has done some research on the UI, mainly focusing on scaling UI. Jac had completed some player modelling and for me I've optimised the game a little bit by changing some visual settings, along with adding the delay to the attacks. Our next steps will be the Cathedral concept for Adam, UI concepting for Erica, more player modelling and texturing for Jac, and I'll be modifying the battle manager to support more enemy variants. It's really boring battling the same Bat for 20 minutes.

The Trello doesn't really look like it's been updated for some time. The only exception is that I've been adding more cards to my section for some visual adjustments. Like adding fire, adjusting the lighting and also some smoke effects. This may be a case that the others don't have access to Trello outside of college, but this is fine since the scrums make up for this.
Battle Mechanics - Respawning Enemies And Enemy Variants (12/04/25)


Before when the enemy detector hits an enemy it'll trigger a kill function on all hit enemies. This works but it means that the enemies are permanently removed for the rest of the game. This is really boring from a gameplay perspective. Since the player dying becomes an inconvenience as opposed to a gameplay element. So the kill function has been changed to simply disable the enemy as opposed to destroying it. Along with that when the players health hits zero the game over screen will be shown and the player will be returned to the starting position. But along with this all enemies respawn function will be triggered.

Now for different enemy types. For the purposes of testing I'm simply going to make a red variant of the bat enemy. The only difference between the typical enemy and this (minus the colour) is that the tag is different. This'll have an "Enemy2" tag on it which I should be able to use in the enemy detector script.

When the enemy detector hits enemies it adds them to an array which is accessed by the battle manager. The problem with this is that there isn't really a way to check what is in this array. If I simply add all enemies to the same array I can't check for anything specific, mainly because everything will be in a different order every time. So I'll have to make another array for each enemy type. It's a simple solution but it should work.

In the battle manager it'll check each array on the enemy detector for an enemy and spawn in the appropriate spawner. I don't think this'll work so I'll have to test it to see.

I've also got to quickly make a battle version of the new bat otherwise they'll not be a way of knowing if this is working or not. It's incredibly simple just the same battle bat except it's in red.

And as I expected it's bugged. While the code does check if the spawner is free, the spawner doesn't actually have a chance to update it's spawner script. It also makes sense since each array will iterate once since both arrays will have one element. So the for loops are iterating once and it does this pretty much at the same time.

To fix this I'll have to check each spawner for a child object before actually spawning. This way if a spawner isn't free it'll simply check the other spawners to see if they're free. However the downside of this is that one enemy will have spawning priority over the other. In this case the new red bat will spawn first over the more standard bat. This isn't really a problem it just means that they'll be a spawning pattern. There's also a delay before the second round of enemies can spawn, mainly to give the spawner reset scripts time to update. It just gives a little bit of insurance that this'll work,
Everything is actually working, the enemies are respawning and the different enemy types are spawning in correctly. But this is probably were I break everything by adding a third variant.

Again I'll be using the bat this time in a purple colour. It's also got a different tag of "Enemy3" which will separate this from other enemy types.


The code is pretty much identical to the code for the other enemies. Except all enemies hit with this variant are added to a new array. Other than that it's identical. It's been added in between the red bat and the normal bats, meaning that this should get spawned in after the red enemy but before the typical bats.
At first everything seemed like it was working alright. But then I realised that enemies of the same type are spawning in the same spawner. So I'm going to have to fix another bug. I knew that this third variant would break everything.

Instead of adding the delay after each spawner I'm also adding a delay inside of the for loops. This way there's a slight delay when the for loop is iterating through the array. Again this should give the spawner reset scripts time to update before more enemies are spawned.
After several hours of trying to get this working it's done. In reality it wasn't that bad it was just really annoying. Back in the pre production I set this up with only one enemy in mind since it was just intended to be a prototype. But it meant that I needed to heavily modify it to get it working for this project. Next step will be more player actions, along with some animation.
Battle Mechanics - Secondary Attack And Guard (14/04/25)


My immediate thought for a secondary attack is a gun. This brings it more in line with Bloodborne (Sony Interactive Entertainment, 2015) since that has a shooting mechanic also. Right now I'm not going to go to in depth with this. For now I'm going to have this select a random enemy and deal damage to that enemy alone. What this means is that most of the battle will be down to random chance, which isn't the greatest but it should work for now. But the benefit of this is that it has the potential to one hit an enemy and it also doesn't consume stamina.


The guard is actually a very simple mechanic. All it does is simply enable the guarding Boolean which will reduce the amount of damage that the enemies deal. The damage dealt is any were between half damage or only 1 off of the total damage. For example if an enemy was originally going to deal 6 damage to the player, the guarded damage will be between 3 and 5.
These mechanics were really simple to implement, which is quite apparent since it only took me a few minutes to add them in. The one thing that this battle system needs now is that it needs dressing up. It needs to look more visually pleasing because right now it's incredibly simple, at least visually.
Battle Mechanics - Health Pack (14/04/25)


Health pack are actually really easy to implement. All I've got to do is keep track on how many packs the player has at all times. It wouldn't be a great thing to have an infinite health boost. So to actually implement this I'm checking is the player comes into contact with an item with the "Health Pack" tag, if they do then the health pack count will increase by one and it'll destroy the object. This will also add the health pack count to a string that'll be applied to a UI element. Then in the battle manager script I'm checking if the player has a health pack before using one. And I'm also checking if the players health is less than the starting health so they can't go over the limit. Then it'll simply reduce the health pack count by one and add the health packs value to the players current health. And it's updating the health bar also.

For some reason the players health was able to go above what it's capable of being. There's a check in the update function that checks if the player health is above what it should, if it is then it's meant to reset it to 50. But it's not working. So I'm going the check in the health pack function. To start with it's checking what the players health would be with the increase. If the players health would be greater than the starting health it'll set the health to max, if the health would be less than the max it'll add the health increase like normal. This insures that the health won't be over the limit before it the health increases. I've also made it so the player can't use a health pack unless they're outside of battle or it's their turn. It wouldn't be a great game if the player could just increase their health just before dying.
The health packs are working. Now the player has a way of avoiding death. It's not looking the best but I think it's serviceable enough. Next steps are going to be implementing a new enemy and probably cleaning up the UI a little bit, since it's a bit messy.
Rendering The First Enemy (16/04/25)

We're running out of time for the project. And on top of that the battle mechanics have been much more of an undertaking than I thought. So to save on time we're going to be using some assets for the enemies. It's going to save on time significantly and honestly this model in particular is looking really good. It's perfect for this game since it fits the style really well. And on top of that it's already got some animations on it so that cuts out quite a bit of work.

When I was importing into Blender it would break the rig. I have no idea why this was happening, but it's okay when it's imported into Maya first. So I needed to import into Maya and then export it to Blender for Rendering.

In terms of the lighting I've simply imported the same lighting I've been using on my character from a while ago It's still working really well.
.gif)
And once it's rendered it's looking horrifying. It's really creepy looking, it's just weird. But outside of that I've rendered this animation out in a side view, front view and back view. That way it covers all sides.

Now for the battles they're in a different perspective. They're in an isometric view so there needs to be animations specifically rendered for this.

Honestly this animation on the isometric view is even more horrifying than before. But anyways with these done I've got to move my attention to an idle animation.

The enemy needs an idle animation for when it's not doing anything in battle otherwise it'll look like it's constantly on the run the entire fight. And while the model did have an idle animation on it for some reason it won't showing in Maya. So I've got to make my own. It's not going to look the best simply because I don't want to linger on it. I just want something that works.

It's not looking the best but it also could look worse. It should be useable for the time being.


Unlike previous projects I'm going to compile everything into one sprite sheet. It's far more optimal and it keeps everything in one place. And to make sure that I know which animation is what I've left a blank space in between all animations. This is so I know which is which when I'm in engine.

With this method of pixel art something is bound to break at some point. And most of these sprite have issues with empty pixels or some parts of the legs being cut off. I'll be here for quite a while trying to fix these.


This is an example of what I've needed to correct. With this sprite it had some loose pixels that weren't connected to anything and also there's a mesh error with one of the legs clipping through the head. So I removed the loose pixels and corrected the head. The loose pixels in the bottom image were removed later.

To finish off for today I've generated a normal map for the entire sprite sheet. Y - Axis inversion needed to be disabled since it meant that the green channel on the normal map was on the bottom of the map which isn't ideal. But with inversion off the normal map is looking great and it should look great in engine. But that'll have to be a later date since I've got so much to get done.
Slowing Down Production (16/04/25)
This review is going to be a bit different from normal. Typically we'll do this in lesson while all of us are present, but this time we're going to have to do this over teams. It's not ideal but this is something that we'll have to deal with. Additionally this isn't necessarily the end of the sprint, we don't intend on planning the next sprint until the end of the month. This will be explained a bit more later. Finally we couldn't all play the game at once, again since we're doing this over teams. So I simply recorded some gameplay and shared the video with everyone.
In terms of what everyone has been able to complete for the sprint, starting with Adam. Adam has been able to complete a blood foot print decal however just like the past few weeks he's still recovering from surgery so I would honestly prefer that he didn't do anything. But regardless it's looking good. Jac has been able to mostly complete the modelling of the player. Everything just needs to be textured but this shouldn't take long. Erica has done some research on the UI, looking at scaling UI along with some design ideas. For me I've implemented most of the battle mechanics that we were after along with rendering some new enemy sprites.


One problem is that the overall sprint goal has not been meet. The player model isn't fully completed, and in turn the sprites haven't been able to get made. Enemies have been started but this is only because of our use of models from SketchFab. Finally the UI also hasn't been started yet. The research seems to have been completed just not the actual UI. While this may seem really bad it's actually not as bad as it looks. It's the easter holidays right now and honestly we need to take a break. So the plan is we'll try and get through a little bit of what's left just nothing major. We've been working non stop for quite a while and we need to rest a little bit. Which is exactly why we're not going to plan another sprint until we return to college. It gives us around two weeks to take it easy and not worry so much about the project.
UI Redesign (17/04/25)

To start off with I'll be completely replacing the health pack element. It'll be replaced with an image of the actual health pack item. I'm using this syringe that I used in an older project and it should workout nicely for a health pack item.

As opposed to rendering this into pixel art it's going to be rendered to a nice clear resolution. A resoultion of 256 by 256 should be good considering the size it'll be on screen. I'm doing this mainly so it's actually recognisable. I want players to know that this is a health pack and not just a blob of pixels.


The health pack count is much smaller now with it just being the health pack icon with the count next to it. It's nice and clean and it looks much better than before. I looked at the UI from Bloodborne (Sony Interactive Entertainment, 2015) with it's blood vials count to get a rough idea on what would be best for this.


Next up is to chose a font for the UI. And for this I came up with a couple of choices. I also asked everyone else to vote for a font and this one won the voting. It's a nice font and fits in with the overall theme really well.


One concern I had with the font was the readability of it. Capital letters were a little overdesigned and that can impede readability. The best person to talk to about this is my brother since he's dyslexic. And immediately he said that he can't read it. Which is why I've changed everything to this font. It still fits the style it's just much more readable. And is actually readable to someone with dyslexia.


Another thing I wanted to do was to move the battle UI into the scene it's self. I'm looking at Persona 5 (Atlus, 2016) for a point of insperation on this. It presents the player with all options in a way that surrounds the players character. It also looks quite a bit better than some other turn based games with it not looking like a basic menu. Also moving the UI into the scene makes it effected by the post processing which makes it blend in a bit better with the rest of the battle.


Next I'm setting up the camera to work with a cinemachine. I want to experiment with a shifting camera while the battle is playing out. It will blend between the original camera angle and this new over the shoulder view. When it's the players turn the camera will move behind the player, while everything else will be scene in the main view. And once the cinemachine is set up it's actually really easy to implement a shifting camera. The cinemachine brain on the camera will automatically go to the newest virtual camera, so if a virtual camera is enabled it'll automatically move there as long as the priority isn't too low. This means that all I've got to do is set the priority on the players virtual camera to be higher than the main camera, then in code I can simply disable and enable the camera when I want to. The brain will also automatically blend between both of the camera views with a nice smooth transition.

And with them changes it makes everything look so much nicer. The shifting camera looks really good and gives the player a nice view on all of the enemies. I also added a bit of noise to each virtual camera which gives everything a nice bit of motion. It's not too intense otherwise that could give people motion sickness but I think this is a nice touch to the overall style.
Battle Mechanics - New Enemy Integration (17/04/25)


To make this entire process much easier I've simply duplicated the bat enemy and replaced all of the sprites in the animations with the new enemy sprites. This way I don't have to deal with setting up a script or animations since that's pretty much already done.

And it's really creepy looking in game. Once it's in the players range it speeds up the animation and this one is looking really creepy once sped up. But there's a bit of a problem with there not being a battle version of the enemy. It just spawns in a regular bat enemy.


The original plan was to use this animation for the battle idle. But it doesn't look great at all. There was another animation included on the SketchFab page but I couldn't get it working. But it's probably worth another try to get it working
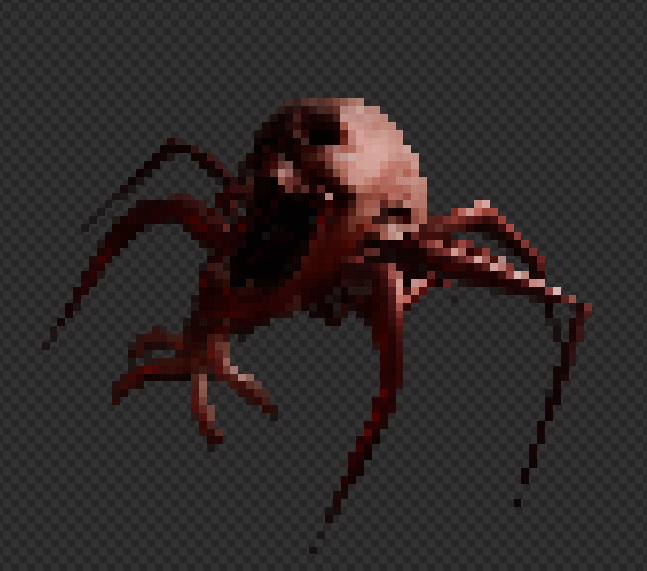

For some reason I get the movement animation in Maya and the Idle in Blender. It's the same FBX file just imported into a different software. But at least It's working now. And with that I rendered out the idle animation using the same set up as the previous renders for this model.


For consistency I'm going to replace all of the old idle sprites with the new ones on the sprite sheet. It's best to have all sprite sheets in one place as opposed to having multiple sprite sheets for different use cases. Thankfully I've spaced everything out so it's easy to erase unneeded sprites. I also corrected the sprints and rendered normal maps for them in Aseprite. Again, just like everything else.

And it's looking much better in engine. It's interacting well with the lighting and I feel as if it fits the overall theme really well. However it might have been noticeable that I didn't show the attack animation just yet and that's because it's going to take a bit of code to get it working.
Battle Mechanics - Enemy Attack Animation (18/04/25)


To start I'm going to have to modify the battle enemy slightly. First off is with the animations. Right now it's set to simply play the idle animation and that's it, but I'll need to create a new branch for an attack animation. It'll constantly loop the attack animation for as long as the attack Boolean is enabled. This lets me control how long I want the animation to last. And on a little side not I've added a little round shadow under the enemy. There wasn't any clear shadows previously so this is a little better.


The last thing that I wanted to add was a blood effect for the player. I want there to be a little bit of feedback for when the player gets hit by an enemy. All I'm doing for this is creating a non looping particle effect using a blood decal from Adam. It's just a quick burst of particles that only lasts a second. And in code it's really simply to implement all I've got to do is give the game manager access to the effect and simply use the play command to trigger the effect.
Thankfully that's all working. It took way longer than it really should have to just get the movement working. But with that done it should make other enemies much easier to work with.
Setting Up The Player Model (20/04/25)


Jac has finished off the models for the player so now I've got to set everything up. And of course I need to start off by importing all of the models for this. I started off with the mannequin and started adding parts of the clothing. Thankfully the origin point on all part are perfect so everything just snaps to the exact point they need to be in. After everything was imported I added all of the texture maps to each piece. There's quite a lot to get through but I managed. There was only one problem and that's with the colour of the jacket it's a deep black and it needs to stand out a little bit. So In the material I've added a colour mix node to give the base colour a nice dark blue tone.
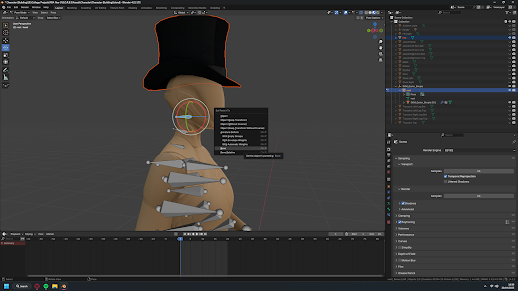

With everything imported I can start on binding everything to the rig. I'm doing this in the exact same way as before with everything being bound to a specific bone.

And with all of that it's actually working quite well. Everything pieces together nicely. But just like all of these types of models it doesn't look great in some areas. The joints in particular look quite bad with it clipping into the mannequin. These can be hidden when correcting the pixel art it's just going to take a little while to correct.
Animating The Player Character (21/04/25)

The original plan was to import the full player model into Mixamo and simply animate that, just like I did back when I tested Mixamo. However the model honestly looks awful with everything skinned. Especially on the arms with then being way smaller than they should be. It's like a twisted take on the stay puft man.


So as an alternative I'll import the mannequin and then dress it up with all of the models later. It should look a little better this way since the movement won't be messed up. And as you can see I was right. Since the mannequin is biped and doesn't have any additional parts, like a long trench coat, it moves much better. To see if this works I'm going to export this run animation and use this for testing the overall look of the character.


Before the animation can actually be used I need to adjust it slightly in Maya before it can be bound to the player models. And to start the animation needs to stay in one place. Since this is rendering as pixel art it needs to stay in one place otherwise the pixel art will have some weird smearing which I don't want. Thankfully removing the movement is actually simple since it's all done on the root bone, so all I've got to do is delete all the position key frames on the root and that fixes the problem. But I'm not quite done. Alongside of the movement I also need a bind pose to make attaching the models to the rig easier. And I've got a little trick for this. What I'm going to do is reset the model back to it's bind pose and then set a key frame of it at the end of the animation. This means that I can simply go to the end of the animation, bind the models to the rig and everything should just work.


Back in Blender and everything was really quick and painless. I'm doing this in the same file as before which means that everything is still there. So all I had to do was import the model, go to the last frame and then bind everything.
After rendering it out it could look a bit better. First off the animation needs to be sped up and the jacket also needs to be corrected. With it being in one place it looks really weird.


To fix the jacket I've decided to very quickly rig the jacket so I can manipulate the positioning of it. This way the jacket can be animated so I can make adjustments as needed. With the better jacket the animation is looking a little bit better. It's still not perfect but I should be able to correct it in the sprite sheet.


For this project we want to have all animations all in one sheet. It's far more manageable and it performs better in engine. But to test how this looks in engine I'm going to create it's own sprite sheet for now. It can always be updated later on with new animations.


One thing I noticed is that the back sprites look a bit weird. It's mainly with the positioning of the coat looking off. So I had to go back into Blender and adjust the coat specifically for the back animation. And with the change these sprites look much nicer.


As with all of these sprite they need correcting. And in this case there was quite a lot to correct. I knew that this would be a problem so it's nothing new. To start with both arms needed to be reconstructed, Main the left arm since it looks really out of place. And secondly there quite a lot of mesh errors that need covering up, like the skin popping out of the back of the coat. Finally all joints needed to be filled in. With the nature of the model the elbows and the knees aren't always going to line up.


Since it doesn't take long I rendered out a normal map. Overall this entire process to over two hours, which is probably the longest this has taken me so far. Normally the correction process doesn't take that long one around half an hour if it's particularly complex.

To make things a little bit easier I'm duplicating the player animations and replacing the sprites with the new ones. This way it's non destructive the the original player, we can always go back to the original player if needed.
With all of that work on both mine and Jac's end, there's something wrong with the sprites and I'm not sure on what it is. Ignoring the popping in of the original player it looks off. I think it's a combination of both the movement and the look of the back sprites. This character looks far better in the front view than any other view. However not all hope is lost with this character. I think it would work perfectly as our boss character. We can dress this thing up and make it a bloody monstrosity. I'll run this by everyone when we get back to college and see what they say.
New Enemy Type (22/04/25)

For the second enemy type we'll be using this model by DM-913 on SketchFab. It's a really creepy looking creature which should fit in really well with the rest of the game. It's also biped which means I can use Mixamo for the animations.


The rig that was already on the model wasn't working the best. It looks like a Maya quick rig and normally that wouldn't be a problem but it wasn't working well for this model. So I needed to remove it and use Mixamos rigger instead. It achieves the same thing it just works a bit better for these animations. For the animations I've chosen two zombie animations, zombie crawling and zombie eating. It works well for this creature.


Before I render anything, I really want to change the material that's one the model. The old texture looked good in SketchFab but it really low resolution in Blender. So I'll be retexturing everything in Substance Painter mainly to make it look more horrifying.

One thing I want to test out with this character are particle systems in Blender. The goal it to try and get something that looks like dripping blood. It's an incredibly simple simulation that emits meta balls with some gravity. Meta balls are dynamic meshes that can join and clump together. Think of this like a real time Boolean. There really useful for something like this.

Unlike with the player character I'm going to be testing this character using the raw sprites. The main reason for this is that last time I spent hours on player sprite that didn't look any good in engine. So this time using the unedited sprites is far better since I've not spent long on this.
Giving the new enemy a quick test and everything is looking good. Still needs correcting in areas like with the blood but I think that it's looking good enough to proceed.


Moving onto the idle animation for the battle. For this I'll be using a piece of the biting animation and mirroring the movement. Because of this the animation will perfectly loop since the movement will be played in reverse returning to the starting position. And in the pixel art it's actually looking quite good.

The enemy needs a movement animation for the battle to actually move towards the player. So I'll be rendering the movement animation again this time in the isometric camera view like all other battle sprites.


For these sprites all I needed to do was put together the sprite sheet and remove some of the blood effect. It was a relatively quick process. However one thing I did differently is that I added an extra column to leave room for naming. This way I actually know which animation of which in engine. There are some left over spots but Unity will ignore these when I cut the sprite sheet.
Everything is looking great with this enemy minus the attack animation not being fully implemented. Right now it'll simply play the movement just like the head enemy. Eventually I'll get around to full animating all enemies. Next steps are going to be improving some of the battle mechanics, and I think the first one will be the shooting.
Battle Mechanics - Improved Shooting Mechanic (25/04/25)


The main part of this improvement is the implementation of an aiming system so the player can choose which enemy to attack over it being random. The code for this isn't too complex. Essentially there is an integer called gunTarget that is can have it's value changed by pressing the left and right direction buttons. Then in a FixedUpdate the position of the reticle will be change to be in the same position as an enemies spawner in the enemies list. If the gunTarget is equal to 2 then the position of the reticle will be based on the position of the second spawner in the array. That value will equal the same thing as the enemy so I can also base the shooting target to be the same as the gunTarget.

Using a basic circle as a place holder I tested this out. And It's mostly working. For some reason the third spawner is in play so the reticle can hover over the third spawner. And on top of that theres also a no longer in range of array error that happens when I press the button too much. Which makes sense since there's nothing stopping the gunTarget to equal more than the array length. There's also a massive issue when I shoot while aimed at the third spawner with Unity crashing. Again this is most likely because it's aimed at an invalid target.

To fix most of these issues I've added a limiter on the gunTarget Value. Now it can't go above the array length minus 1. The main reason for this is that when calling to an array it starts with 0. So before when the value was 1 it was actually aiming towards the second enemy. Doing it this way means that if the value is equal to 2, it'll minus 1 so it targets GameObject 1 in the array.

Again I quickly tested everything and it seems like it's working as intended. I got lucky hitting the targeted enemy but there's no errors or issues that I could see at first. But after one enemy died issues started to appear. The reticle could still be positioned to where a dead enemy is. Giving me the same issues as before.

Turns out the issue is because I'm basing everything off of an array instead of the constantly updating list of enemies. I have no idea why I did this but I did. Anyways it's now based off of the enemies list which removes destroyed enemies. But for consistency I also needed to change the positioning of the reticle to be based off of the enemies position over the spawners position. All of this works exactly the same as before it's just based off of an updating list over a permanent array.

With the aiming working as it should I need to make the targeted enemy take damage when the player aims at them. The code was already based off of the enemiesList it would just generate a random value to be the hit target. Instead I can simply base this off of the gunTarget. Along with this I've also included a max ammo mechanic so the player has a limited amount of shoots per turn. For the time being the max is 2.

I also need a way for the player to cancel their turn after choosing to aim. I'm repurposing the run for this since it'll be deactivated after starting to aim. Right now there's two options for cancelling a turn. Aiming can be cancelled after taking aim and not shooting this will simply return the player to the main options view. Another way is for the player to cancel a shot after starting to shoot. This way the player can shoot once and cancel the rest of their turn to conserve ammo.

After the player is out of ammo they'll be left with a turn with no ammo. Afterwards the player will get one bullet each turn until they hit max ammo. This can always be adjusted later is necessary.

Everything is actually working really well with only two issues that could notice. The cancel feature wasn't working really well at least for cancelling mid turn. It gave players the opportunity to cancel shooting after shooting twice, effectively giving the player two turns. On top of that the ammo count carries over between battles. Which could be a good thing since it could be another item pick up. But I think it would be a bit better if the player returned to max ammo at the end of each turn. That way the player gets to use this option a bit more.
Sprint Two Review (30/04/25)


Typically we would get someone in the class to playtest the game to get their thoughts on it. Last time this was Alex and his feedback was really helpful last time. For this it's a bit different since we were able to get people from the other class to play test. Erica even set up a survey as well so we've got something to get everyone's feedback with.
Following the play test we we're able to get a good understanding on what's appealing to people and any potential issues they may have. To start the majority of people really liked the art style of the game. In particular the style of the models blending really well with the pixel art. This is a core pillar of this game so it's great to see that it's working. In addition people really liked the shifting camera during a battle It's a small detail but people seem to really like it. The randomised damage was also mentioned which is nice since it shows that it's noticeable in combat, which was a concern that I had with this mechanic.
Along side of this they we're some issues that people had with the game. The most notable one being the overall simplicity of the combat. The lack of animations and some of the battle mechanics not feeling complete. For example there's no reason to ever guard during a battle. Enemies need a charge attack of some kind to really make this mechanic usable, because right now why would players guard over trying to get that little bit of damage out. Hopefully this can be addressed with the boss fight. Additionally the ability to exit the shooting option would be nice. I did incorporate an option to go back but I needed to remove it because of several bugs with it. I was going to revisit this mechanic at a later date. In terms of animations for the player during battles, that is something that we've got in mind for the next sprint. Admittable these we meant to be done during this sprint but I've had some complications with the character model Jac made. I'm still trying to rectify the issue and it should be done by the end of next week if all goes well.

One thing that may be noticeable is that we've done this sprint twice. The main reason for this is because it was the easter holiday. And many of us were taking some time away from the project to relax. And this is perfectly fine since we've not really had a chance to slow down since the project started. Because of this the previous sprint review will be considered as a mini sprint review, a review that we did before slowing down production. Since production slowed down we've completed some tasks like the enemies along with Jac completing the player. And that's pretty much it. The UI still hasn't been completed but again this is fine since we we're taking a break. Moving forward well be going back into full production trying to finish everything off ready for the deadline.
Another thing that I mentioned was with the difficulty I was having with the new player character that Jac had made. The models look great but they don't look right as a player character. As a result of this we'll be sticking with the old player and keeping Jac's new character as a boss character. It's unfortunate that it couldn't be used as a player but I think that it should work as a awesome boss.
Sprint Two Retrospective (30/04/25)
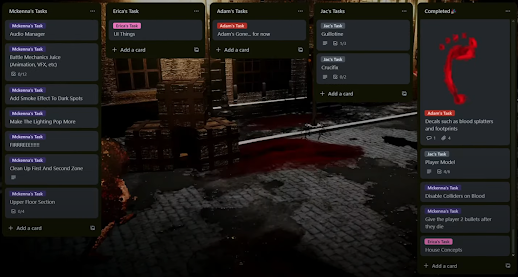


As I've already mentioned production has been much slower over the past week or two. For most of us. Personally I struggle to take breaks which is reflected on the Trello. While this is good for the project it's not great for me. Not in the sense that I don't want to be working on the project but in the sense of me slowing burning myself out. I've become a little obsessed over the project lately and I need to slow down. I'll still be doing what I normally do but I've warned everyone on the team that I may slow down at some point. Outside of that there isn't really much to cover here that I haven't already. However something we did discuss during this retrospective is what we're going to be doing over the next week. For now we've agreed on Jac creating some set dressing models, Erica completing the UI along with some models and for me I'll be mainly focusing on audio along with the boss fight. Another thing that's important to note is that Adam hopes to be coming back next week. Which is great, it really hasn't been the same without him.
Implementing Audio (02/05/25)
Due to technical difficulties the musicians that we're making music for us weren't able to fully complete their part of the project. However they did have an old recording that they sent over. It's pretty much just a full length version of the sample they gave use last month. It sounds great there's just a few issues with it. To start with it isn't looping. Thankfully this is an easy fix since I can simply add a fade in effect at the beginning and then a fade out at the end. So that's good. But another issue is with the tone. There's a bit of a tone shift in the middle of the track that I'm personally not a fan of. It sounds good I just fell that for the typical battle it won't work as well. Which is why I'll only be using the single track for the normal battles.

One issue with the part that I want to use is that the clip is really short and it won't work for the length of the battles. Which is exactly why I'm trying to extend the length of the track. I duplicated the middle portion of the track and attempted to line up the two pieces to the same frequency. It took some time and effort to try and get a good blend without it being noticeable. It sounds good to my ears but I'll ask everyone on the team to hear it to double check.


Finally I need to actually play the audio in game. For that I'll be using the basic audio manager that I've used quite a bit before. It simply takes an audio clip and gives me the option to manipulate the volume and the pitch for each track. For the time being it's just going to be the battle track on loop until I can find some good audio for the overworld.
In game it's sounding great but it feels really weird with it constantly looping throughout the entire game. We need more calming music for the overworld and keeping the heavy metal for the battles.
Rendering VFX In Unreal Engine (03/05/25)


Everything I'm about to do I've already done prior in the 2D Game Animation project. With that I use my Real Time VFX sword slash to create an effect that I could use for my pixel art character. It worked really well back then so I'm going to be using that again. Just like last time I'll be rendering my sword slash VFX in Unreal Engine 5 using the movie render que. With the render que it'll render out each individual frame as a PNG image with transparency. If I set it up correctly. From what I remember from last time all objects other than the effect need to be set to Hidden In Game. That way they aren't visible in the render.


After adding the new camera to the sequencer I can now render the VFX. The resolution is 256 by 256, which can always be downscaled later, with the framerate being reduced to 30 FPS over 240 FPS that it was set to. For the most part I would normally render something like this using 12 fps to match the frame rate of everything else, but the VFX is very frame rate dependent. The intensity of the effect increases over time, and that time is based on each frame. So the effect at 12 FPS will look much smaller than it running at 30 FPS, since it has more frames to increase the intensity.

Even though I rendered at 30 FPS I can simply use every 3 frames to get the same look.

While I'm here I'm also going to be rendering the healing VFX, just without the mannequin. I think I've got a good use case for this I'll just have to see.


To see how both of these look in engine I've set up a sprite to constantly play either of the two animations on loop. This is just to get a good understanding on what to expect from either of them. The scythe slash is just in front of the player with the healing VFX being on one of the battle enemies. It should be useable for a charge attack but that'll be coming later.
Overall I feel like these are looking good in engine, the scythe slash especially. But right now they're just playing on loop and it's really distracting. So when I get around to rendering player animations I'll incorporate these into the battle animations. That way I'll be able to time when each effect is played.
Improving The Short Cuts (05/05/25)


This job was intended for a bit later in the project, but I'm doing it a little early. The burn out is starting to kick in and I want to do something that isn't going to frustrate me. So I'll be 3D modelling a new gate for the short cut areas. I'll be making these as metal bars that will be inline with the current fences that are in the game. It's a very simple model with the core spike being a cube with a twist deformer, along with a cone to act as the spike. Afterwards the spike can be duplicated to get the rough fence look.


To combine all of the spikes there's a simple bar going across all of them to them all together. It's very simple but the texturing should make up for it. In addition there's also a new fence model which matches perfectly with this new gate model.


For the material I wanted to go for a very gothic gun metal look. The overall look is a dark grey metal with some elements of rust on them. But there's also darkened tips on the spikes which adds to the gothic look. The material is the same across both objects just with the fence having more intense black lines around the bars.


With the new look of the fences I'll need to apply the same texture to the original fence. We're still going to be using it for this project since it looks good it just needs to be inline with the other fences. And it actually looks quite good in this colour scheme. It's also been rendered out again in the exact same way as it was in the pre production project. Making this a drop in replacement for the originals.


Finally the original fences were replaced with the new sprites along with the new models being placed for the short cuts. The main reason for not rendering the new short cut fencing into sprite is mainly for clarity. All sprites that are placed sideways are near invisible to the player and for these short cuts they need to be visible.
The short cuts are looking much nicer than they did prior, not just with the short cuts themselves using better models but also with the fact that I removed the middle part of each short cut. Now the player will simply fast travel between each part of the map. It feels much better to play since it feels much more responsive and paired with a good crossfade this should look really good.
New Player Animations For The Battles (06/05/25)


Since this character uses an Unreal Engine 5 Mannequin as a base it works really well inside of Mixamo. At the start of this project I did a test with this character to see of these animations would be viable, and they were. So I'll be using it again to animate my character ready for the battles. I've got five animations total. The attack animation which is the exact same one as I used for the test. An idle which looks injured, a damage animation, a guard and finally a shooting animation. All of these are looking good in Mixamo so they should be good for the pixel art.

The only downside of using Mixamo animations is the fact that they've got root motion. And for what I'm doing I can't have that. Which is why I've got to import the animation into Maya, remove the root motion and then export it ready for Blender.


One thing I'm going to add to the player is a gun. This is mainly so the shooting mechanic makes sense with the gun constantly being in view of the player. The model is very high quality especially for a model that was made in 2016. But it does have an issue with the colour so I brightened it up slightly so it contrasts a bit better with the player. It's also been bound to the thigh so it moves around with the player.


Finally before I can render the attack animation I need to do some corrections. First off is the positioning of the scythe. It's always wrong and the best way to correct it is to go frame by frame manually placing it. It's tedious but there's only 12 frames to get through so it's not too bad. But unique to the attack animation is the need to animate the camera moving along side of the player. Even though the root motion has been removed there's still hip movement that can place the player out of the cameras view. So animating the camera was the best solution for this.
All of the animation are looking quite good, I'm just dreading needing to correct these. I can already tell that the hair will need quite a bit of correcting. But actually speaking of correcting the scythe placement was mostly fine of most of these animations. The only one that was having a bit of an issue was the attack. Another thing to note is that I've split the guard animation into two separate animations. On for the guard and another for a guard hit. They'll need to be two separate animations for when they're added into engine.


The last animation that needs doing is the shooting animation. And I needed to get creative with this one. I need the gun to go from one part of the model to another. My solution for this is to have two guns on the player. One on the hand and another on the hip. At the start of the animation the gun in the hand will be invisible while the hip gun will be visible. When the exact frame that the characters hand is over the hip gun it'll be removed from view and the hand gun will be present. I'm doing this by setting the scale from it's base scale to 0. It's not the best way to do this but it works.
Just like the guard animation this animation needed splitting. One for the aim and another for the shot. Both of them look quite good and should be great in game. And the popping between the two guns is barely noticeable in the pixel art. It actually looks really nice and consistent.


As I expected the hair is a complete mess in the pixel art. And while it's not a massive problem correcting the sprites it's a problem with trying to keep them consistent. I'm pretty much drawing hair for every sprite so consistency is key.

It's currently 1 in the morning and I've been correcting this sprite sheet for over 6 hours. I've been taking long breaks in between but this is by far the longest I've spent correcting pixel art. It was mainly in the attack animation if anything. With the hair being a complete mess. But it's all done now and I'll get around to adding it into game at a later date.
Planning The Final Sprint (07/05/25)


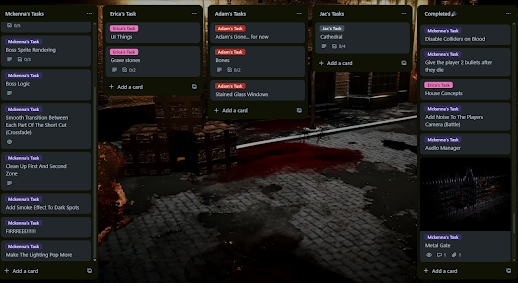

It's almost hard to believe that we're approaching the end of the project. But we're not quite done yet. The past week has been dedicated to mainly set dressing models, along with some other visuals like VFX. All of the models are looking great but the important thing is that Adam is back. After some time off he's back and in time for the final sprint. For this sprint we're completing the boss fight along with some additional set dressing. The set dressing will consist of some grave stones and some bones. Done by both Adam and Erica. For me and Jac we'll be primarily focusing on the boss character, with both the boss itself and also the environment for it.
One thing that's a bit different from our other sprints is that two people have been assigned to the same task. That's for the stained glass windows, with Adam starting the task and then Erica taking over next week. Both of them are 2D artists and neither are a fan of 3D modelling. So this is a good compromise. While they're working on that Jac will be focusing on the cathedral model, it's the final area of the game so this is all he'll be doing. For me I'll be working on the boss fight. Both the sprite work and the logic. It's defiantly achievable since the logic is pretty much already done, so most of the work will be on the sprites.
As a quick side note I filled Adam in on the fate of the new player character. He wasn't around when we made this decision but thankfully he seems okay with it. It might not be exactly the same as a player but I think it being a boss was a good compromise.
Battle Mechanics - Finalising The Battles (10/05/25)


We've not got long left on the project and the battle mechanics are near completion. While there's some bugs the core objective right now is to finish the core of the mechanics and then bug fix at a later date. And to start with I'll be replacing the old player sprites with the new battle animations. For now I'm keeping the animator simple with everything being set to a trigger except from the guard and aim animations. For them they need to be constantly looping to maintain these poses. It wouldn't make much sense for the player to start aiming just to go back to the idle animation. Branching off of the aim and guarding is the respective secondary animation. The shooting and the guard hit. These will be playing directly after the main animation not just because it makes sense but it'll also look more visually consistent.


Thankfully actually triggering the animations is incredibly simply for a turn based game. Since everything branches from the idle I can simply just call a trigger for the animation I want, over toggling Booleans on and off. And what makes turn based animation even easier is that I can simply animate any movement that I want. For this attack animation I can animate the player moving towards the enemies while swinging the scythe.


Of course not all animations can be used with a trigger. The aiming is one of these. For aiming a Boolean it set to true to constantly loop the aiming animation and while in that state the shooting trigger can be used to actually shoot the gun. When the player ultimately stops aiming the aiming Boolean will be set to false returning the player to the idle state. One important thing to note is the new keep aim animation. This is just the final frame on the aim animation running on a constant loop. Without this the player will replay the aiming animation after each shot and that looked weird. So now the aim animation is triggered once, constantly loops the keep aim animation and then plays the shooting animation when the player shoots. When the player is done shooting the player will return to the idle state.

In the enemy attack it checks for the players current guarding state. If the player is guarding the player takes reduced damage while if they aren't they take the full amount of damage. Because of this it makes triggering the correct animation really easy. Since all I've got to do is trigger the guard hit when the players guarding and the normal hit when the player isn't. For the guard animation itself the animation Boolean is set to be equal to the guard Boolean. So if the players guarding it'll loop the guard animation, if not then the typical idle will play.


With the animations being played correctly they can now be dressed up with some VFX. The scythe slash was already in the game but now It's animation is being played from the scythe slash animation. This way the animation can be controlled from the attack animation which should give better timings overall. In addition to that an asset pack with some basic VFX is going to get used for the shooting animation, to give a muzzle flash effect.


Controlling particle effects in an animation is a bit difficult. There isn't a basic play key frame that can be set, so I'll have to use a work around. Effectively the particle system will constantly loop along with playing on awake. Then in the animation the particle effect can be set to inactive and then set to active. That will play the particle effect as soon as it's set to active so it can triggered from the animation. It's a bit of a work around but it's effective. I've also triggered the blood particle effect in the same way by setting it to active in the damage animation. Before this was triggering in code but it wasn't reliable since it would constantly fail to play.


The final thing I'll add to the battles are Erica's UI elements. These are looking great and are defiantly much better than the place holder rectangles. I've also add a type 2 enemy to each spawner which means that when I start a battle it'll be against all 5 of these enemies.
For the most part everything is playing perfectly fine minus the damage animations. There's a bit of a delay between each animation and my guess to why this is happening is because of exit time. I'm not sure if it'll break anything but setting both of the damage animations to activate on any state might fix this issue. But it could also introduce some other issues with them playing at the wrong time. This will be experimented with at a later date.
Rendering Boss Fight Animations (11/05/25)


Just like before with this character the animations will be added to an Unreal Engine mannequin and then later dressed up with Jac's models. The only thing that's different about these animation is the quantity. There's seven in total for multiple attacks, damage, a power up, death and the standard idle pose. Some of these animations are incredibly complex and I've got no idea on how they look on camera but I'll have to see.

As is typical with these Mixamo animations they not only need to have the root motion removed but they also need the bind pose to be key framed. Just like I showed last time with this character the model needs to return to the bind pose so all of the models can be bound to the correct position. Otherwise all of the models will be misaligned.


Following the failure of the last test I'm going to be changing a few things with these animations. First is the lighting. This time all of the detail maps on the models have been removed and the lights are now a simple white. It's a very simple change but I believe this is why the previous test didn't look that good. Another little detail is the added blood on the jacket, it's a small detail but it helps to add that detail with out any detail maps. Finally for all of these animation I'll be animating the positioning of the coat by hand. Last time it was really stiff and didn't look right, this time I'm hoping that this makes for a better looking result.
Immediately I can tell that these look much better than they did last time. Despite the changes being really quick it helps quite a lot for this character.


The only issue with this animations is the number of frames that it gave me. In total there's 114 frames which is the most I've ever had to work with. Just putting together the sprite sheet took awhile. Correcting the sprite sheet took quite a while last time so the corrections will be happening tommorow.
Sprite Sheet Correcting For The Boss (12/05/25)
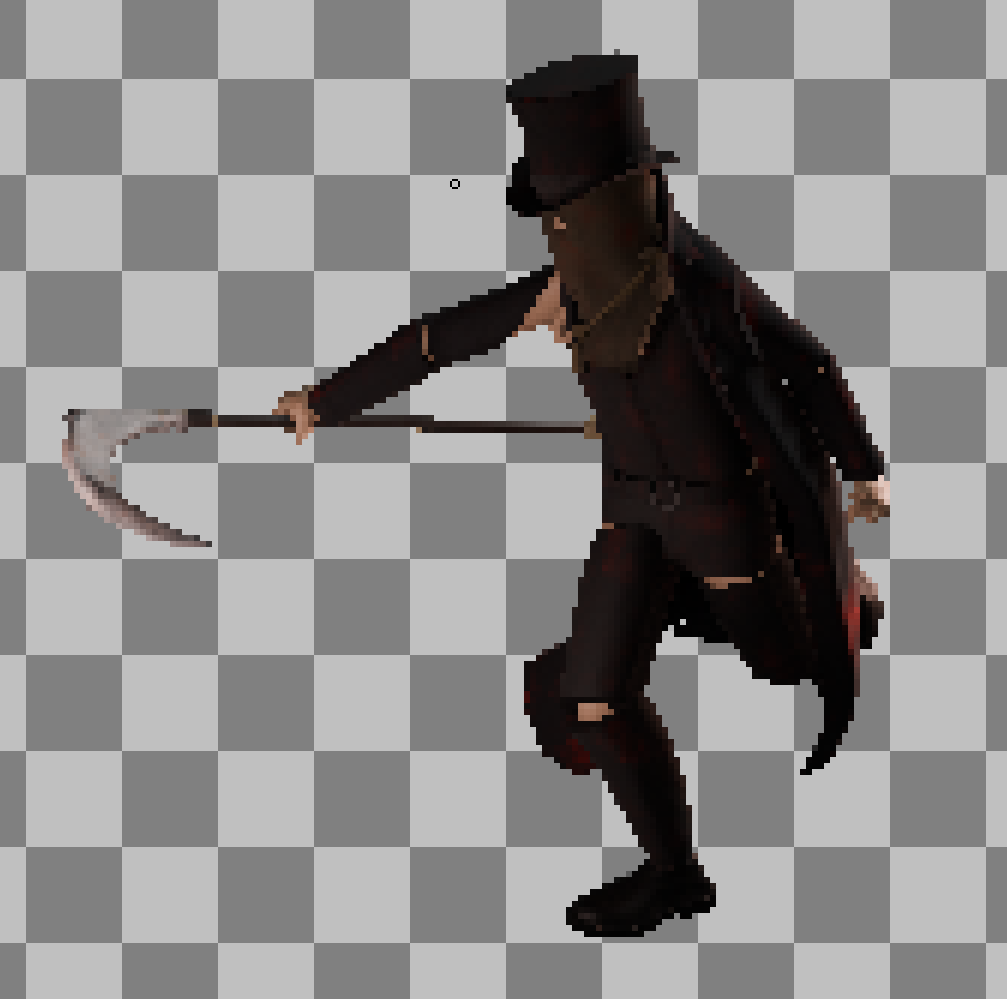


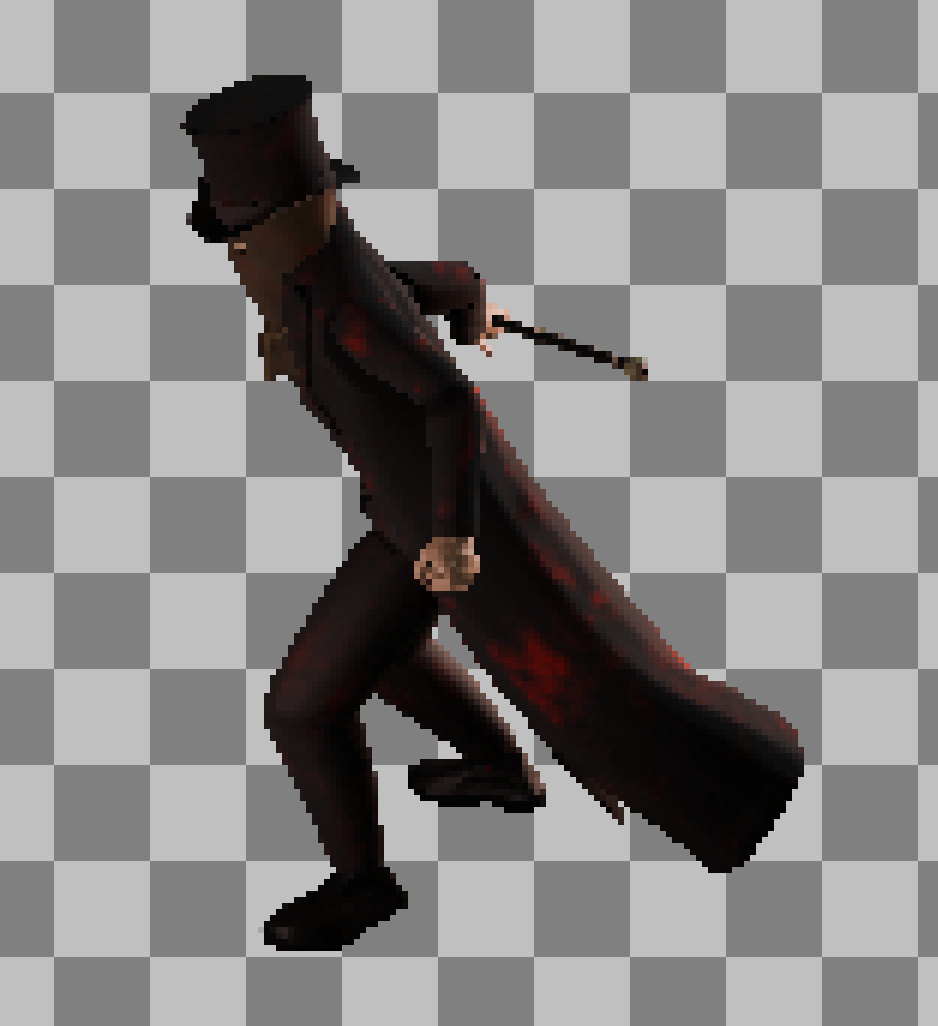
This round of correcting is either going to go really smoothly or is going to be a nightmare. There's over 100 frames to correct and I'm not even sure how bad later animations are. Some sprites are actually fine for the most part, only needing some corrections around the joints. But others are quite bad with some parts needing to be completely altered.


Despite my concerns with some of these frames the majority of them were actually good quality. Some were quite quick to get through which did save on time. Some of them however needed correcting quite a lot mainly with the mask clipping through the chest. Overall these should be really sprites ready for the boss fight, which will be the next thing I do.
Battle Mechanics - Boss Implementation (13/05/25)


Before the boss fight can be implemented there needs to be a way to actually trigger the fight. This is actually quite simple since the code is set up to support multiple enemy types. To start with the players collision needs to check for an enemy with the "EnterBossFight" tag. If the player hits one of these enemies then the enemy detection script will work like normal. In this case the enemy detector will look for an enemy with the "EnterBossFight" tag on it and add that to it's own array.


In the game manager it'll check each array in the enemy detection script just like it normally would. But in this case it won't spawn in any other enemy other than the boss fight. All other enemies will be ignored. This makes sure that it's just the boss fight the player has to worry about and nothing else. Additionally the code is also set to load in a specific battle scene depending on if the player is entering a boss fight or not. The plan is to have the boss fight take place in a cathedral so with this we can change the environment to the interior of the cathedral over the typical buildings.

For the purposes of testing I've set up a boss trigger on this cube. It acts just the same as the regular enemies just without the movement. This will also be removed later this is just for testing.
The good news is that the boss fight is loading in correctly. It's prioritising the boss fight over normal enemies and it's even loading in the correct environment. The only issue is that it can't do anything special. Right now it's just a basic enemy.

All enemies have a logic script on them that randomises all damage and sets max health when it's spawned. This makes sure that enemies are unique from each another since it's health and damage will be different. For the boss fight it's going to need a unique script to handle the damage. There three classes in this script that will be called in the game manager. This way the damage can be randomised each turn as opposed to on spawn. For a boss fight this is incredibly important since the fight could take a while for the player to get through. With that done I can put the code aside for now.

With the animations I'll be starting with the basic attack. It's a simple side slash with the slash VFX. To differentiate this slash from the players it's been turned red and admittable it looks pretty good in a blood red. The annoying part about this animation was animating the position of the boss. It really wanted to clip into the ground for no reason. So I needed to manually go frame by frame to correct the position.

For the second attack it was even worse. Not only did the position need animating, just like with the first attack, but also the scythe slash VFX needed to be fully animated also. There's three attacks with this so in total the VFX needed to be adjusted for each attack. I couldn't just leave it as is since it wouldn't make much sense for how the scythe was moving. Also the health bars position needed to be changed since some of the sprites were clipping through the bar. This was actually quite easy to correct since it only took a few key frames.

This last attack is a blood based attack were the boss spews out blood towards the player. The only unique thing about this animation is the VFX for the blood. For that I'm using a modified version of the damage VFX that has full velocity on Z Axis. This was blood is just shooting towards the player at a high velocity. And just like the other particle effects the emitter is set to looping and play in awake. It will then be set to inactive and then active in the animation.

With the animations done the priority is now to actually make this work. The code overall is basically just the standard enemies code with one extra element. At the start of the bosses turn it'll generate a random number, this will trigger one of two attacks that the boss can use. Either a basic attack or a charge. The charge will take up the bosses turn and it'll enable to boss to use one of two charge attacks the next turn.

The two attacks that the boss can use after charging is the rapid slash and the blood attack. And this'll randomly pick one of the two attacks.
For the most part it's working, minus a few things. First off is damage and health. It hasn't got enough health and it damages the player like a basic enemy. This is a very easy fix it'll just take some time to find a good balance. Secondly, the animation timing needs adjusting. After the enemy attacks it carries over to the player early. This isn't game breaking but it does look weird when the players shooting the boss while being sprayed with blood. Finally, the damage and death animations aren't playing at the correct time. The damage animation is far too delayed and is really distracting. And with the death animation it plays far too late. With there being a massive delay from actually dealing the killing blow to it dying. These shouldn't be too hard to correct, it should just be a case of changing where it's being played.
Scrum Meeting (14/05/25)


This past week has been quite busy. We've mainly been catching up since the little break we took over the easter. Overall we've been able to do a bit since last week. To start with Adam has made a stained glass window texture for the cathedral, Erica has been working on a concept for another window, Jac has been working on the cathedrals outer walls and for I've been working on the Boss fights logic. With this we've also discussed the deadline that we set ourselves. Originally it was set to the 19th which is the end of the project. However we also need time to actually do our writing work. So we've all agreed on moving the deadline to this Friday. That will give us an extra two days to complete our blogs.
Since the deadline has changed our tasks for the sprint have also changed. To start with the bones have been scrapped, they were only going to be used for set dressing anyways so they weren't important. Additionally Erica won't be making a stained glass window, instead she'll be moving onto the grave stones. Other than that Jac will be working on the cathedral interior, which will be used for the battle, and I'll be working on Audio along with final level building. One important thing to note is that Jac mentioned that the quality of the final interior may not be the best since he expected to have a few extra days for this. This is perfectly fine since we should have planned on this from the beginning, so this isn't his fault.
Final Round Of Bug Fixing (15/05/25)
The fights are way broken than I thought. After doing some play testing I discovered that the player can rapidly press either the attack or shoot button to no only deal a tone of damage to the boss, but also to enable to boss to get multiple attacks in the same turn. And I believe I know why this is happening.

Each attack, as well as the enemies turn, are done using coroutines. They need to be this way so I can add delays to each action. The downside however is that coroutines can be triggered multiple times at once. So when the player presses the attack button multiple times it'll trigger the shooting multiple times. As well the enemies turn is being triggered at the end of a players action which is why the boss can attack multiple times in the same turn. To fix this I've added a lock Boolean to both the attack and the shooting. This will stop the coroutines from triggering multiple times and in turn stopping the enemy from attack multiple times. The Boolean is enabled as soon as the coroutine starts and is disabled at the end of each action.

While I'm in the code I'm going to add a delay to the end of each boss attack. It'll wait a moment before actually carrying the turn over to the player. Each attack has a separate delay the basic attack has a 0.5 second delay while the blood attack has a 1.5 second delay.

As soon as I fix one problem another one shows up. Now the player can press two options at the same time. The gun specifically seems to have this problem the worst since the player can aim and guard at the same time.


To stop the player from pressing multiple buttons at once, there's a new Boolean that will enable it's self as soon as the player uses an input. It'll enable as soon as an input is used but then disabled as soon as the action is done. In the shooting for example it enable as soon as the input is used and then disabled after the player has aimed, meaning they can use an input again to actually shoot. It's not the most elegant fix but it should.

Moving onto the next problem, I'm correcting the damage and death animation on the boss. As it turns out all that needed to be done to fix the damage animation was to set it to be playable in any state. What this means is that the damage animation can play no matter what animation is currently playing. This gives a much nicer look since the damage animation needs to finish before it can play again. I've also done this for the player also. I'm hopeful that it looks fine but I'll see in a moment.

The death animation I'm doing something a bit different. Before the animation was being played in the boss fight logic script, which was fine for the most part. However triggering the death animation in an update function is much better since the damage class doesn't need to be called again to play the death animation. In addition to this I'm also activating a boss dead Boolean that'll trigger after the fight is complete. This will disable most of the code and show a end of demo screen.


Currently the end of demo screen isn't anything special. It's just a basic canvas that will fade in after the boss has been defeated, prompting the player to press start to restart the game. While I did try and simply reload the scene, this wouldn't work as the both the player and the battles wouldn't fully reset. I could have created a class that resets everything but at this stage of the project we've not got the time for that. So for now the application will close over restarting the game. It's not ideal but it means I can implement a proper restart later.
Everything seems to be working as intended now. Attacks are working as they should and all the animation is playing at the correct time. Now the only thing for me to do is some final level building, and this should be ready for submission.
Final Level Building (18/05/25)


To start completing the overall game I need to texture the grave stone models that Erica had sent over. Both of them are looking great and all they needed was a basic mossy stone material on them. For the second one I added some text onto it, I'm hoping that this isn't fully visible in game but instead I want it to be something that adds a little detail. If it is readable in game I can simply rotate the grave stone to hide it.

Secondly is the interior of the cathedral that Jac has completed. The overall model is looking great but the textures aren't looking looking to great in game. The texture are 4K but they're spanning across the whole model. There are several way of fixing this from simply using an 8k texture or by splitting the model into multiple texture sets. I think the fastest option is to split the model.


To get this done as fast as possible I split the model into three parts one of the original building without benches and then these two. One pillar and a bench. There taken directly from the original model just unwrapped a retextured. These are the main focal point so they need to be nice and clear.

Now to quickly piece everything together. I'm placing the benches in roughly the same spot as before and I'm using the new pillars to cover up the old ones. The model is the same it's just got a new texture. For the walls they're just plane objects with a wall texture on them. The exact same ones that I made for the Bloodreign project just with a more grey look.

The floor was also fairly low resolution. To fix this I'm using the same floor tile I've used for the entire project and importing it into Substance Painter. There's a tile material and I think it should look decent for a cathedral setting. Especially since it'll be covered in blood.

For the final detail I'm set dressing the cathedral using the crucifix and the coffin models that Jac made some time ago. They fit the overall theme perfectly and look great in the scene.


And with that the battle scene is done. I gave it a red tone since it made the entire place pop that little bit more. And since the boss fight is primarily black and red I think it fit in with the overall theme.

But I'm not quite done yet. There needs to be a way to actually trigger the boss fight. And for that Jac's second cathedral model will be used. It blends in really well with the rest of the buildings and with Erica's grave stone models it brings everything together. Also Adam's stained glass window also adds another detail to the scene. A great collaboration between all three of them.


Now to finish this off with the boss trigger. I using the exact same cube as before to trigger the boss fight except this time the mesh renderer will be disabled to there isn't a white block in the door way. But with that done and the entire scene lit, It's looking fantastic. It might actually be my favourite part of the game.
I gave the game a quick play through and I'm confident that this will be the final version of the demo. For now at least. I will return to this after submission, in what capacity I'm not sure but I defiantly will before the end of year expo.
Final Major Project Post Mortem (19/05/25)
This project may one of the best things I've worked on throughout this course. Not only have I been able to push my personal technical capabilities but everyone else in the team have pushed themselves to make this the best it can be. I'll start off this post mortem by reflecting on my aspect of the project with the technical side of the project, followed by the production management and pre production after.
Game Mechanics


The original idea for the combat was meant to be combat similar to Octopath Traveler (Square Enix, 2018) but ultimately this changed during development. The plan was to incorporate basic mechanics and then add our own spin to it. But instead we took the original game play idea and changed it to something more akin to Persona 5 (Atlus, 2016). Personally I don't think this is a bad thing. The controls work really well and it feels nice and smooth to play. But one thing that made this a bit more unique from most turn based games was the enemies in the overworld. Instead of random encounters or a generic enemy the player will enter a battle with the enemies they hit into. If the player want's to fight a head spider they've just got to run into one. Other games like Persona 5 (Atlus, 2016) have done something similar for quite some time now. But with that the player is always hitting into a generic shadow and then it's a random encounter. It works well in that game but with ours we felt that not having random encounters would be the better move.
In total the player has a total of four actions that they can perform. Either they can attack, aim, guard or attempt to run. The attack damages all enemies currently in battle while the gun can only damage one or two enemies depending on ammo. The attack also is restricted on stamina so it can't be used all the time, and in addition the damage output isn't as good as the gun. This gives the player a reason to use one over the other as well as creating a situation where the player is forced to use the other attack. Guarding is also an interesting mechanic. The player will either take half damage or just a little less than normal. Guarding helps the player in a situation where they've got no other option or during the boss fight. Running is also completely randomised, there's a 25% chance of running from a battle. In most cases the player fails and gets punished by the enemies.How Was The Chosen Art Style Executed


The chosen art style is a unique blend between Bloodborne (Sony Interactive Entertainment, 2015) and Enigma of Fear (Dumativa, 2024). Bloodborne (Sony Interactive Entertainment, 2015) is for the gothic Victorian style and Enigma of Fear (Dumativa, 2024) is primarily for the sprite lighting as well as the integration of sprints in a 3D world. The reason for blending these two styles together is to create a unique dark world pleasing to both old and new fans of the turn based genre.


In terms of how well the art style was executed I feel like we did a really good job at it. It maintains that Victorian style while also blending the pixel art with the models well. Part of what really brought the style together was the lighting. In previous projects the lighting was always a problem. Either to bright or too dark. In this case I think we've got a good balance. While the scene it's self is bright it's been darkened with the vignette which helps the scene get that night look. Because of this the player can actually see without much difficulty. The normal map lighting on the sprites also helps a lot to merge the sprites with the environment. With the lighting interacting with the sprites it makes them feel like they're actually in that world like they're meant to be there. My previous attempts on this style didn't use normal maps it just used a shader. This project is using normal maps along side of that shader, to get the best result.
Technical Analysis


From a technical perspective this game was interesting to say the least. Starting with the code it's some of the most complex code I think I've ever wrote. For the battle manager that was over 1500 lines of code to get that working. And that doesn't include the enemy detector script either. On top of that the use of several arrays and for loops also added to the overall complexity of the entire project. A typical turn based game like Pokémon (Nintendo, 1996) would normally be incredibly easy to code. Since there's only one enemy to worry about. This was far more complex since there's can be five enemies at once. I needed to account for every enemy situation from different types to quantity of those types. Everything needed to be accounted for. And I feel like I was able to deliver on those mechanics.
But along side of the code was the performance. On PC the game runs incredibly well. On my computer at least it run quite well at a locked 60 FPS with no stuttering. My computer didn't even realise that a game was playing so it staying in an idle state and it was still able to play the game well. On top of that the GPU/CPU usage was really good along with the frame pacing being perfect, with no stuttering. The Steam Deck on the other hand has some issues. I ran another test for this game and it's struggling a little bit and I believe that this issue is caused by the RAM usage. For some reason the game is only using 6GB of the 16 the Steam Deck has. At first I thought this was a VRAM issue since the Steam Deck only reserves 1GB for it but even after increasing the limit the usage stayed exactly the same. The only fix for this that I can come up with is to use level of detail to try and decrease the VRAM usage and that may fix the issue. I can look into this later before the showcase.
Production Management
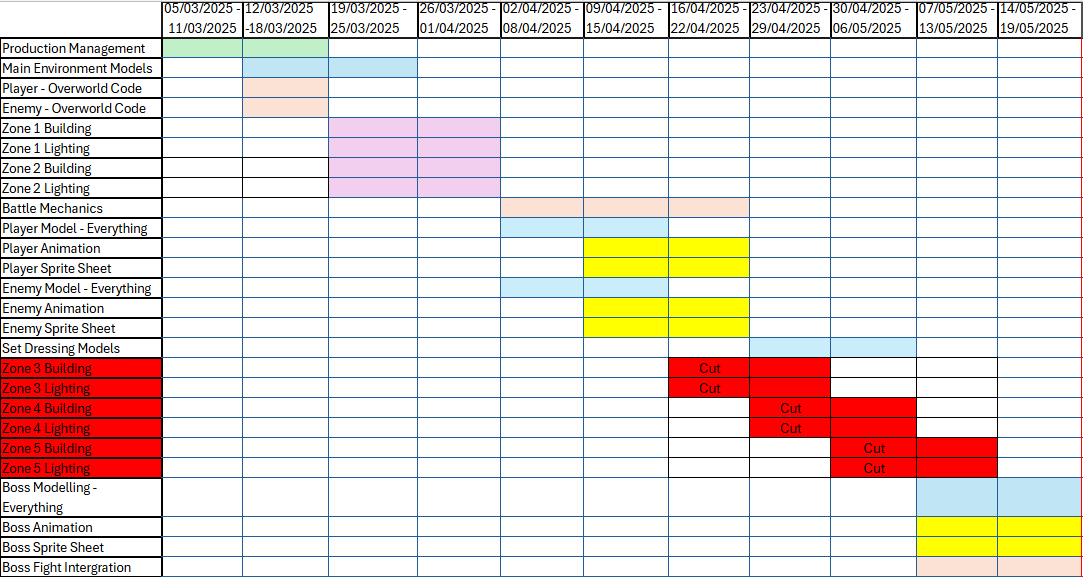

Production management has been one of our main focuses for this entire project. It's kept us on track on what needed to be done and when it needed to be done for. The Trello specifically helped a tone since I had a clear indication on what I've got to do next. On top of that it also let everyone else keep track on what was being completed. For me this was helpful when I was waiting on a model from Jac, I was able to see where he was at with a model. It can also be noted that in my section there's still a full list of tasks. This isn't because I've done nothing but instead it's me constantly creating new cards for bugs for an additions. I probably should have put these in a different section but didn't become a hindrance during production so it wasn't a bid deal. I'll have to keep this in mind for future projects to place these in there own section.
The production schedule was also quite useful. Despite most of it not being used over the past few week it's still been a crucial piece of production management. Most of our sprints had used this schedule to determine what we needed to do over the two weeks. The only time that we started to ignore the schedule was during the easter holidays, in which case most of use were taking a break. And this is reflected on the burn down with there being a dip on week 8. This wasn't a problem however since we were mostly able to hit the project task goal. We're only three tasks away from meeting the goal so I feel like that's a positive.
How The Pre Production Was Used In The Development Of The Game


The pre production from the last project has acted as a foundation for this entire project, which it should have been. From the pre production everything was set in place, the art style, game mechanics and even the map layout. For the battles specifically It's heavily based off of the render that I did in the pre production. The same overall design and layout has been kept the same since it works out nicely. Even the positioning of the enemies is roughly the same as was originally planned. It's looks great and works out really well for a turn based game. For the art style and the mechanics I've already went over them. But both of them have mostly remained what we planned out, minus the mechanics which have shifted as the project has progressed.


For the overall map layout it's changed a little bit from the original concept. To start with Zone three to five were completely cut to save on time. Ultimately this was a good decision since we barely had the time for two zones along with a boss fight. However the first zone has maintained the same layout from when the project first started, the only difference is the new houses that Jac made. But one big difference is the second zone. The layout of that zone did change quite a bit and for the better. When I first blocked out this zone it felt really boring to run through since it just felt stale. There were too many straight paths and it didn't play well. In the new layout not only has the zone be shortened but it's also got more deviating paths that make the overall space feel better to play. And in testing with a few of my friends it seems to be a much better section of the game to play through.
Final Outcome

I think project shows a significant level of improvement of everyone on the team. This project gave us the chance to fully show what we are capable of doing and this has definitly showcased our skills. On a personal level comparing this project to one of my older project, like Portal 3, seems a little unfair. This is so much better than anything prior and I've been able to show my skills in code by creating a full turn based battle system. I can say with confidence that this is the best project I've worked on over the course of this FDA. All of the mechanics just work and it feels great to play.
Conclusion
A few months back in the pre production part of this project I set my self a goal. That goal was that I wanted to make a high quality demo that not only looked good but worked well. All of my past projects always had something wrong with them. My Portal 3 Project was really rough, it was not a mess with the code but it also didn't look great. And with my project from last year, Bloodreign, that looked decent but was full of bugs and it had some major performance issues.
But keeping that in mind, I can safely say that this project is defiantly way better than both of those projects. Not only is it performing really well but it also isn't full of bugs. There isn't any game breaking bugs and the performance isn't setting a computer on fire. And even outside of that the gameplay feels really nice. Looking back at both Portal 3 and Bloodreign both of those felt fine to play. They had some really stiff controls that made everything feel far more restrictive than they should be. This project feels really good to play. It's responsive and doesn't feel stiff. So yes I'm confident in saying that my goal for this project has been met even going beyond what I thought would be possible for this project.
To finish off this project I need to say thank you to Adam, Erica and Jac for being an incredible team. Along with Dylan and Louis for the piece of music they made. This game wouldn't be this high quality without any of these people.
Bibliography
3dbrooklyn (2017) Noose - Vikings 3D Prophecy - Episode 11 [Online Asset] Available at: https://sketchfab.com/3d-models/noose-vikings-3d-prophecy-episode-11-9566d377bc4f479b921892c1b1efc708 (Accessed: 23/03/25)
Alcore Rain (2016) Victorian Revolver "Skytear" [Online Asset] Available at: https://sketchfab.com/3d-models/victorian-revolver-skytear-free-lowpoly-c1340d6fc32842898a3c0bf3061cf043 (Accessed: 06/05/25)
CommunicationNode (2020) Crying Head 2 [Online Asset] Available at: https://sketchfab.com/3d-models/crying-head-2-2867ed3cd41243caaf9dd24eeccf6ca5 (Accessed: 16/04/25)
Dieter Steffmann (2007) Angelican Text Font [Online Asset] Available at: https://www.fontspace.com/anglicantext-font-f1963 (Accessed: 17/04/25)
DJMaesen (2020) Syringe [Online Asset] Available at: https://sketchfab.com/3d-models/syringe-cdcc401bf48d42e3895965d52eb2f3d8 (Accessed: 17/04/25)
DM-913 (2022) Lesser Cyclops Variant Rig [Online Asset] Available at: https://sketchfab.com/3d-models/lesser-cyclops-variant-rig-40d31731af1b46b59addd81ed5750db0 (Accessed: 22/04/25)
Dumativa, Cellbit (2024) Enigma of Fear [Video Game] Dumativa, Nuuvem IncFilip (2020) Top Hat [Online Asset] Available at: https://sketchfab.com/3d-models/top-hat-acc9845b7c48479c9b23d93d3643612f (Accessed: 23/03/25)
FromSoftware Inc (2015) Bloodborne [Video Game] Sony Interactive Entertainment
Gabriel Aguiar Prod (2024) Free Quick Effects Vol. 1 [Online Asset] Available at: https://assetstore.unity.com/packages/vfx/particles/free-quick-effects-vol-1-304424#content (Accessed: 10/05/25)
Game Freak (1996) Pokémon [Video Game] Nintendoid Software (2016) Doom [Video Game] Bethesda Softworks
Max Mraz (2020) YarmTown [Video Game] Max Mraz, Available at: https://maxatrillionator.itch.io/yarntown
PlatinumGames (2017) NieR: Automata [Video Game] Square Enix
P-Studio (2016) Persona 5 [Video Game] Atlus
Rob Tuytel (2021) Cobblestone Floor 001 [Online Asset] Available at: https://polyhaven.com/a/cobblestone_floor_001 (Accessed: 30/03/25)
Roy's Effect (2020) How to make a Procedural Chain in Maya | MASH | Roy Creations [Online] Available at: https://www.youtube.com/watch?v=TOzI5xzgcac (Accessed: 13/03/25)
shimtimultimedia (2021) Horror Mask Scarecrow [Online Asset] Available at: https://sketchfab.com/3d-models/horror-mask-scarecrow-01d803a1bf5849b99b1888148e4022de (Accessed: 23/03/25)
Square Enix, Acquire (2018) Octopath Traveler [Video Game] Square Enix
Queen Rose (2019) Victorian Vampire [Online Asset] Available at: https://sketchfab.com/3d-models/victorian-vampire-668e21f076f047f7a1f21b18691f16ba (Accessed: 23/03/25)
Vladimir Nikolic (2024) Oseberg Font [Online Asset] Available at: https://www.fontspace.com/oseberg-font-f109029 (Accessed: 17/04/25)