Indie Game Development (Snakientist Development)
Compared to the other projects from this course, this one is a bit different. Instead of being individual projects, it's now more team focused with us working together on one project. For myself, I've been teamed up with Jac, Alex and Adam. Before we came up with a team idea, we did some random idea generation. We each got a individual animal and job for us to come up with a game for. I got a hacker crab and the best I could come up with was a WarioWare (Nintendo, 2003) style of game, where the player needs to complete minigames to hack into the system. After we each got our own ideas, we attempted to combine all of our ideas into one. This didn't really work out as well as we hoped. We ended up using Jac's idea as a basis and adding in our ideas into that game. Jac's idea was to make a Octodad (Young Horses, 2010) style of game were the player controls a snake scientist, trying to obtain components to make a potion. Of course crazy physics and controls make it much harder to complete the level. Overall this is a really solid idea and with a few additional ideas from myself, Adam and Alex we should have a good concept.
Before we do anything, in terms of development, we need to break down what we are best at. As I think I showed in my Bloodreign project. I'm defiantly best at game design and programming. I can do other things like 3D modelling but it isn't my strong point. For Jac, he's going to be doing 3D modelling and also rigging. He seems confident in these areas. Alex is also going to be doing some 3D modelling but also the animation. It's going to be great having two 3D modellers to split the work load a little bit. And finally Adam is going to be our concept artist, he's going to take any ideas and make a physical representation of it. It's going to not only help me on a game design perspective but also help out Jac and Alex with the style. Adam's also going to be doing other miscellaneous tasks like 3D modelling or even texturing if he has the time spare. With software this was quite easy. Unity (2022.3.46f1) is our preferred engine, it's what we are all best at and it's also the only engine we all know. Pairing with Unity is Visual Studio, C# it's the only programming language I know so this is a necessity. On the modelling side of the project Jac and Alex's preferred 3D modelling software is Maya. While for Adam he prefers Blender. This doesn't really matter as the two are really good and can both achieve the same end result it's just a matter of preference. If I end up doing a little bit of modelling it'll be in Blender. I've been using it a little bit and I like it over Maya. And if I need any help with it I can always ask Adam. Finally we'll be using substance painter for texturing. It's a really good tool and it can give some really good looking models easily.

With production management we aren't doing anything we haven't done before. First off we have a Trello board. It's got a backlog of tasks that need doing, a section that shows what each of us are currently working on and a section for finished tasks. Nothing too crazy. We're also going to be having weekly meetings. To discus what we're going to be doing over the next week. We are only in college once a week so this is a good chance to meet (in person) and talk about were we are at. Through out the week if there's any issues we have a teams chat were we can ask for any assistance or for someone's thoughts on something.
And that's about it for now. It's still really early in the project so we're just going to come up with some ideas going into next week. The Trello board does have some tasks on it, but we're not going to focus on that just yet.
Failed Snake Prototype (16/09/24)
Before I start I need to say that everything I'm about to show was done completely on my own without any guidance from any video or article. This is important since the quality of this is really bad because I had no idea on how to do this.

The way I thought a 3D snake could be done is by controlling each part of the snake using it's rig. That way each part of the snake could blend with the other. For testing purposes I'm just going to use a cylinder with a very basic rig just for testing.

The code is going to be the hard part. To reiterate I have no idea on how to do this so I had to come up with something on my own. Ultimately I came up with something like this. The head is going be be what the player controls with the rest of the snake gradually moving closer to the head. I thought this would work just fine, but as you'll see it didn't quite work out like that.
As you can see this was a complete disaster. The snake moves but doesn't like to stop and on top of that each part of the snake takes for ever to actually move. And mixed with the collider and Rigidbody on each part the snake gradually stretches out when the other parts aren't moving. The worst part is that I have no idea on how to fix it. I've never done anything like this before so I don't even know if this is the correct way of making a 3D snake or not. The problem I'm running into is the 3D perspective, it's really hard to actually make something usable in 3D. But I think a 2D snake should work just fine and will be much easier to make. I'll ask the team during our weekly meeting, but the snake prototype is going to have to go on hold until then.
This is our first team meeting of the project and we seem to be progressing fairly smoothly. We have come up with a few additional ideas since last week. First off is with the change in camera perspective. I asked everyone in the team if they liked the idea or not and they all said yes. So this means that from now on the entire game is going to be in a top down perspective similar to games like Ape Out (Devolver Digital, 2019) and Hotline Miami (Devolver Digital, 2012). Everything else is going to be exactly the same except it's going to be much easier to develop.
Outside of that we also discussed about what each of us is going to be doing over the next week. For me I'm going to make an actually functional snake and other prototypes if I have the time. Adam is going to be working on some map concept and other miscellaneous concepts. Jac is going to be working on some models for the environment and finally Alex is going to assist Adam with some UI concepts, as well as making a low poly snake model.
This has been a week of struggle for most of us. Adam was having a technical issue with his drawing monitor, I've been too caught up writing the Bizdev blog and Alex has been having a personal issue. The only one of us that hasn't been having issues is Jac who made some really nice models for the environment. So we're a little behind. Thankfully these issues have been recently resolved so it shouldn't be an issue again. For me I just really need to improve my time management, I'll make a timetable for my self to try and remedy this issue.
Thankfully with these issues fixed we should be able to get some work done over the next week. For Adam he's going to be working on some map concepts along with some other miscellaneous concepts. I'll be working on another snake prototype that (hopefully) will work this time. Jac's going to be working on more environment models and Alex is going to be working on some snake concepts along with the low poly snake model. This shouldn't be to much of a stressful week be we'll have to see.

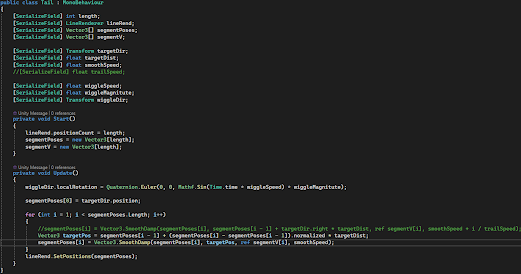
This is the basis for the entire snake. All it's going to do is continually create markers that contain both position and rotation data for each part of the snake. That marker will then be used by the next part of the snake so it knows where to go.

The next part is to spawn in each part of the snake and also add movement to it. For now I'm just going to this with the head just to get a basis. All I'm going here is Instantiating the first part of the snake, then adding a Rigidbody2D and the marker manager script if that part doesn't already have one. And finally I've added a simple line of code to simply move the head to the right.

Giving everything a quick test, it seems to be working. The head part was spawned and it also has all of the necessary components.

Now everything may seem far too complicated but it's not that bad. Essentially the new function CreateBodyParts will iterate through the list and spawn each part in the correct order. Starting with part 0 and ending at part 9 (this can be bigger if I want it too). It's going to do exactly what it did before with the head piece except this time there's a slight delay between each part spawning. In addition to that there's also some code for rotating the head of the snake. In theory the head is the only part that needs to move also the rest should follow.

Giving it another quick test reveals an issue. The other body parts aren't moving. And that makes sense since there's no code to actually move each piece. So onto that now.

Adding this in is actually quite easy. In the SnakeMovement function there a for loop that will iterate through each part and get the position and rotation data from each of the marker manager scripts. Then it's going to apply that data to the next body part. This should make a chain of parts that move in sequence.
And it all works fine. The snake can move and the other parts follow without an issue. There is one thing I need to do though and that's to make the movement controllable by the player.

Using the new input system, I have two vectors. One for forward movement and another for side movement. This makes it so all I have to do is read the value of the vector and do something based on the result. So for the front movement I'm checking the Y axis on the Forward vector, to see if it's not 0. If it isn't the snake can move. And if the front vector equals anything else the movement of the snake is set to 0 so it's idle. The side movement is also the same except this time it's using the turn vector on the X axis.

Now with that done, there needs to be a way to have the camera move with the player. What this is doing is checking for a player game object and setting the camera position to where the player is. It's able to find that by using tags, the player has the player tag on it so all I have to do is look for any object with that and have the camera follow it. This had to be done on a slight delay since the players head isn't spawned immediately. So for now there's a one second delay on the camera before it can move.
Now not only can the player move on their own but the camera also follows them around with a little bit of a delay. It works quite well but there a few issues with it that'll need addressing. First off is it's interactions with physics. It can push boxes around just fine but the snake it's self can't actually be moved by physics, which is something we wanted for the game. Second is that the snake becomes all grouped together when the player stops moving. I think I can correct this in code, but it's not going to be easy.
Thankfully this last week wasn't a complete disaster. We've been able to get some map concepts done, we finally have a snake prototype that actually works. What this means is that we finally have a basis for our game, it's not perfect but this is something we can work with. I said last week that we were falling behind a little bit but we technically weren't. A production schedule wasn't even made so there was nothing to say that we were off schedule. So we fixed that.

With this we actually have something to say were on schedule. Right now we're still in the first week which means that the tasks we've been working on the past week or two, we still have a little longer to work on them. This is mainly to account for some delays that we had.

Along side of the schedule we still have our Trello board that's being put to good use. We still have quite a big back log but of course we would, we're still very early in development. This has actually become really useful since we can manage tasks, appoint tasks to everyone and also to see what everyone is currently working on. I can see that Alex is working on some snake concepts and some UI concepts for example.

Finally we've all made a timetable for ourselves. We've agreed to a minimum of 24 hours a week to project work. That doesn't necessarily mean 24 hours dedicated to making things for the project more so 24 hours for everything, including blog work. For me I've planned on working around 20 hours on the project with the rest of my time targeting the blog work. It's mainly Monday and Friday we're I'll be working on the project directly, with a few hours on Tuesday and Saturday. I've also given myself Sunday off and an hour break from home work each day. This is to stop me from burning myself out, like I've been doing for the past few years. I don't want to repeat my bad time management from the Bloodreign project.
Now onto what each of us is going to do over the next week. Starting with Adam he's going to be creating a map for a basement level we thought of along with a blood texture for the floor. Alex is going to be working on the snake model we came up with a way to quickly make a model and turn it into something usable so it shouldn't take too long. Jac's going to be working on some additional surgical equipment and an autopsy table model, his last one's turned out really well so these should also be great. And finally I'm going to be working on another snake prototype that should work a bit better and I'm also going to be doing a lighting test to see roughly what we want for the lighting. Hopefully with the production schedule and our timetables development should go a bit more smoothly.

I'm going to start off with a bit of an explanation. I'm going to be making a new snake prototype and I needed some sprite to actually make it. So I'm going to be using this really rough model from Alex and make it into some usable snake sprites. And the plan for this new snake prototype is very similar to the last one we're the head drives the movement while the tail simply follows. Which is exactly why I'll need to render each part of the snake separately. To actually render the models I'm going to be using Blender, In a very similar way to when I made pixel art for the Bloodreign project. I'm not going to be making pixel art with this, instead I want to keep this fairly high resolution to preserve the detail. I can always make this into pixel art later when I'm in engine.


Right now the sprites don't look great. They'll probably look fine for pixel art but we aren't sure if we're going to be using pixel art yet. So I'm going to edit these in photoshop to make it look more snake like.


Inside of photoshop I did two things. First off I cropped out most of the empty space and I also used the liquify filter to distort the sprites. I'm hoping to make the sprites look more snake like instead of solid models. Originally I was going to use the smudge tool for this but as the name suggests it blurs the image, making it look really weird and not very pleasing to look at. I also used the liquify filter on the head sprite and it probably made the biggest difference. It actually looks like a snakes head now.


And with that I have some usable snake sprites. I wasn't really sure if this would work or not but it actually worked out quite well. Next I'll be using these sprite to make a second (working) snake prototype, that should function a bit better than the last one.
The last snake prototype had some issues. The colliders were a bit weird and it bundled up if the player stopped moving. And trying to fix that was just breaking it even more so the best option I've got is to simply start again. I found this video in my YouTube recommended a couple of days ago and I think that it might actually work a bit better than the last one. It should work just fine with a few adjustments mainly with the movement since this video isn't actually for that. This is exclusively for the tail movement so that it trails behind the head. So step one is to make some movement.

This is actually me simply reusing the movement from the old snake prototype. It works exactly the same as it did before it just looks more simplified than before. I'm getting access to the Rigidbody2D on the head and simply adds velocity depending on the value of the movement vectors. And that's pretty much it.

So the snake is moving well enough but now it needs a tail. And to start working on that I'm going to need a line renderer component.

The benefit of using a line render is that the snakes tail is going to be all in one piece, as opposed the the previous snake where it had around 20 different pieces. This also means that it's much easier to create the movement of the snake. Since all I'll have to do is control the different points of the line renderer in code, instead of obtaining data from multiple scripts.

And this proves just how much easier this method is. Now I don't have to worry about multiple scripts or spawning multiple game objects, now all I've got to do it simply make each point of the line render move in the same position as the previous point. It sounds really complicated but it really isn't. It's very similar the movement of the last snake except everything is in one simple piece of code.

For the most part this looks and plays quite well, with a few issues. First off is the red tail, all it needs is a new material so this isn't a problem. Second is the fact that it squishes together when the player stops moving. This is actually a really simple problem to solve it's just going to take a little bit of work.
It actually turns out that the only thing that needed changing was one line of code. It works exactly the same as last time just with some smoother movement. This one is using a Vector3.SmoothDamp function that will move each point of the snake smoothly to the previous point. This should give some much better looking movement.

In addition to the movement issue I've also applied the snake tail sprite to the line renderer. Now it actually looks like a proper snake and it moves like one also. However one thing that I completely forgot about is that the tail won't have any collision. I think I have a solution for this that shouldn't take too long.
I can't simply add a collider to a line renderer and expect it to work. So I'm going to have to create several empty game objects that follow each part of the snake and giving each them a box collider. That way I can create some colliders with out attempting to apply that to a renderer. It's also relatively easy to do also with the movement being handled by one line of code. I'm creating a transform array for each collider and applying the transform data of the line renderer to each of them. The only thing I need to keep in mind is that I need the exact amount of colliders as the length. In my case the snakes length is 50 so I need 50 individual colliders.

I also need a separate script for the rotation of each collider. It simply takes the current rotation of a target object and applies that to the attach object, with a bit of a delay.

One problem that the rotation script brings is that each script needs a reference to another object for it to work. I could simply do this in the inspector, but that means giving 50 different objects a reference to a different object. And don't have the patience for that. So instead I'm going to iterate through each collider object and give it a reference the the previous part of the snake. The only one that this won't work on is the first collider that'll need a reference to the head, but other than that this should give 49 objects a reference.

While everything looks like it's working fine it really isn't. To start the colliders aren't actually working as colliders. My theory on why this isn't working is that each object is moving based on where a non colliding object is going, but I'm not to sure on that since the boxes aren't even reacting to them. I think that if the colliders were the moving object and tail moved based on were the colliders are, that might fix this issue. I'll have to see about this a bit later on but for now it's mostly working.

After trying to come up with a solution for the collider issue I ended up thinking of merging the two different snake prototypes into one. That way I get something that should move and look good, while also being affected by physics and colliders. What this also means is that the code is incredibly simple. It's basically combining the movement code along with some slightly changed code for the snake tail. For the most part the tail code is the same except I've removed everything to do with the line renderer.

And this is where the first snake comes in. I'm reusing the snake parts from that snake, they've all got a Rigidbody and they've all got a collider. The only thing I need to do is add them to the body parts list and give each part the rotation script. I'm hoping that this works very similarly to the previous snake except this time each part has a collider.
To my surprise it actually all works. The snake is working just fine it just doesn't look very good visually. It's obviously tiled and on top of that the tail looks awful. I attempted to make a sprite for the snake that I could reuse for each part but it didn't work, so I'll have to use Photoshop to correct it.


To correct the issue I rounded the edges of the snake sprites, by using the liquify filter. The hope is that this stops the tiling from being to obvious. The tail is one part that will need to be done again at a later date but for now this will work well for the purposes of testing.
Surprisingly this actually worked and looks good. With the rotation it makes for a really constant snake and it also creates the illusion of the snake being 3D when it really isn't. In addition to that I've also lowered the resolution to 640 by 360 which give a really nice looking pixel effect. So with the snake finally done I can start and work on the level block outs along with some lighting, which I've already started as you can see in the video.


First thing that needed adding was some post processing. These aren't final and will most likely be changed out later when some finished assets are added in. For now there's bloom, a vignette, shadow adjustments, tone mapping and also some colour adjustment. The main things that were changed was the colour adjustments, with the contrast and the saturation being increased. But other than that I made some minor adjustments to everything else.

The next thing is enabling the player to pick up objects and move them about. This is one thing that'll bring the chaos element to the overall game. For the code I simply reused the same pick up script from my Portal 3 Project a while back. It worked really well and I think it should work well here also. A few needed changing however, with all of the 3D components needing to be changed to work in 2D space. The Rigidbody needed to be changed to a Rigidbody2D for example.

For this to work the script needs an empty game object. This is so the object has something to attach it's self to, and it also acts as a position for the picked up item to stay at.


To solve this issue I'm going to make it so the box collider on the picked up object ignores the snakes collider. This way the box can move through the player and still interact with other objects around it. There's also another excludeLayers function that will reset the collider when the item is dropped, so the player can hit and interact with it again.
The player can pick up and interact with objects, just with one small issue, mainly with the bed component. The issue is that sometimes the bed object can get stuck behind the players head which increases it's movement speed. Thankfully this is an easy fix since the players head isn't on the snake layer. With it being on the snake layer this would fix the issue. Outside of that this is working really well and I'll start on implementing some new lighting and potentially some doors for the player to open.
This past week has been quite busy to say the least. For me I've been able to make a fully functional snake prototype after quite a lot of trial and error. On top of that I've also been able to make a level block out that could potentially work as a full level with a little modification. On top of that we've had some concepts from Adam, models from Jac and even some voice line suggestions from Alex.

In terms of the production schedule we're completely on track, and we've eve had the time to start working on tasks that weren't meant to be started on till the 21st. This isn't a bad thing since we were able to complete everything for this week anyways, we're just a little ahead.
Over the next week Adam will be working on some UI drafts consisting of a health bar, items and a subtitles box. Jac will be working on an Autopsy table, surgical tools and computer models. Alex will be working scripting for the voice lines. And I'll be working on some doors, switches and some draws. One thing that we've all planned is for some voice recording next week using one of the colleges recoding rooms. We have no idea on how this is going to go but I guess we'll see.
Comparing Our Snake To Slither.io (10/10/24)

Finding reference on a 2D top down snake is incredibly difficult. It took a lot of research to even find something close to what I was after. But in doing some further research after the snake was finished, there is one game that closely resembles our snake. That game is Slither.io (LowTech Studios, 2016) a game that I completely forgot excised. The snake in this game looks as if it works similarly to ours. It looks as if it's in multiple circles with the pattern and shifting colour. My guess is that it's done this way to make adding to the snake easier, it just needs more circles adding to the end to increase the length.

Where our snake differs from Slither.io (LowTech Studios, 2016) is mainly with the movement of our snake. Slither.io (LowTech Studios, 2016) perpetual movement which means that the snake doesn't stop, it's constantly moving forward. It also has a very primitive look with it being exclusively made out of circles. Finally it can't interact with physics the whole point of the game is that you can't hit into anything. Our game on the other hand is the opposite of these. Our snake can stop when the player wants too, it also has a stylised look that is similar to a real snake. And finally our snake has a pick out feature where the player can pick up and drop objects.
So while the two snakes are comparable on how the snake movement was achieved, or two also have many differences that make our snake stand out that little bit more.

Starting off with a door that the player can push open, It's going to be much easier to make and it can be used as a basis for another door. There's two pieces to this door, the main parent object is the white handle with the main door being a child object to the handle. This is mainly so the door can move in a locked position. The handle also manages the physics with a Rigidbody2D.

On the handles Rigidbody2D Freeze Position on the Y axis needed to be frozen and the rotation also needed frozen. I also set the collision detection to continuous to stop any weird interactions with the player. Even when the player had continuous collision detection it was still happening so it could be an issue with the player movement.

Finally for this to work the colliders need to be adjusted. An object with a collider can't be pushed into another object with a collider that's not how they work. So for the door to work the doors collider needs to ignore any collisions from the wall layer. With each wall object having the wall layer the door can simply ignore any collisions on that layer. The handle however needs to still interact with this collider. This is mainly to stop the door from permanently being stuck.

And that all works just fine. It doesn't look the greatest but that can be changed later. Now onto the more complicated door.

For this door it's going to be opened when an object is over the button. Kind of like the weighted buttons from the Portal (Valve Corporation, 2007) games. The easiest way of doing this is with animation, so to start the door needed to be animated opening and closing. It's really simple and with it just moving to the left and back.

In terms of code it's a little more complicated. The door will shoot a Raycast2D directly in front of it, when it detects an object with the box (or player) tag it'll start the animation for opening the door. This is done on a Boolean so the door will stay open till the Boolean is false. It's not incredibly complicated but Raycasts aren't the easiest to work with at times.
It's working quite well just not looking the best. The animations fine just with it being a white rectangle it doesn't look the greatest. On top of that the button doesn't look like a button so that'll need fixing.
Team Update And First Recording Session (16/10/24)

Over the past week we might not have done a whole lot but we're still a head of schedule. This was intended to be a slower week anyways so it's not a problem. Next week is the half term and we've decided that we'll set our self some tasks to get done over the next two weeks.
For Adam he's going to be working on them UI elements I mentioned last week and he's also going to work on a blood texture for the environment. Jac plans on working on miscellaneous surgical tools and a computer model. For Alex he'll be doing more scripting (this'll make more sense later on) and some miscellaneous concepts to help Adam out. For me I plan on prototyping some more puzzle components and building some additional levels from Adam's concepts. These feel like good goals to set for over the two weeks and we'll probably have extra time to finish some other tasks as well.

At first everything was going really well with the recording. We had a couple of interruptions but for the most part we we're able to record most of the lines that we wanted. I was even listening to them from my headphones and the audio files sounded great. Fast forward a couple of hours (when we had finished recording) and it turns out that the audio is completely unusable the volume is far too low and you can barely hear the voice lines at max volume. We had no idea what caused this issue, the equipment was great and everything seemed to be working correctly. What we think the issue was, is with my headphones. I plugged them directly into the Mac Mini we're we were recording the audio. And since my headphones had a microphone on them all of the audio was recording from that. So we've wasted around 3 hours on recording that didn't do anything. We'll be doing this again after the half term and this time I'll not plug my headphone directly into the Mac.
Player Health And Damage (28/10/24)


The main part of a health and damage system is the code and it's just as simple as decreasing a number. The player has a health script with a health value of 1000 and when that value hits 0 the player dies and receives a game over. For now it's set to just add a "Player Dead" log to the console for testing purposes. There's also an enemy script which will simply decrease the players health when it makes contact with the player.


For now I've made a quick health bar which is the same one that's been used for some previous projects. It's very basic and is just decreasing the value of a slider based on the players heath. In terms of the bar it's self it's very simple, it's just a rectangle in the corner of the screen.
And with that it's all working. This is a very basic mechanic to add but it actually does give the player a sense of danger. The enemy isn't anything special right now it's just a red square but movement and some sprites will be added later on.
Prototype Death Screen (28/10/24)


Starting off with the death screen itself; it's nothing major. It's just a black screen with a button in the middle. And on that button is a script that will simply reload the current scene. It can be set to load into any scene but for now the current scene will do.
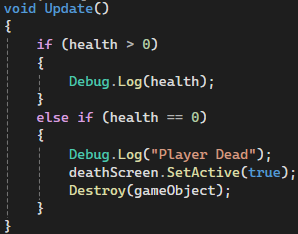
To actually trigger the death screen the players health code will enable the death screen canvas when the players health hits 0. It will also destroy itself after the canvas is enabled. If it's not organised like this then the player will be destroyed before the death screen is shown.
While it might not look great it functions as intended. When the players health hits 0 the screen is shown and the player destroys itself.
Main Menu And Level Loading (29/10/24)

Just like the death screen the main menu is also really basic. Later on Adam can make some elements for the title screen so it doesn't look bare. But for now it should work.


Now for the level loading. All that this game needs for level loading is a collider that will load the next scene when it's triggered by the player. To achieve this there's a very basic script on the collider that will detect if the collider is triggered by the player and load the next scene. A wall was removed from the environment so a level loading collider could be placed there. This isn't permanent it's just for testing.
It's working but it really doesn't look good. It's too much of a sudden change and it really needs to have something to smooth the loading.

To remedy this issue a crossfade has been implemented to hide the sudden change in scene. This is another thing that's been used in other projects but it's very helpful to use for smoothly transitioning between scenes. This is just a black UI image that has it's alpha channel animated to smoothly go from opaque to transparent or vice-versa.

By default the fade will happen from opaque to transparent, this will happen when the scene is first loaded. The only one that can be triggered is the start of the fade. Fading to a opaque image. Doing it this way is much easier since nothing needs triggering when the next scene is loaded. In code there needs to be a reference to the crossfades animator component so that the "Start" trigger can be activated. This can be added anywhere, but one thing that needs to be kept in mind is that the crossfade will start as soon as it's triggered. So for the player death script there needed to be a 2 second delay before the death screen is shown.
Now the loading looks much smoother with it blending each scene together perfectly. the only thing that really needs doing is the environment sprites and the enemy. But that's just as a priority, there's still other things that need doing but these are the essentials.
Comparing Our Game To Ape Out (29/10/24)

Our game is very different from Ape Out (Devolver Digital, 2019) but there are some comparable aspects. The first thing that I thought of is the style, mainly with the wall. There just basic black wall like ours, but they're presented in a way that makes them look 3 dimensional. This is something that we defiantly could look into doing for our game. Secondly is with the object pick up. It actually does look quite comparable to ours minus the throwing. Right now we only have a basic pick up and drop, but again this part of Ape Out (Devolver Digital, 2019) is something we could look into for our game. It would be really cool to be able to use this to fend of some of the enemies, and it could even be used as a puzzle element. Finally the screen shake is one thing that we really need to add. It makes everything feel impactful and it gives some feedback to the player.
To conclude our game isn't really comparable to Ape Out (Devolver Digital, 2019). However there are some aspects from the game that we could implement into our game. Things like the style, that can be easily be implemented into our game without any effort. We'll look into add these later on.
Medical Crate Model (30/10/24)
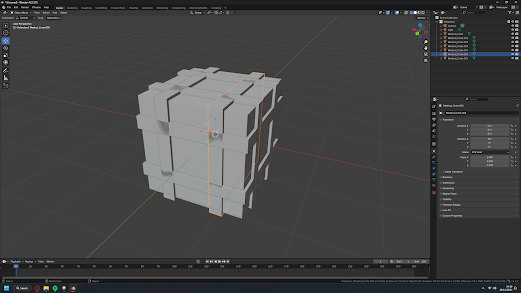
To make this I'm going to be following some principles that I created for my Bloodreign project. Keeping the model and texturing really simple since it's going to be rendered into pixel art sprites. So following that the base mesh is just some primitive cubes combined together. The plan is to make a wooden crate with some leather straps holding it together.

With a model this simple the best thing to do is add the detail in the texturing. The issue comes with the sprite rendering. There's no point in adding so much detail just for it to not be noticeable. There's several layers of wood textures that are in use. Most of them are just for the detail with the walnut being the main wood. One of these textures is from the Substance Painter Community Assets and that's "Stylize Wood Plank" by Chew Gashuen. The leather strap is just a basic leather material that gives a very subtle leather effect.

The art style we're trying to go for is very dark with quite a lot of blood, so two dirt generators have been added for some dirt and blood. It is quite subtle so it might not show in the pixel art, so later on the intensity of the dirt generator may have to be increased.

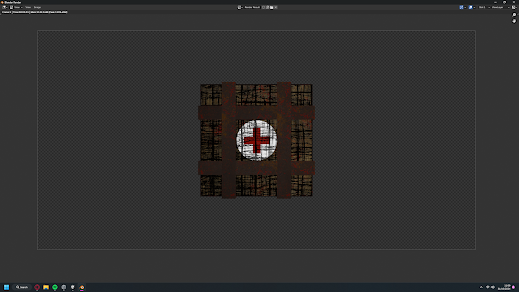
To make these look medical there has to be a red cross on it somewhere. To players this indicates that it's something medical related. To do this they need to be manually painted onto the wood. It's quite simple to do since there's a "Circle Plus" brush that can be used that'll give me a good basis.

With it rendered in substance painter it's looking quiet good. I'm hoping that this looks good in pixel art but I'll have to wait and see.
Rendering Models (31/10/24)

The rendering for these environment models is going to be exactly the same as the snake rendering. There going to be rendered at a fairly high resolution and then down scaled in game. The models are going to be rendered from a top down perspective with a light pointing directly at it.

The renders are looking really good. They need cropping in Photoshop but for the most part they should be usable. There's just on problem with the bed sprite with it looking a little too clean. I'll ask Jac about this when I get the chance.

The new crate sprite was added in without any scaling issues at all it fit in just fine. However with the beds there was an issue with the size of the beds being much bigger than I thought. So to correct this the pixels per unit needed increasing to 500. Now it's more scaled closer to the originally block out.

Right now they do look a little out of place with everything else being basic primitives. This should be corrected once we have a actually back ground.
Hospital Floor Texturing (10/11/24)

To make the texture I'll be using a plane model which will give me the full texture. And for the texture it's really simple, it's just a tiles material with some dirt generators for some imperfections and blood.

Now in Blender the textures were applied to a plane object and then rendered with a light directly over it. This is best since the final sprite will be effected by the games lighting. Two light passes would make the floor look weird and out of place.

Along with the new floor texture the the lighting and the post processing were also altered. The main changes were with the tone mapping and the post exposure. The saturation and contrast were also changed to darken the overall image.

One thing that might be noticeable is with the lighting it doesn't look as bright as it did before. However quite the opposite is happening with the global light having double the intensity than it did before. And it works really nicely with the new floor. There's just one issue, and that's with the quantity of blood. It's a little too much and it makes the overall image look too red.

To fix this all that needed to be done was to turn down the intensity on the dirt generator and that should make it look a bit better.
Overall the new floor texture looks quite good with it not over taking the whole screen. One thing that it needs is something to break the repetition. It's the same texture tiled so the repetition can be quite noticeable.
Making Corpse Sprites (13/11/24)

We don't have much time left to work on the project so I need to make these as quickly as I can. While not affecting the quality of them. So to save time I opted to reuse some corpse models that I had from the 2D game art project. They'll get the job done.

Now to render and this time there's no lighting and the textures have been changed to completely black. I think the jet black look will work better for our game since it'll be comparable to the style of Endoparasitic (Deep Root Interactive, 2022). It's also going to hide the etchings that's on the mannequin so it's not noticeable.

It wouldn't make too much sense if there's just corpses laying around without any blood. So I'll be using some blood textures that Adam made to make it look more like a recent corpse.

And finally when it's scaled down to pixel art it's looking really good and fits onto the scene well. It gives that Endoparasitic (Deep Root Interactive, 2022) look while adding a bit of it's own charm.
Team Update (13/11/24)

With that in mind our tasks over the next week are going to be minimal. Since the pitch decks have priority. Adam is going to work on some more blood textures, Alex is going to be working on a basic enemy model, Jac will be re-texturing some of his models to add some imperfections. Finally I'll be working on the enemy movement and also some sprite rendering. This will be mainly renders for the models that Jac has made.
Enemy Movement (20/11/24)
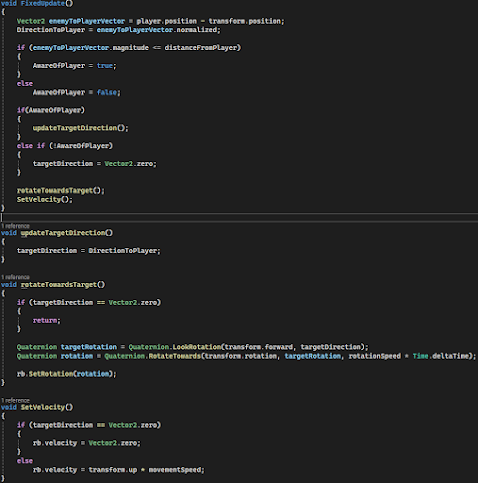
For the purposes of this test I'm simply going to try and make a cube move towards the player, but only if the player gets close enough. For this to work there needs to be a Boolean that triggers when the player is within range of the enemy. To do that I'm simply subtracting the position of the player from the enemies position, then normalising the vector. With that I can check if the magnitude of the vector is greater then the maximum range, if it is then the player is within range and will set the "AwareOfPlayer" Boolean to true. The rest of the code is setting the target position to be equal to the player, as well as rotating to face the player.
While it works it needs some tweaking. First off it's far too quick and it's huge. It doesn't give the player much of a chance to get away from the enemy. It also needs to be able to move while not in range of the player. Right now it'll only move when it's within range of the player, which can work but that's not what is needed for this game. Finally there a bug that causes it to get stuck on the doors. I'm not entirely sure what's causing this but it shouldn't be too hard to fix.

The script has been modified so that there's now a patrol state that the enemy will enter when out of range of the player. All that's happening with this state is that the enemy will randomly change direction every few seconds. Which won't do much on it's but that's exactly why I've also changed it so the enemy is constantly moving.
With them changes the enemy is moving around much better than it did before. Now it will randomly move around when not in range of the player. And thanks to that the issue of the enemy getting stuck seems to have resolved it's self. It's still not perfect but for the most part it's functional.
Environment Modelling (22/11/24)


For a while now the front desk has been a simple dark green sprite that the player looks past completely. So the plan here is to re-use some older models that were made for the 2D game art project. They're very simple models but they should work fine with a little bit of work. To start with the desk model needed to be re-made. It's a little over complicated for what I'll be doing with them. In addition to this all of the other models needed to be UV unwrapped. When these were made originally they simply had solid colours for textures and that's not what is needed for this.


In terms of texturing, nothing major is happening. It's mostly basic Substance Painter materials. Something that's a little more detailed is with the new door and the stairs. The door is mainly an experiment, I have now idea if it's going to work or not but It's worth a try. Secondly the stairs are actually from the 3D environment that was made almost 2 years ago. It should work just fine I'll just have to get a little creative.


To render the desk I'm going to do something I've really done for the project so far. When I've been doing this, I normally render out each piece individually and then combine them all inside of Unity. For the desk I'm going to assemble it first and then render it with everything attached. The chairs are going to be separate so the player can move them around but everything else is going to be on top of the desk. I've added something a little extra with each monitor having a area light over the screen. This emphasises the glow that would normally be missing. Finally Bloom needed to be enabled to get the effect that I wanted. Normally this would be really easy since it's just a toggle in the post processing settings. But now it's been moved to the composting section. It's not a problem it's just really confusing as to why they moved it.


After experimenting with the area lights; these needed to be changed to spot lights. It gives a much better glow to the desk and makes it look a little more natural.


With the desk done it's time for the other models to be rendered. For the stairs they needed to be duplicated and placed side by side. This way the textures aren't stretched and it looks more consistent. However I'm worried that this won't turn out great once it's in game. Other than that I've also rendered some models from Jac. I've done the trolly with a saw and some scalpels. And I've also rendered the autopsy table which I have a really good idea for.


In game most of the sprites are looking quite good. The desk for example looks really good and fits in with the style. But with the stairs and the door they look great. The stairs don't even look like stairs, and the door looks out of place. These will need correcting at a later date. However with the autopsy table it really good with the added body and the blood. It gives the feeling that something really horrible happened. Even more than the normal bodies.
Making A Button Sprite (28/11/24)

One thing that's been really annoying to look at is the button. In game it's just an orange square and it stands out far too much. So I'll be correcting this issue by making a simple button sprite. As normal I started out by making a simple model. I took inspection from Portal (Valve Corporation, 2007) with the simple and clean look it had.

in terms of UV unwrapping I opted to unwrap a quarter of the model and then mirror it to get the full unwrapped model. This does mean that the textures will also be mirrored but with what I have planned this won't be a problem.


Now onto texturing. For this I started with a very simple red button that actually looks decent. But it's a little too plain, so to make it stand out I added a cross pattern to the centre. I didn't plan for this originally but I'm hoping that with some emission it should fit in with the rest of the game.

Rendering in Blender the model looks quite good with the bloom added. It makes the centre cross pop and it looks like it should blend in with the overall style of the game.

With the new button in game it's a little odd. I think the problem is with the glow and also with it looking too pristine. There needs to be some more noticeable dirt on it for it to blend in with the rest of the game.
Rendering An Enemy Animation (28/11/24)

Over the past week I've been reusing quite a few of my older assets, and the main reason for that is simply because we're running out of time. Our production schedule is finished yesterday so I'm using all of my older assets that I can to save on time. And for this enemy I'll be using my Boss model that I made for my Bloodreign project. I've already got an animation I might be able to use so It's a good choice.

But I don't want to just render my model and call it a day. I want to modify it slightly to make it look more original. So I'm going to make a hand with some really long fingers. Alex made a concept that had something like this so this should match up with our concept. To make this hand I simply cut it from the original model and scaled the finders so they're incredibly long. It might look stupid here but hopfully it's better when it's rendered.

Now in Blender with the old running and attack animation, I've removed the scythe and added the new hands. The hand on left was really easy to add since all I needed to do was parent it to the scythe and then hide the scythe. However for the right hand I needed to animate it moving along with the arm. It wasn't too bad to do, I'm just not used to animating in Blender.

It looks really silly when it's rendered in Blender. What I'm hoping for is that it looks alright when it's downscaled in game.

While I could simply add in each frame into Unity to save on time, Instead I'm going to make a sprite sheet out of it. It's more optimal and it makes everything easier to work with. Each sprite is 512 by 512 pixels so the sheet needs to be 2560 by 1024. That way I can have I clean looking sprite sheet.

There isn't any need to remake the enemy, All I need to do is simply add the sprites on top of the existing enemy. Doing it this way is so much easier and it doesn't effect anything. One thing I did have to change was the collider, I changed it to a circle collider and made it slightly bigger to fit the whole enemy.
Overall the enemy is working really well. It fits in with the overall style and it look really good. The animation could do with some adjustments but that can be a job for later.
Comparing Our Art Style To Endoparasitic (29/11/24)

The style of Endoparasitic (Deep Root Interactive, 2022) is a very simple style that also reminds me of Ape Out (Devolver Digital, 2019). It's very greyscale with only a few pieces of red mixed in. There's also a black smoke effect that's around the screen which I'm sure is being used to mask some potential loading, or it's just there to make it look more interesting.

Where our game is comparable is mainly with our enemy and our miscellaneous sprites that are in the environment. There a simple black sillouette just like Endoparasitic (Deep Root Interactive, 2022), but we've also added some higher detail blood textures onto them to match with our style. Both games also have a similar concept for the floor, with them both being a simple square tile. But again our game differs with the floor have more detail.
Overall our style is fairly comparable to Endoparasitic (Deep Root Interactive, 2022) with the major difference being that our style is higher detail. Taking insperation from this game was a really good idea with it looking really unique and original.
Blood Effect And Camera Shake (30/11/24)

The blood effect my sound really complicated at first glace but it's really simple. For the emitter it's just a simple burst of particles that only last a second. It's using one of the blood textures that Adam made for the effect and it's looking decent.


The complicated part is with triggering the effect based on which part of the snake is hit. Normally this would mean making a script and adding it to each part of the snake, but in my case there's already a script on each part of the snake. That'll be the body rotation script that normally would rotate that part of the snake to match with the previous part. So all I have to do is check for a collision on each part of the snake and play the particle effect when it's hit by the enemy. However making the effect this way is really tedious since I've got to add a emitter to each part of the snake, and then add that emitter to that body parts rotation script. It took a while.

Something a bit easier is with creating the camera shake. I've used this before but it's just a script that will randomly shake the camera based on two values given, an intensity value along with a length value. All I've really got to do is give this value from another script, in this case it'll be in the player damage script. Once the player is hit shake the camera.
These two things really give the game a bit of extra polish and some feedback of when the player has been hit. And making it so it reacts based on where the snake is hit is a good little detail. Each particle also has some collision so it can react to other objects around it, it makes it look more like a real liquid.
Creating A Main Menu (30/11/24)

On thing I did for my Bloodreign project that really made it feel higher quality is by making a good main menu. Last time I did this with a cinemachine camera that gave a subtle hand held camera look. I'm going to do something similar here by creating a duplicate of the autopsy room and using that to make a moving main menu.


I experimented with a cinemachine camera to achieve that hand held look, however it didn't look quite right. The effect doesn't really work well in 2D space with it creating a really weird parallax scrolling look. It didn't work for this game. So instead I'm simply going to use the camera tracking I used for the player along with the enemy movement script. The way this will work is with an empty game object having the enemy movement script, this will make it so it randomly moves around. Then the camera itself will have the camera movement which will track this moving object. One road block with this is that the enemy movement script needs access to a player for it to move around. If it can't find a player it'll stay still. So it fix this I made a dummy player outside of the scenes boundaries and gave it the snake proto 3 script (this is what the enemy script uses to find the player). And since it's out of range the enemy will enter it's patrol state.

Another problem with reusing these scripts is with it not having any restrictions to it's movement. The only thing that can stop the movement is with some colliders. So I created a little cage for the camera to sit in. I've also set the colliders to ignore everything other than the transparent layer, this way the enemy that's running around can't get stuck on these colliders. The only thing these barriers can stop is the camera which is on the transparent layer.

Finally I put together a simple play button that I think should fit in with the overall style well. The pixel outline was made by GX310 and the font was made by vrtxrry. Both of these can be found on Itch.io and are completely free to use with them also being able to be used for commercial means.
Overall I think that this menu look quite good. It just needs the title from Adam which should be ready by the end of today. I also need to fix a slight issue with the enemy colliding with the camera. It's not too bad but I can make it so it completely ignores the camera.
Final Demo For Snakientist (02/12/24)
After over 3 months of development, while also researching about the business side of indie game development, Snakientist is officially done. Mostly. This here is our final demo for our game and it's functioning quite well. The enemies work as intended, the button works and other miscellaneous things like the respawn function. And the big thing is the the player is working as intended. There were so many issues at the start of the project around the player and I'm really glad that it all worked out in the end. I've also changed a few things such as the door, which has been significantly downscaled to fit in with everything else. And I've also made a better looking death screen as well, that looks a lot better than it did before.
For the full project post mortem it can be found on the main page:
https://20999935fdablog.blogspot.com/p/indie-game-development_5.html
Bibliography
Blackthornprod (2021) Procedural Animation: Tail, Wings, Hair, Tentacles! (Unity Tutorial) [Online] Available at: https://youtu.be/9hTnlp9_wX8?si=M9GI9QFqIBXvIkEc [Accessed: 01/10/24]
Chew Gashuen (2021) Stylize Wood Plank [Online Asset] Available at: https://substance3d.adobe.com/community-assets/assets/8400a70b35ea093139d30307672714624fd4494b [Accessed: 30/10/24]
Deep Root Interactive (2022) Endoparasitic [Video Game] Deep Root InteractiveDennaton Games (2012) Hotline Miami [Video Game] Devolver Digital
Gabe Cuzzillo, Bennett Foddy, Maxi Boch (2019) Ape Out [Video Game] Devolver Digital
GX310 (2022) Pixel Art UI Borders [Online Asset] Available at: https://gx310.itch.io/pxiel-art-ui-borders/download/eyJleHBpcmVzIjoxNzMyOTc1NDg1LCJpZCI6MTM1MjA1MH0%3d.bZmBp2Y9H8TM82Fn4veGhlcUiHc%3d [Accessed: 30/11/24]
Itch.io (2024) [Online] Available at: Itch.io [Accessed: 30/11/24]
Nintendo (2003) Wario Ware (Franchise) [Video Game] Nintendo
Random Art Attack (2021) Making a snake with snake like movement in Unity (Part 1/2): Follow the leader / synchronized movement [Online] Available at: https://www.youtube.com/watch?v=sPlcecIh3ik [Accessed: 27/09/24]
Steve Howse (2016) Slither.io [Web Game] LowTech Studios, Available at: Slither.io [Accessed: 10/10/24]
Young Horses (2010) Octodad [Video Game] Young Horses
Valve Corporation (2007) Portal [Video Game] Valve Corporation
vrtxrry (2024) DungeonFont [Online Asset] Available at: https://vrtxrry.itch.io/dungeonfont [Accessed: 30/11/24]