Game Production Part II
I declare that the material contained in this assessment is the result of my own work and that due acknowledgement has been given in the bibliography and references to ALL published and unpublished sources. I confirm that I have reviewed the guidance on academic integrity at Academic Malpractice | MyCumbria to ensure that I understand the requirements.
Welcome to part 2 of my game production project. My WordPress cloud storage was full so I couldn't add any more images and on top of that I hate WordPress with a burning passion. It's really cumbersome to use and I just don't like it. So from now on everything is going to be on this Blogger blog. On the off chance that you haven't read through the first part use the link below.
Part 1 of blog is on: https://mh20999935.wordpress.com/game-production/


The effect wasn't actually that hard to do. All I did was rapidly emit some particles with some gravity and it creates the effect of something dripping. On each particle I added a blood splatter texture that I pixelized and it actually looks quite cool. It's a similar effect to what Warhammer 40K: Boltgun has with the pixelated blood. Next I simply added the effect to the enemy, and then added some code to play the particle effect when the enemy gets hit.


I'm going to start off with the flash effect. This is basically the exact same effect that you'll see in most games where the player flashes red when they're hit. Normally this will be done by making an animation, but I don't want to mess around with animation trees anymore. So I'm going to do it all in code instead by using gradients. I started off by taking the players current sprite renderer colour and creating a gradient key out of them. I then added these keys to a gradient. Finally in the hit section of the code I'm changing the position of the gradient to one and then a tenth of a second later changing it back to the original colour. This is a very quick way of doing it but it should work just fine.


Next I want to make some new sprites for my item drops. The first thing I thought of was a syringe since it would make sense for both health and a antidote. I started off by setting up the model in Blender, getting the lighting and render setting correct. But I thought there was one thing missing and that's some emissive. So I opened up photoshop and used the base colour map to try and make a emissive map. I actually turned out quite well which is surprising coming from me. I made one in both red and green since the health is going to be red and the antidote green. Finally I rendered in Blender at a resolution of 128 by 128 in both red and green with a little bit of bloom. The bloom might be a little too much for the pixel art but I think it should look fine.


After trying to make a shader to add the emissive I accidently ended up making a shader that just isolated the part I want to make emissive. It should work fine the only downside is that I can't change the colour. But after overlapping it with the original sprite it actually looks quite good. For the original sprite I used the shader with the outline since that will make it look more noticeable to the player.

To a little more to the effect I made a simple script that should gradually rotate the sprite. This is another thing that should catch the attention of the player so they pick it up.
Overall everything is working just fine. The flash effect is very quick and brief but it's still noticeable and the item drops look much better than the primitive spheres they were before. The only thing that's a little off is the item drop rotation. It's a little weird looking but I don't think it's a problem for now.


I'm going to be using the poison trap model as a basis for the new UI. I was getting really tired of looking at bars so I thought that getting rid of them would be best. All I did was render the poison trap in Blender at 96 by 54 pixels to nice pixel art look. There should be enough space for all of the UI.


Actually setting up the UI in engine was actually really easy. All I did was delete the old bars added the new sprite to the top left corner and placed the text. The green text is for the poison and the red is of course for health. Even in code, implementing the new health text was so much easier. I didn't have to call to another script all I had to do was set the text to the current health number.
Overall I think that this new UI looks so much better. It fits in with the overall theme of the game while not covering half of the screen. I think this will probably be what I use for the final piece of UI since it's all I'll really need.


I want to attempt to make a boss fight for the final section of the game but I don't want to spend forever trying to get a usable model. So I got lazy and just used my player character as a base. I removed the dress and the hair and added the reverse bear trap to the head. I also added two cylinders to act as eyes but I'll have to see what they look like when I texture. After that all I did was layout the UV's. The UV's were already done they just needed to be placed a bit better.


For the texturing I tried to keep it quite simple. All I really did was add a metal material with some blood, along with some red emissive on the eyes. I did also add in some finer details around the eyes but your never going to notice this at all. I keep doing that were I add smaller details that you never going to be able to see.


Finally I made a quick pose and exported the model into Blender. I'm mainly doing this to see what it'll look like for the final rendering. I set up the materials as I normally do and added some bloom to the overall image. So far it's looking really good but the pixel art is where it needs to look it's best.

And it looks great. I really like the menacing look with it being smothered in blood with the glowing eyes. I think reusing the reverse bear trap model was a good move since it really does bring everything together. What once looked like a character from the film 9 now looks like a killing machine.

Normally I would capture some footage of every stage of the animation. But in this case I decided not to bother with that. I've shown so much animation for this project and it isn't really my main focus. I just need a simple animation that works. For this it's just the players run animation but a little more off balance. I didn't spend too much time on it I just needed something that would work.
And after rendering it, it looks fine. I could be a little better but I'm starting to run out of time. I might come back later and improve it but I think it should be okay.


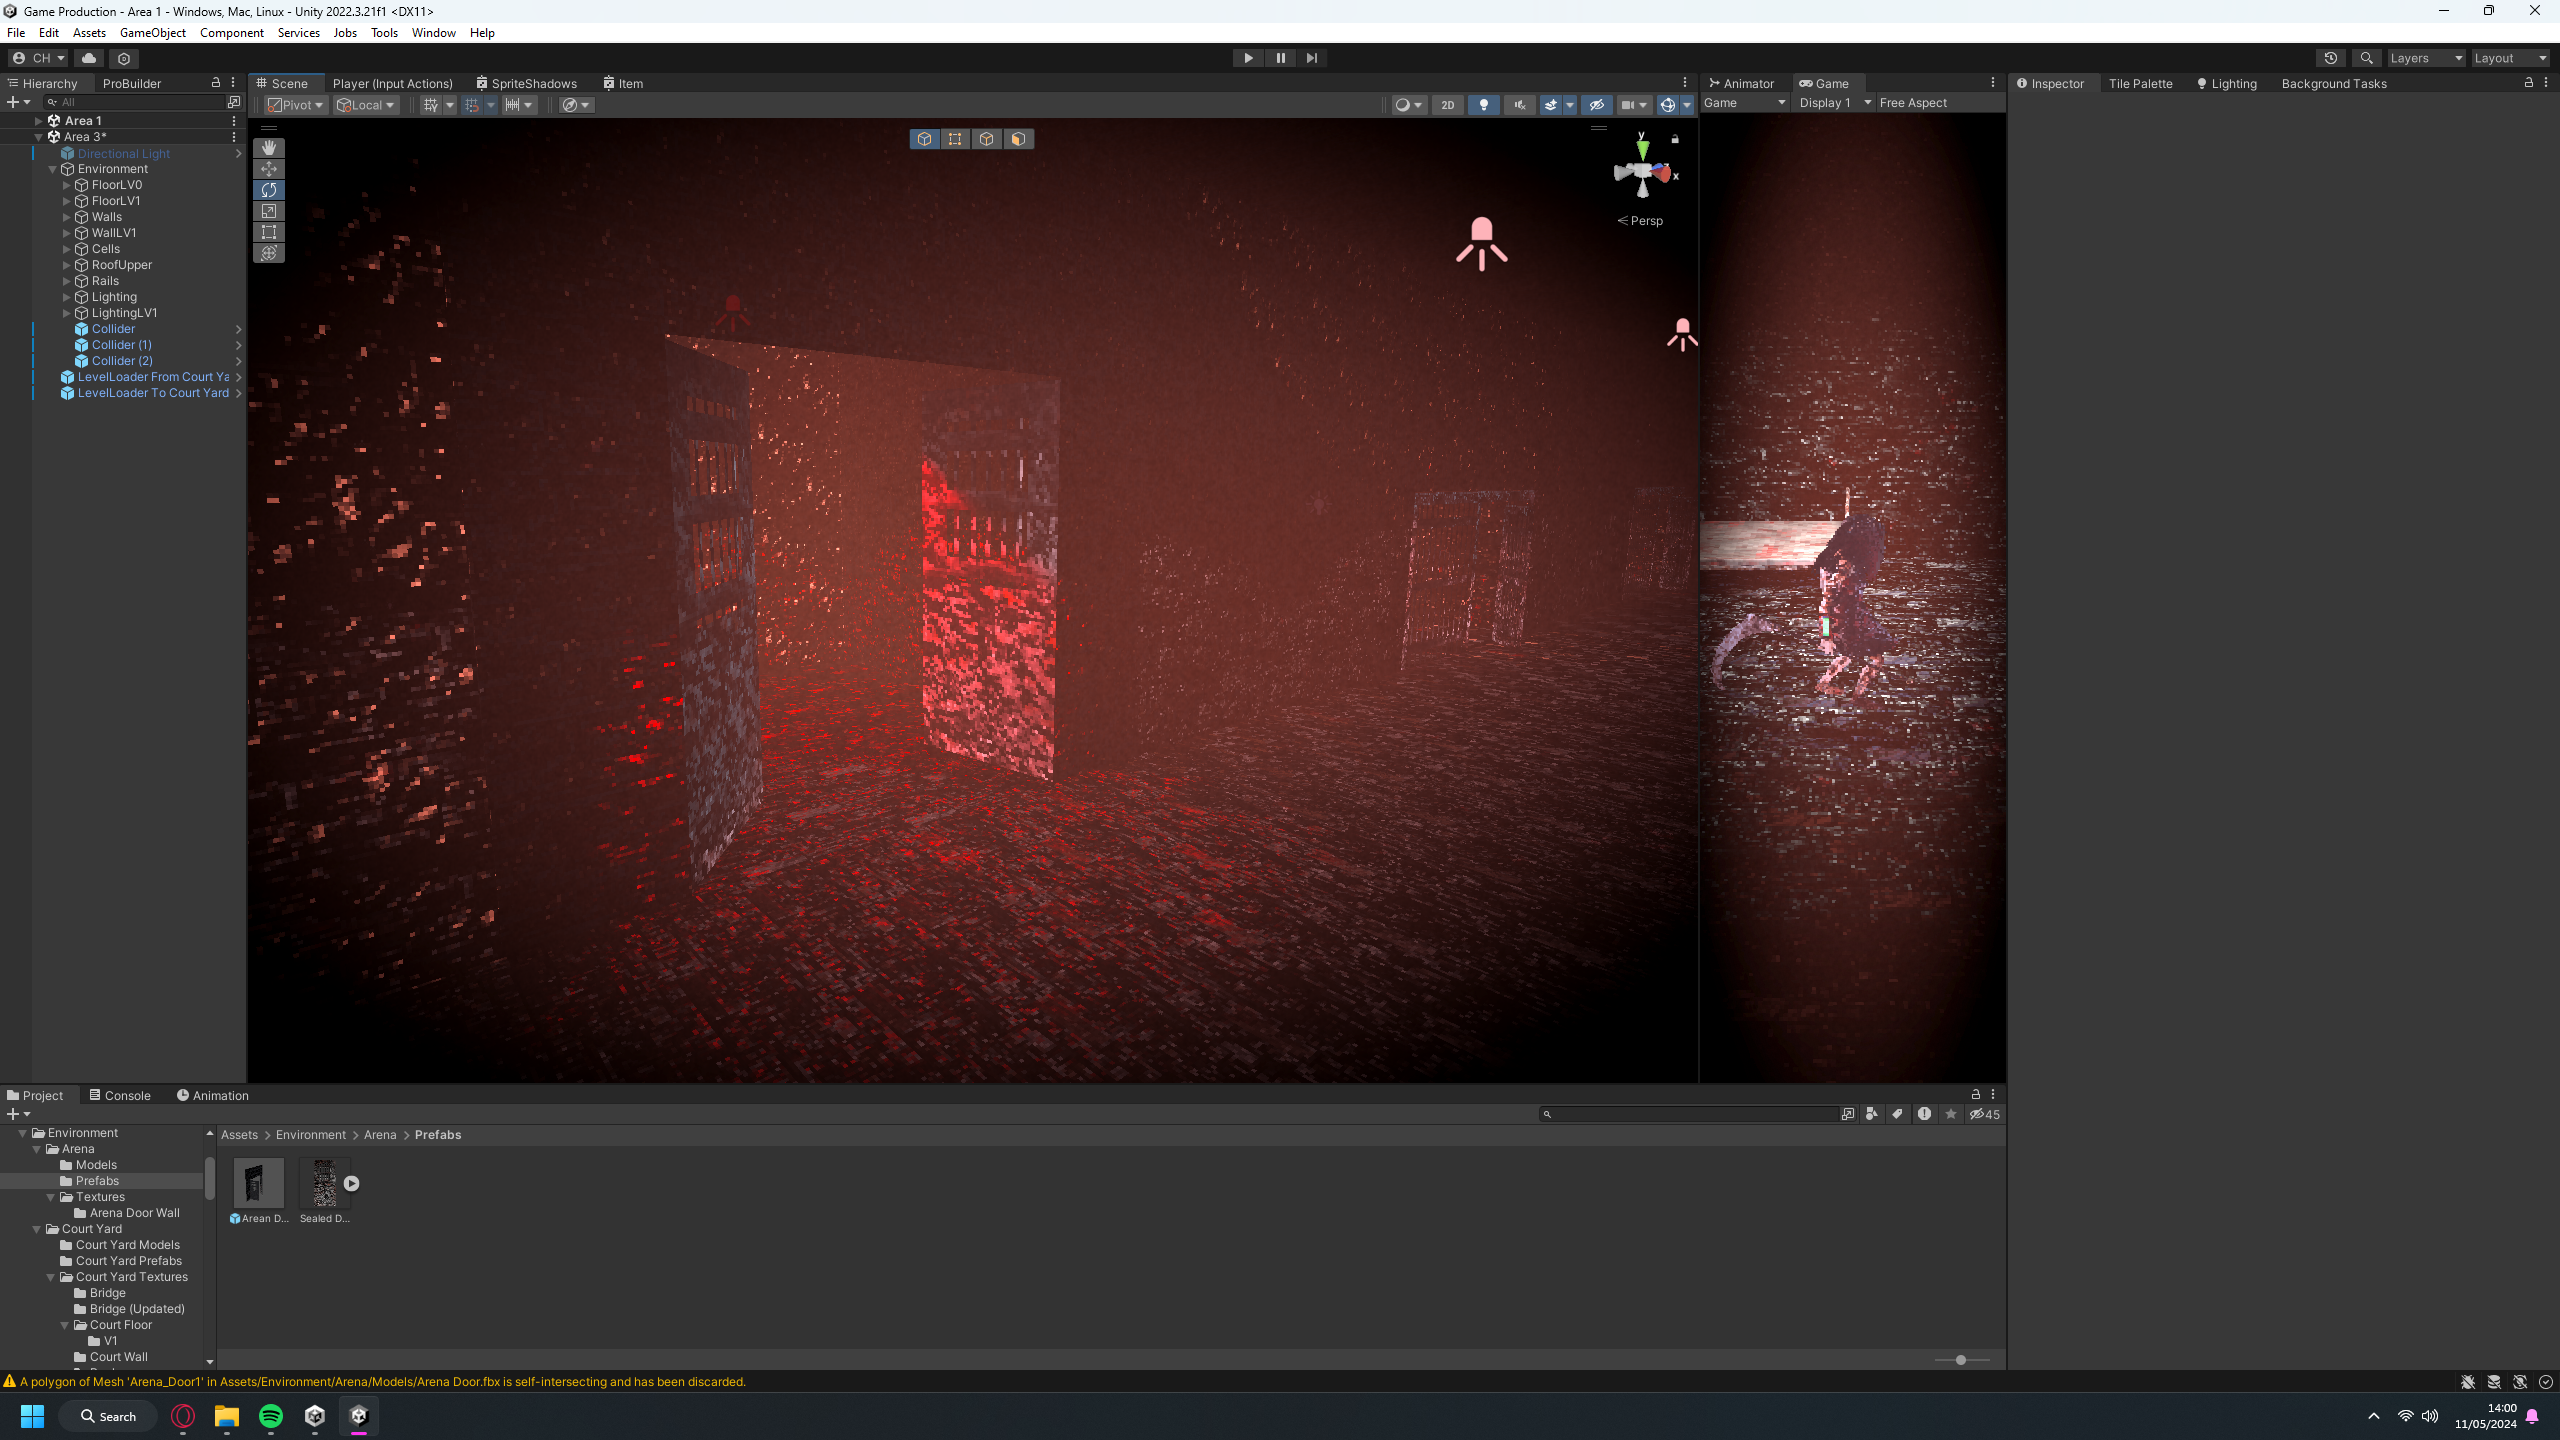
Instead of loading the arena level additively I'm instead going to load this scene independently. So it's going to unload everything and load this scene. But to do that I'm going to need to transition between the main scenes to the arena. I started off by making a very quick and simple model for the arena entrance. The door frame is going to be a solid model while the door is going to be rendered in blender to make it into a sprite.


For the texturing I didn't doo anything special. All I did was use the wall material for the door frame and I used the rusted metal material that I made for the bars. They both look just fine and they should work out nicely.

When I made the prefab I did a few things. The main thing is that there's a collider that will do two things, it'll first lock the position of the camera and then it'll load the arena level. This is all going to get triggered in code.


The code might look complex but really isn't. The main thing is that the player is triggering a Boolean that will tell the camera if it can move or not, and this happens when the player collides with the trigger. Finally there's a script attached to the trigger that will detect if the player was hit the collider and then load the arena scene. I've set it so there's a little bit of a delay and this is so I can come back later and add a screen transition to mask the loading.
Because I'm lazy I deleted part of the first area to place the new arena door. It's not going to stay here this is just for testing. But after testing it, it works great. There is a few things that I need to do however and that's to make sure that some of the game components delete themselves when the arena scene is loaded. It's mainly the NavMesh that's a problem since I'll need a completely different one for the arena scene. I'll also like if the current health and poison carry over to the new player. I think I can do this with the game manager but I'll have a look a this later.

For the arena I had a few ideas. I was first thinking of an open field but in the end I thought of a theatre style arena. As for most things I pulled this idea from NieR Automata with the Simone boss fight. It's based in an abandoned theatre and I think it's something that I can replicate.


I started of by making the basic pieces first. The walls, floors and the stage but it's with the curtain where I did a little more than normal. I wanted a curtain that had creases and folds in it so the easiest option for that was to use a cloth simulation. I'm using a plane with max subdivisions to run the simulation on. Actually making the simulation is really easy, all I needed to do was add the cloth physics onto the plane and it just works. The hard part is actually controlling how the cloth simulation moves. For that I needed to use a cylinder and attach the top part of the plane to it. It's quite simple since I just needed to select the top vertices and the cylinder and then add a physics constraint to them. After that I animated the cylinder scaling down which I needed to do since the physics only play in the time line, not in real time. Finally I duplicated the mesh so I had it as a solid model.


With the texturing the only interesting part is with the new brick material. It's much brighter than before and the blood stains a quite a bit more noticeable. I added this brick to pretty much everything minus the curtain which I added a shiny cloth material to. My original plan was to import the curtain as a model but it really didn't look any good. So I rendered it out as a sprite and I think it'll look much nicer in the final scene.


What your seeing here is just me testing each piece to see if they line up correctly. Thankfully they do and I think I should be ready to fully build my scene.


Actually setting up the enemies was exactly the same as before. It wasn't really any different from all of the other enemies, the only difference is how they move around. The plan is for the enemies to be stuck in one area till the door opens. In theory they should just wander around till the door opens, making a direct path to the player.


I started of by making a duplicate of the arena door with each door having a NavMesh obstacle component on them. This should block the NavMesh till the doors are moved. And to actually make them move I simple added the doors to empty objects and animated them rotating. I then made a massive collider that will open the door when the player enters the arena.
And it all works just fine. Surprisingly there wasn't any issues. Next I'll be working on making these into waves of enemies along with me trying to get the boss fight to a usable state.

To actually make waves of enemies I first needed a way to detect when all enemies are defeated in one wave. So I made a script that will add all children game objects to an array. But because destroyed game objects don't remove themselves from arrays I needed to add everything in the array to a list. And with a list I can simply detect when the list is empty. It also lets me add the total amount of game objects to a string that I can use to show how many enemies are left.


Next I need a way to actually change between each wave. So I made a arena manager script that will detect of all enemies are defeated in one wave and trigger the next one.


Moving onto the arena I made a new passage for the enemies. It's exactly the same to what I had with the first group of enemies just mirrored to the other side of the room. But another thing that I did was added the curtains into an empty and animate the scale decreasing. It creates the illusion that the curtains are opening and it actually looks quite decent. This is going to be for the boss to make it feel more like an event.


I also made a very rusted door that's going to have the boss behind it. My idea is for the curtains to open then the door.
And that's pretty much it for waves of enemies. I can add more but I think having two waves with a final boss should be enough. Also waves two and three are unremarkable right now but this is something I'm going to add to later.
I'm going to keep this brief just like I did for the previous boss animation. Just as before I'm trying to make this done as quick as I can. This is literally just the run animation with the scythe arm flailing around. It could look worse but honestly I'm not trying to make a masterpiece with this.
With it being rendered in Blender it does look much better but still not perfect. I could come back to this later and correct it if I wanted to.

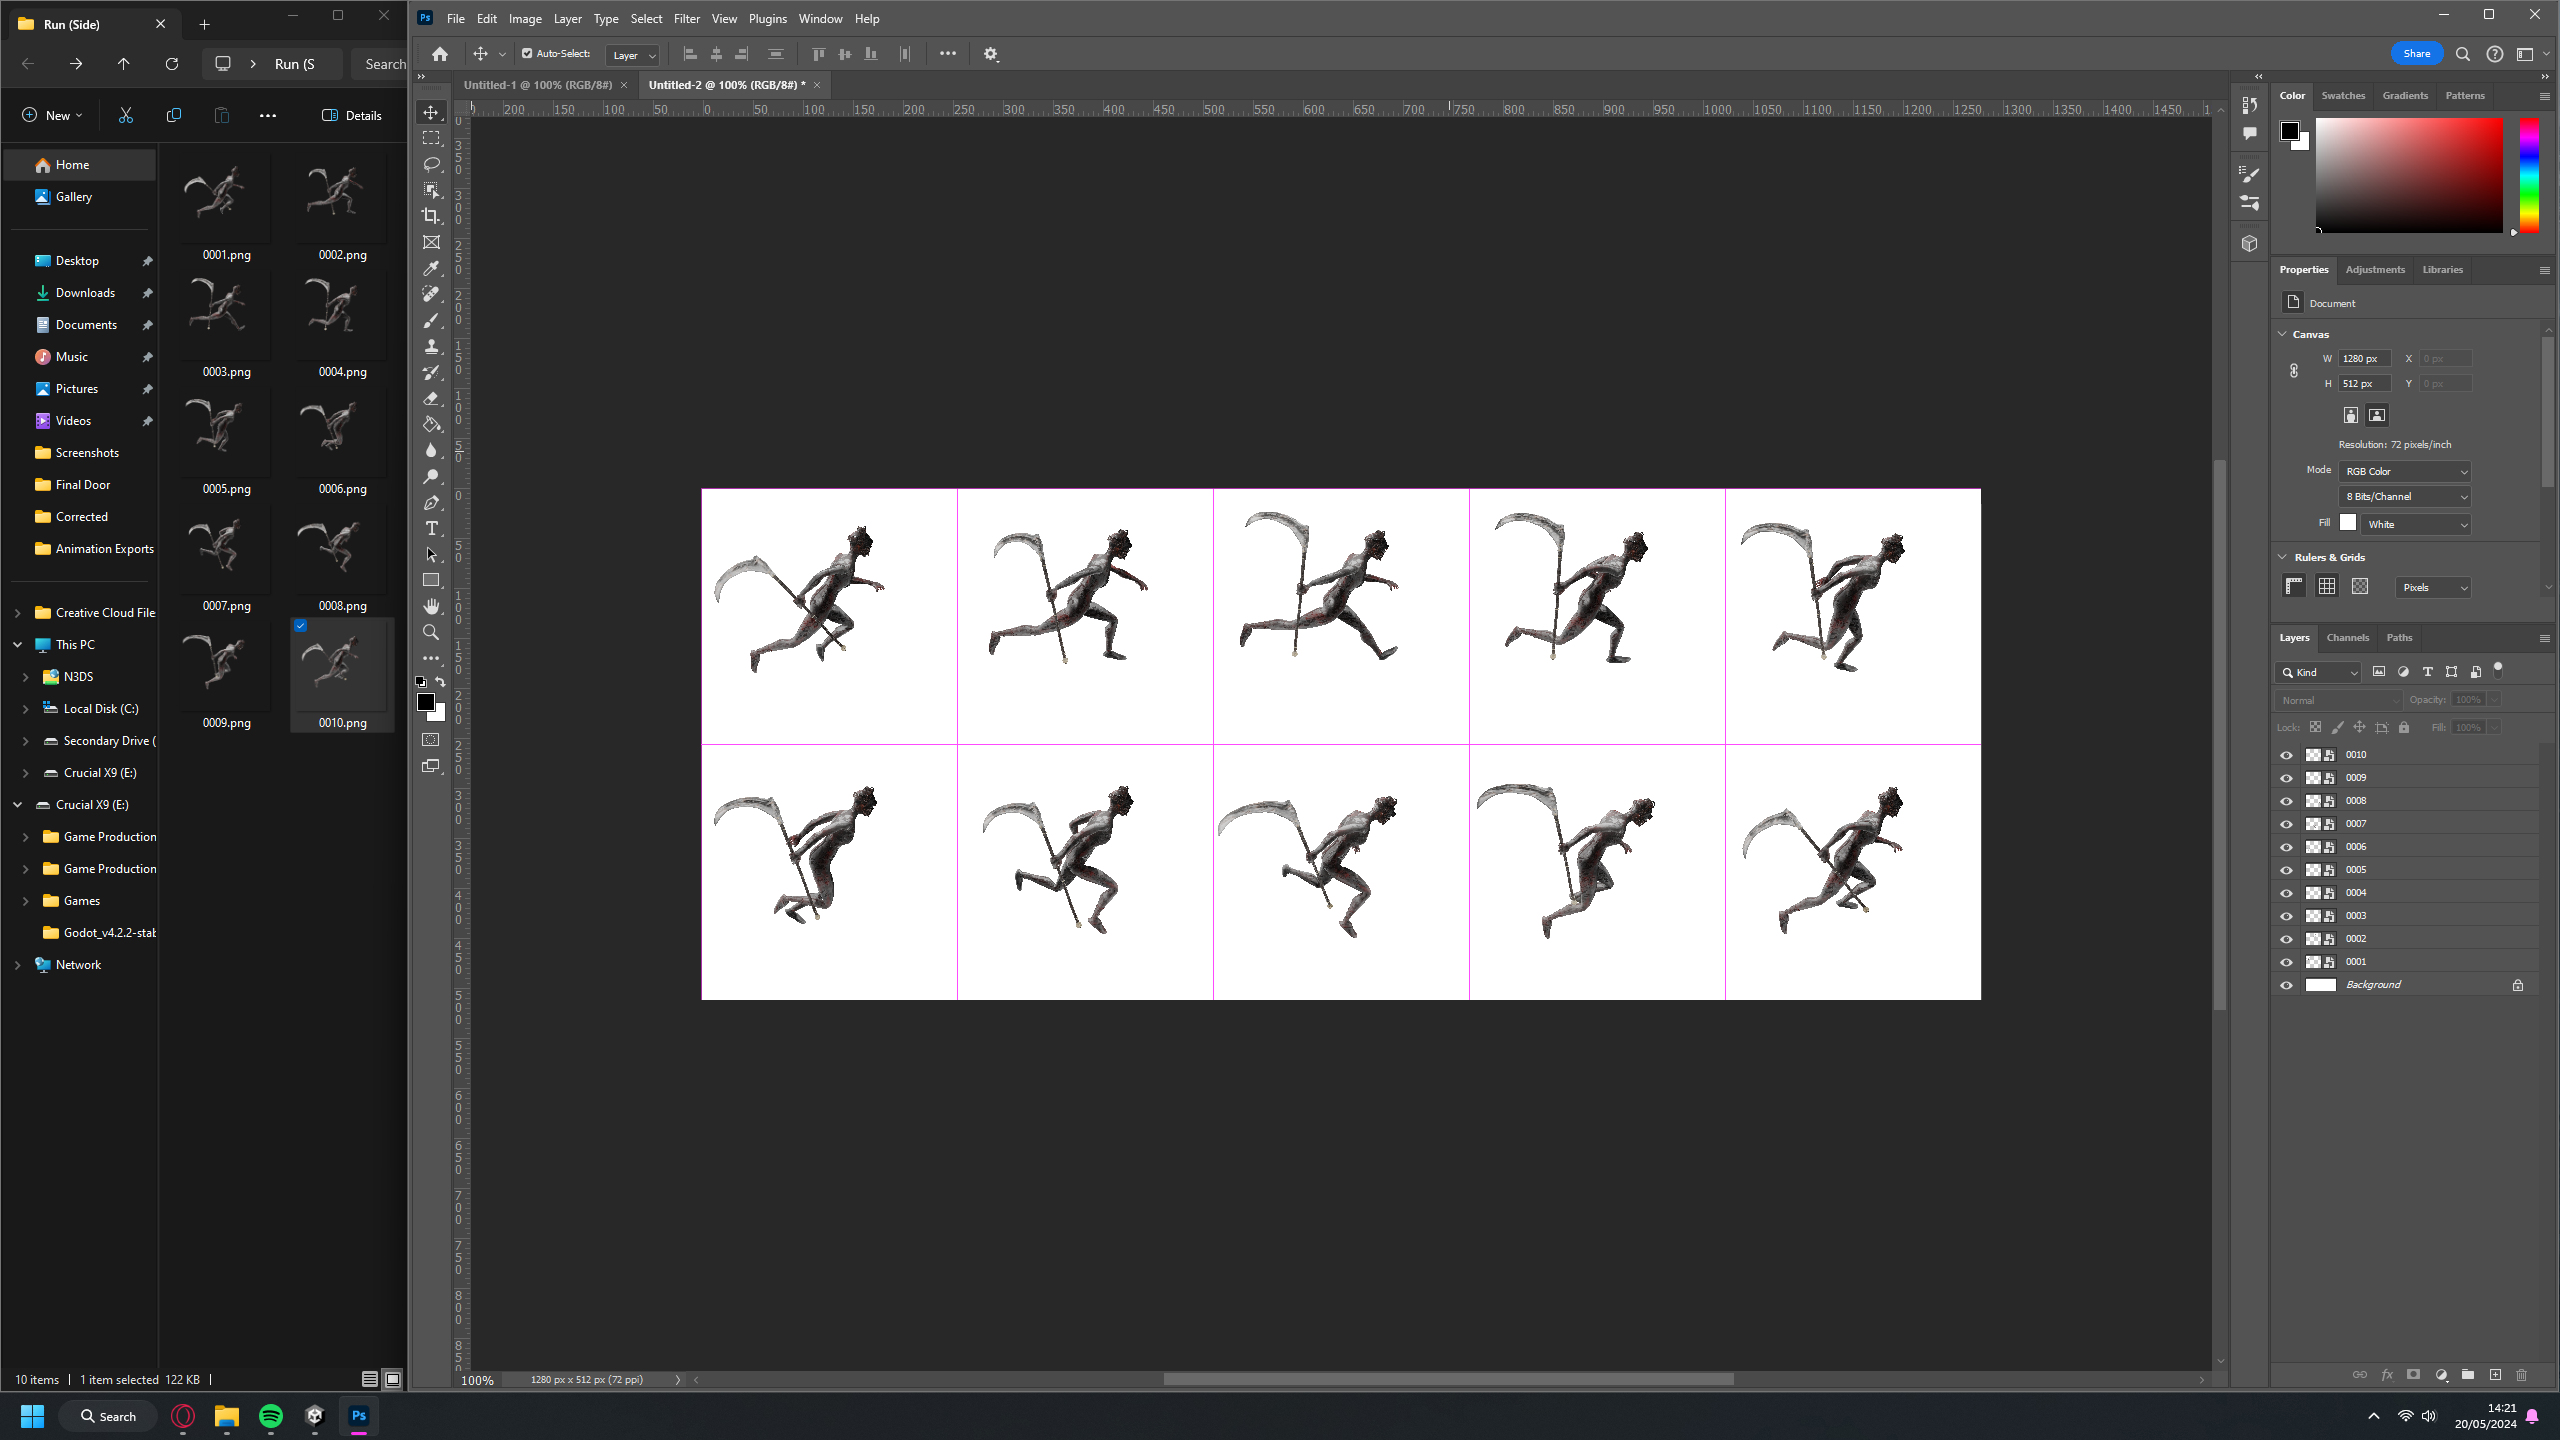
Again just like I've done with every other animation I've rendered out each position and made sprite sheets out of them. But with the higher resolution of the sprites (with them being 256 by 256 pixels) they didn't need any correcting. They were fine as is. Now I've just got to get them into engine.


Just to see how these sprites are going to look I decided to just use the corpse puppet enemy as a base. For now the only difference between the normal enemy and the boss is that this is going to be faster and deal more damage. And it's going to have more health also. In terms of animation I did exactly what I've been doing for all of my other animations. Importing the sprite sheet and setting up the animation tree. But one thing I did, which I wish I did for everything, is using sub state machines. I can have all of my attack animations inside of a sub state. It makes everything looks so much cleaner and it didn't mean that I needed several bool parameters. I can just have everything be in one attack state and move between states that way.


For the code everything is near identical to the corpse puppet code. The only thing that really changed is the amount of Booleans I'm controlling. Instead of having three for the attack I can just have one.
And this is what I ended up with for the boss. It's not really a good boss fight but I think as a final enemy it should do. It's more visually distinct from everything else so I think that it should be okay. I tested out this fight with a friend and the first thing they said say "What the hell is that" so I guess it's doing it's job well.

Horror Atmosphere Lite By Black Leaf Studios (Found on Unity Asset Store)


Demonic Woman Scream by Pixabay (Found on Pixabay)


Audio isn't really a hard thing to implement. The only difficult thing is making sure that the timing on playing the sounds is right. Buts that's something to worry about later. For now I'm going to make a simple audio manager script that's going to handle everything. To start I made a basic script for the different settings that I would want to change. I needed a name, the actually audio clip, volume and pitch along with an option to loop the sound. Then in the main audio manager script I create an array of the sound script and create an audio source component for each sound. Finally I made a public statement so I can play a sound effect from other scripts. It's much easier to do it this way as opposed to controlling each sound in one script.


In the inspector I add each sound effect that I need and I give it a name. This way all I need to do is write "FindObjectOfType<audioManager>().Play" followed with the name of the sound that I want to play. It's works really well and I think I'm probably going to be using this for future projects.
As normal I gave everything a quick test and it seems to be working just fine, for the most part. There's quite a lot of bugs that need correcting, with both the attack bug that I've still not fixed and some audio issues. The attack sound plays every time the attack button is hit so if you hit it enough it'll sound really weird.


This is probably going to be the final production management update that I write. The end of the project is in two days and I honestly think I've done all I can till the deadline. I've done almost everything in my Trello board minus a few blog tasks that I need to do. And the only reason on why this was possible was simple because I cut half of what I had planned. I've explained this before but cutting the escape room elements was definitly the right call. I had a big problem with the environment pieces with them taking way longer to make than I originally expected. But after I finally committed to cutting the escape rooms that gave me an extra two weeks to get the environment complete. This was definitly for the better since the game actually looks decent visually. Which is surprising since I chose to make my game look like this so I could focus on the code side of things. There's still one or two things that I want to do before the deadline but I think that overall I'm done with this project. At least for now.


This is the so what final gameplay. I'm probably going to tweak certain parts of it today but this is pretty much it. I think it actually worked out quite well and everything seems to be working as intended. Except for the attack being more broken than it was before. I thought I was able to work out a fix for it but in the end It just made it worse. My plan was to check if the player was in an idle state while attacking which they were, so by simply resetting the attack while in that state that should fix it. But instead it broke it more with the player getting stuck attacking more often. I'm probably going to revert the "fix" to correct it before I try and fix it properly.
I didn't mention this when I did the pitch but I did that with an industry professional called Rob Clarke. I was pitching to him instead of the rest of the class. But he's back and this time it's to show what we ended up with. Charlie Blay was also in the call and he works with Next Gen which run this entire course. He was there there to give some additional feedback and he's back also to see what we ended up with. So it wasn't exactly a presentation it was more so a talk about what the project became compared to the original idea.

Just to recap a little bit my original idea was to make a game where the player would need to find three keys to remove the devise on their arm. Killing enemies and escaping deadly traps along the way. And as you might remember I needed to cut the trap aspect of the project to save on time. In the end three of my four pillars actually made it into the final project.
But now for the feedback. And I'm going to start off with the bug. I've shown this bug quite a bit were the player will get stuck in an attack state that they can't escape from. I worked around this with an unstuck button but as Rob mentioned I should have simply asked for help. Instead of trying to tackle the issue my self I should've asked for some assistance from sites like stack overflow. There's nothing a programmer likes more than telling another programmer that they're wrong. Odds are this would have corrected the issue and I think that it would have saved on time. Next it got mentioned that I should have added some more effects to make it look a little better. I did look into adding some juice to the game, which I did with some blood effects and a damage indicator. But I could have gone so much further, like how Dead Cells or Vampire Survivors fills the screen with effects that makes the whole game look so much more appealing. And finally there was a bit of an issue with the player. They do blend in with the background a little bit which makes it easy to lose track of where you are. I tried to correct this with a point light pointing towards the player but I think that I need to do a little more so they don't get lost.
In terms of what I did good, I apparently did a good job in cutting down the project. Cutting the traps was definitly a good call, especially since it meant I could spend time on other elements of the game. If I did try to make the game with the traps I would have had two gameplay elements that were terrible to play as opposed to one mechanic that was a bit more refined. As Rob mentioned I had a more cohesive end product because of this. Charlie also mentioned that the game looks really stylish and that I've achieved a lot in a small amount of time. I'm actually surprised by this since the art style was intended to be a really quick and dirty style. I didn't really intend to make something that visually looked decent but apparently I've done alright.
Overall I seem to have done alright. There are some issues but of course there will be. And thanks to both Rob and Charlie I've learned that I don't need to do everything I originally planned out. I knew that already but they both mentioned that no game is exactly like there original concept. Things need to get cut in game development and that's fine. What really matters is that the end product is good. The legend of Zelda: Tears of the kingdom is a game entirely built around cut elements from the previous game. And honestly that's one of the best Zelda games. I also learned the original intention of this project was to learn how to correctly scope a project. It wasn't intended to make a master piece. For me my original scope was completely over the top and completely ignored what could of actually been possible. I planned out something that could have been a whole game despite knowing that I only had two months. I keep doing this where I go completely over the top, remember where I tried to make a full portal game in a month.


Actually putting the game onto a steam deck is actually really easy. I'm showing the process that I did for when I was adding my Portal 3 project to the deck but the fundamentals are the same. All I really need to do is create a build of the game. It can either be a Linux or a windows build. Then all I have to do is enter desktop mode on the deck and copy the games folder to the deck. After all I have to do is add the game to steam which is as easy as right clicking on the executable and clicking add to steam. One thing to note is that for a windows build I'll have to enable proton for that game. The steam deck runs off of Linux so it can't run windows EXE files natively. Proton essentially is a compatibility layer that lets you run windows software on Linux.
And as you can see the game pretty much runs just fine on the deck. I'm even able to control the game with my 8BitDo arcade stick which is so much fun. I like to do this with any of my game projects since it's a way to test my game on less powerful hardware. I'm creating this game on an RTX 3090 GPU with a AMD Ryzen 7700X. Of course the game isn't going to have a problem hitting 240 fps so testing on something that is much less powerful is great to do. This is something that needs to be done otherwise I wouldn't know if my game is performing well.
I had so much fun with this project. I've been able to do so much that I've been looking for a chance to do for a while now. It feels like so long ago when I made the 2D game art render but it hasn't even been a year yet. As normal I'm going to finish off with my usually retrospective, were I ramble for an hour about what went well and what really didn't.
The concept
The theme for this project was "Escape the space" and at the beginning I gave my self three option on what I could do for this project. First off I could have simply finished off my Portal 3 prototype. Added some assets and cleaned up the code. This would have been a more art focused project with most of the mechanics already being there. Another option was to make a Resident Evil style of game where your solving puzzles to progress. Originally I was planning on choosing this option but I went with the next one. That of course was this project, where I was using the character I made for the 2D game animation and making it into a full game. I was definitely the right choice since I was able to make a project that leveraged combat and puzzles.
Art style analysis
The art style was also something that I had planned out from the beginning. Since my plan was to reuse the character I made for the 2D game animation I just had to make my style around that. I took heavy influence from both Dead Cells with the style of pixel art and Octopath Traveller with how it integrated the pixel art. I covered this in the 2D game animation project and it's with how Dead Cells created it's pixel art. It's essentially taking a 3D model and recording the animation at a very low resolution. And when the right image settings are set then you get pixel art. It does take a little bit of work with some parts of the renders needing fixing, but overall It's far quicker and easier to get a consistent pixel art animation. And Octopath Traveller comes into play with how it actually made these pixel sprites fit into a 3D world. I did look into the style quite heavily, seeing how certain elements were implemented. On thing I noticed quickly is that quite a few models actually have downscaled textures. It seems like the textures were originally created for higher resolutions and then were downscaled to get that pixel look. With my assets I recreated this with me texturing in substance painter and then downscaling them in Unity.
Technical issues


To start off this section I'm going to rant about the attack bug. It's something that I never really fixed I had to just work around it. I tried to check the current playing animation and then disable the idle state and enable the side state. And for the most part this actually was effective. It didn't stop it from happening completely but It did stop it from happening as often as it was. However this did have the consequence of stopping the player from attacking sideways while idle, which wasn't really a major loss. I also tried to raise the player slightly off the ground to see if that helped but it really didn't. I thought that the issue of the player being stuck on some of the tiles was the colliders clipping. That wasn't the case at all it was actually linked to the attack issue. Which is why I created an unstuck button. Pressing C on the keyboard or clicking in the left stick on controller would simply disable the attack. And that actually worked as a little work around.

Another issue that I had was with some of the shaders. The first one to break was actually at the very start of the project with the sprite foliage shader. I can't really say that the shader was broken it was more so a case that I wasn't using it in the correct perspective. It was originally intended to be used for 2D games not 3D worlds. In the end it wasn't that bad to correct the issue since all I had to do was replace all vector 2 with vector 3 and change the space on all textures to object. Outside of that issue I also had a problem with Universal render pipelines lit shader. For some reason there's a limit to how much you can use the shader, I maxed out that limit and I couldn't create a build of the game. I did some research and apparently this is caused by the maximum amount of light cookies that can be made using one shader. So as a fix I simply made a shader in shader graph that works near identically to the basic lit shader. With that I was able to build the game without any issues and with no reduction on overall visuals.
Creative and technical learnings
Probably the big thing that I learned from a creative point of view is knowing how the HD-2D style actually works. I did do some research into this from other projects but this my first time actually executing the style for an actual game. And I think that the end result turn out quite well with it being one of the defining things about the finished game. I've also learned that tile map 2D can be used for 3D spaces. This is something I really didn't expect would be possible, yet it is and works really well. It made constructing my environments so much easier since all I really needed were pieces to build my environment.
Now onto technical learnings. First off I feel like an idiot for not remembering sub state machines when I needed them. These would have made animating the player so much easier and it probably would have corrected the issue I was having with the attack. Another thing that I learned was with me understanding how Unity handles both batches and also textures. With the Unity's batch system for static objects it'll gather all objects with the same properties and render them as one batch. So for my grass that I had in the court yard, batching helped to reduce the performance impact. It can only do so much but it does help out a little bit. With texture this is were things get a little weird. With me downscaling my textures I though that this wouldn't effect performance that much. I actually thought it will help, but in reality it doesn't really do a whole lot. When a texture is downscaled in Unity it doesn't actually effect the original file of the texture. It'll only change the resolution that is shown in game. This can impact things like file size and also VRAM usage. It's not really a big deal as long as compression for each texture is on, but if it wasn't then this could have been a problem.
Production management and how it was used


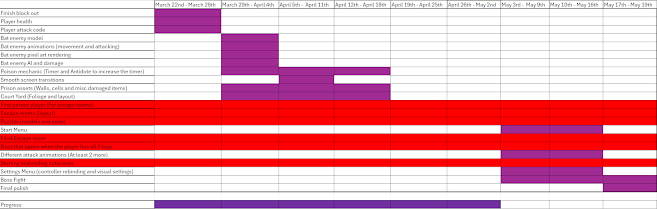
Production management helped out immensely for this project. Without it I probably wouldn't have finished this project to the level I did it at. The Trello board is the exact same board I've been using for this entire year and it has been my most valuable piece of planning I've got. Being able to see all of the tasks I needed to do all in one place really helps to put everything into perspective. The schedule also helped a little bit not really that much. I did look at it on occasion just to double check that I was on track, but other than that I never really used it. I pretty much had the whole thing memorised after a few weeks, so after I had it all memorised it never got looked at. I mentioned this to both Rob and Charlie during the last pitch, but around April 19th that's when I realised that I wouldn't have had time to get the traps done. This is something I probably wouldn't have realised if I didn't have a production schedule. So in that regard it really did help to make sure I was on track.
What would I do if I started over
I'm going to start off with what I would have kept the same. And to start I would keep the art style that same. The best part about the whole game is the visuals, surprisingly it actually looked quite good. I really wasn't expecting it to turn out as good as it did, especially since the assets took minutes to make. Everything for the arena only took and hour to make and texture. One thing I did mess up on is with my player, the whole environment is red and my player has red highlights. So I would have probably tried to change this up a little so it fit better into the game. Another thing I wouldn't change is with the use of tile map 2D to make my 3D environments. It worked out great which is really surprising since it isn't really intended for 3D spaces. The entire environment pieced together great and I did have any issue with how it looked.
Now onto what I would change. And it's mainly to do with the original scope of the project. I planned out something that could have been a whole five hour game. I had six areas, four escape rooms and two massive gameplay mechanics. If I was to do this again I would cut down on everything. Instead of six areas I would have cut it down to 3 and I would only plan out one major mechanic and not two. I would completely write off the traps and the escape rooms since they weren't going to happen. I really need to keep in mind what is actually possible to do in a short amount of time as opposed to having this crazy idea that impossible to achieve.
Conclusion and final outcome
For once I was actually able to go through the whole game without running into a single issue. Overall I think that the game functions well enough and I also think that it plays alright as well. It's still not perfect but I think that it's not bad for two months of work. There are still some features that need adding but I think that for the purposes of this project they should be fine.

Now if you want to play this for your self, you can. I posted this on itch.io and I think the store page is looking quite nice. I've added an in depth description of the game including it's features and controls. I even add a little note to tell people about the Unstuck button and also mentioning that there isn't an end screen. I've also included some high detailed renders of the game to show the overall art style and the theming also. I've made it public so other people may or may not see this page, but I'll have to wait and see.
To conclude I just need to say that this has been one of the favourite project that I've worked on. Yes I wasn't able to go as crazy as I wanted to but I honestly think it's between this or the Portal 3 for my favourite project. I think this might just take the edge since it's a completely original game that I've made. Portal already excised as a concept so that didn't next to any planning. I also just want to take this time to say thank you to Rob Clarke and Charlie Blay. Getting feedback at the beginning and end of the project has really helped with the development of this project, but it'll also help with the development of future projects. And this is the moment that I realise I've finished another year of the course. Not sure what the final year will bring but I'll make sure to finish with the best work I've done.
https://sketchfab.com/3d-models/free-rock-assets-pack-227f976b7675401e978858ddcb7fc0b1
https://sketchfab.com/3d-models/moss-covered-rock-pile-b7461a9388fc4a6f96726d54df7e641d
https://sketchfab.com/3d-models/rose-3d-4aad2c8cd1564bc49fddb00df80d5776
https://www.youtube.com/watch?v=_jtj73lu2Ko